Dashboard & Inventory
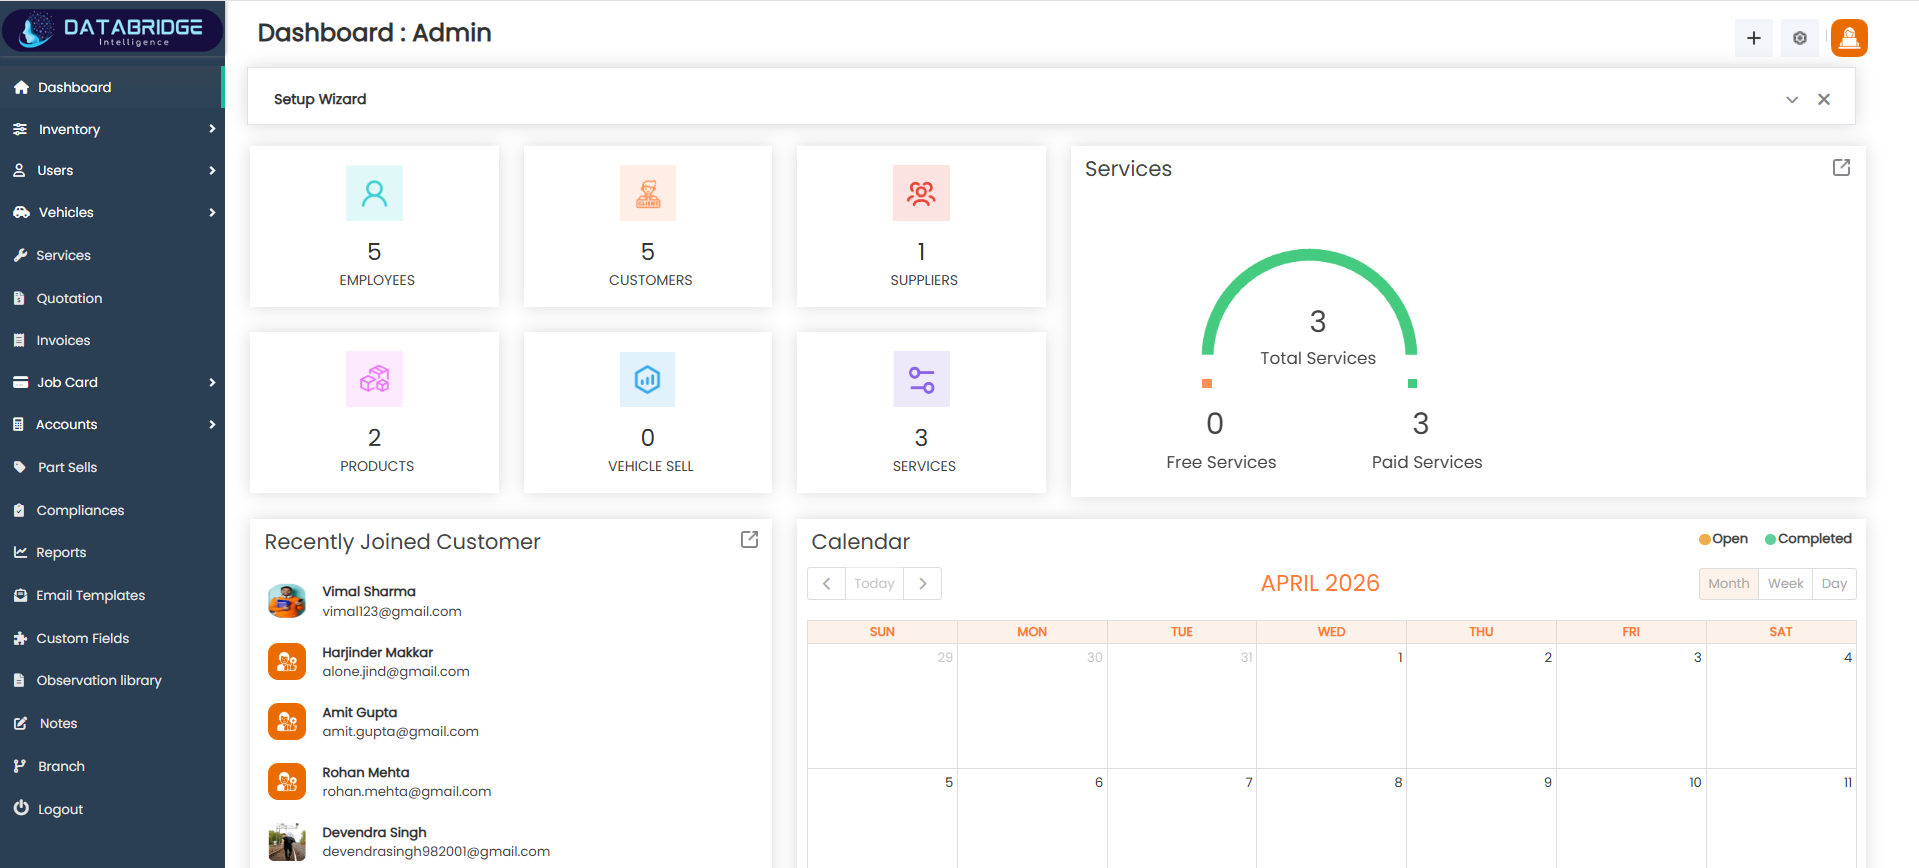
The Dashboard serves as the central overview panel of the Garage DataBridgeCRM system, providing a quick snapshot of key business metrics and activities. It allows administrators to monitor employees, customers, suppliers, services, and overall system performance in real-time. The dashboard is designed to give instant insights and easy navigation to different modules, improving decision-making and operational efficiency.
Features:
-Overview cards displaying total Employees, Customers, Suppliers, Products, and Services
-Service summary visualization (Total, Free, and Paid Services)
-Recently joined customers list with quick details
-Interactive calendar for scheduling and tracking activities
-Setup wizard for initial system configuration
-Quick access icons for adding new records
-Clean and responsive UI for better user experience
-Real-time data updates across all metrics
Functionality:
-Displays key performance indicators (KPIs) in a summarized format
-Tracks business growth through customer and service data
-Provides quick insights into service distribution (free vs paid)
-Shows recently added customers for easy follow-up
-Enables scheduling and monitoring through the calendar view
-Acts as a navigation hub to access all major modules
-Helps administrators make faster and data-driven decisions
-Supports system initialization and setup via setup wizard
Inventory:
The Inventory module provides a centralized view of all products and stock available in the system, helping users manage and track inventory efficiently. It displays detailed information such as product name, manufacturer, quantity, pricing, and supplier details in a structured format. This module plays a crucial role in maintaining accurate stock levels by automatically updating data based on purchases and sales activities. It enables better control over inventory operations, reduces the risk of stock shortages, and supports smooth day-to-day garage management.
The Inventory module provides a centralized view of all products and stock available in the system, helping users manage and track inventory efficiently. It displays detailed information such as product name, manufacturer, quantity, pricing, and supplier details in a structured format. This module plays a crucial role in maintaining accurate stock levels by automatically updating data based on purchases and sales activities. It enables better control over inventory operations, reduces the risk of stock shortages, and supports smooth day-to-day garage management.

Suppliers:
The Suppliers module is used to manage and maintain supplier information within the Garage DataBridgeCRM system. It provides a structured interface to store supplier details such as personal information, company name, contact details, and associated products. This module helps in maintaining vendor relationships and tracking supply sources efficiently.
Features:
-Personal details form
-Company and contact fields
-Address selection fields
-Image upload option
-Notes and file attachment
-Internal/shared notes option
Functionality:
-Creates new supplier records
-Stores supplier contact details
-Links supplier with products
-Supports document upload
-Allows internal note keeping
-Used in purchase process
1
Inventory
2
Suppliers
Add Supplier Module:
The Add Supplier module is used to register new suppliers in the system by capturing their personal and company details. It includes fields for contact information, address, and optional notes or documents. This screen helps maintain a centralized supplier database, which is essential for managing purchases and inventory supply. It ensures that all vendor-related information is stored in an organized manner.
Features:
-Personal details form
-Company and contact fields
-Address selection fields
-Image upload option
-Notes and file attachment
-Internal/shared notes option
Functionality:
-Creates new supplier records
-Stores supplier contact details
-Links supplier with products
-Supports document upload
-Allows internal note keeping
-Used in purchase process
1
Inventory
2
Suppliers
3
Add Suppliers
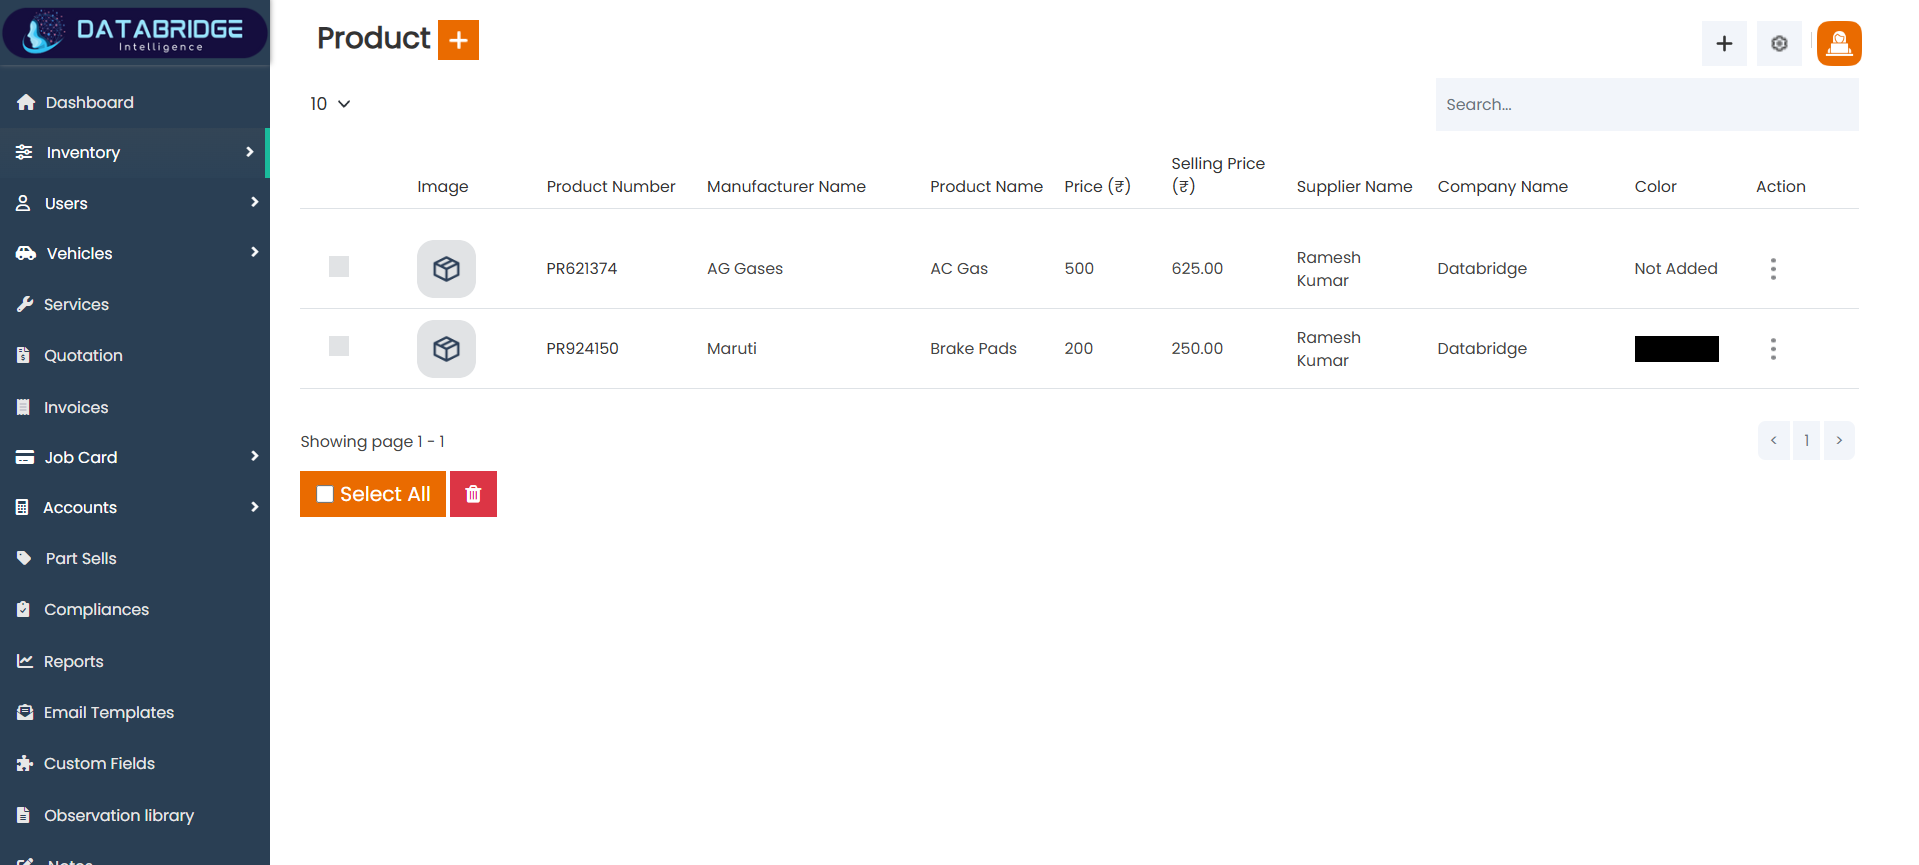
Product Screen:
The Product Listing screen provides a structured overview of all products available in the inventory system. It displays key product details such as product number, manufacturer, pricing, supplier, and company information in a tabular format for easy readability. Users can quickly scan, search, and manage products from a single interface, making inventory handling more efficient. This screen also supports quick actions like adding new products and performing operations on existing ones, ensuring smooth product management within the garage CRM.
Features:
-Displays all products in a clean tabular layout
-Shows product details like name, manufacturer, price, and supplier
-Search bar to quickly find specific products
-“+” button to add new products
-Pagination support for navigating multiple records
-Select All option for bulk actions
Functionality:
-Users can view complete product details in one place
-Allows searching and filtering products instantly
-Enables adding new products via the add button
-Supports bulk selection and deletion of products
-Provides action menu (three dots) for edit/delete options
-Displays selling price calculation alongside cost price for quick comparison
1
Inventory
2
Product
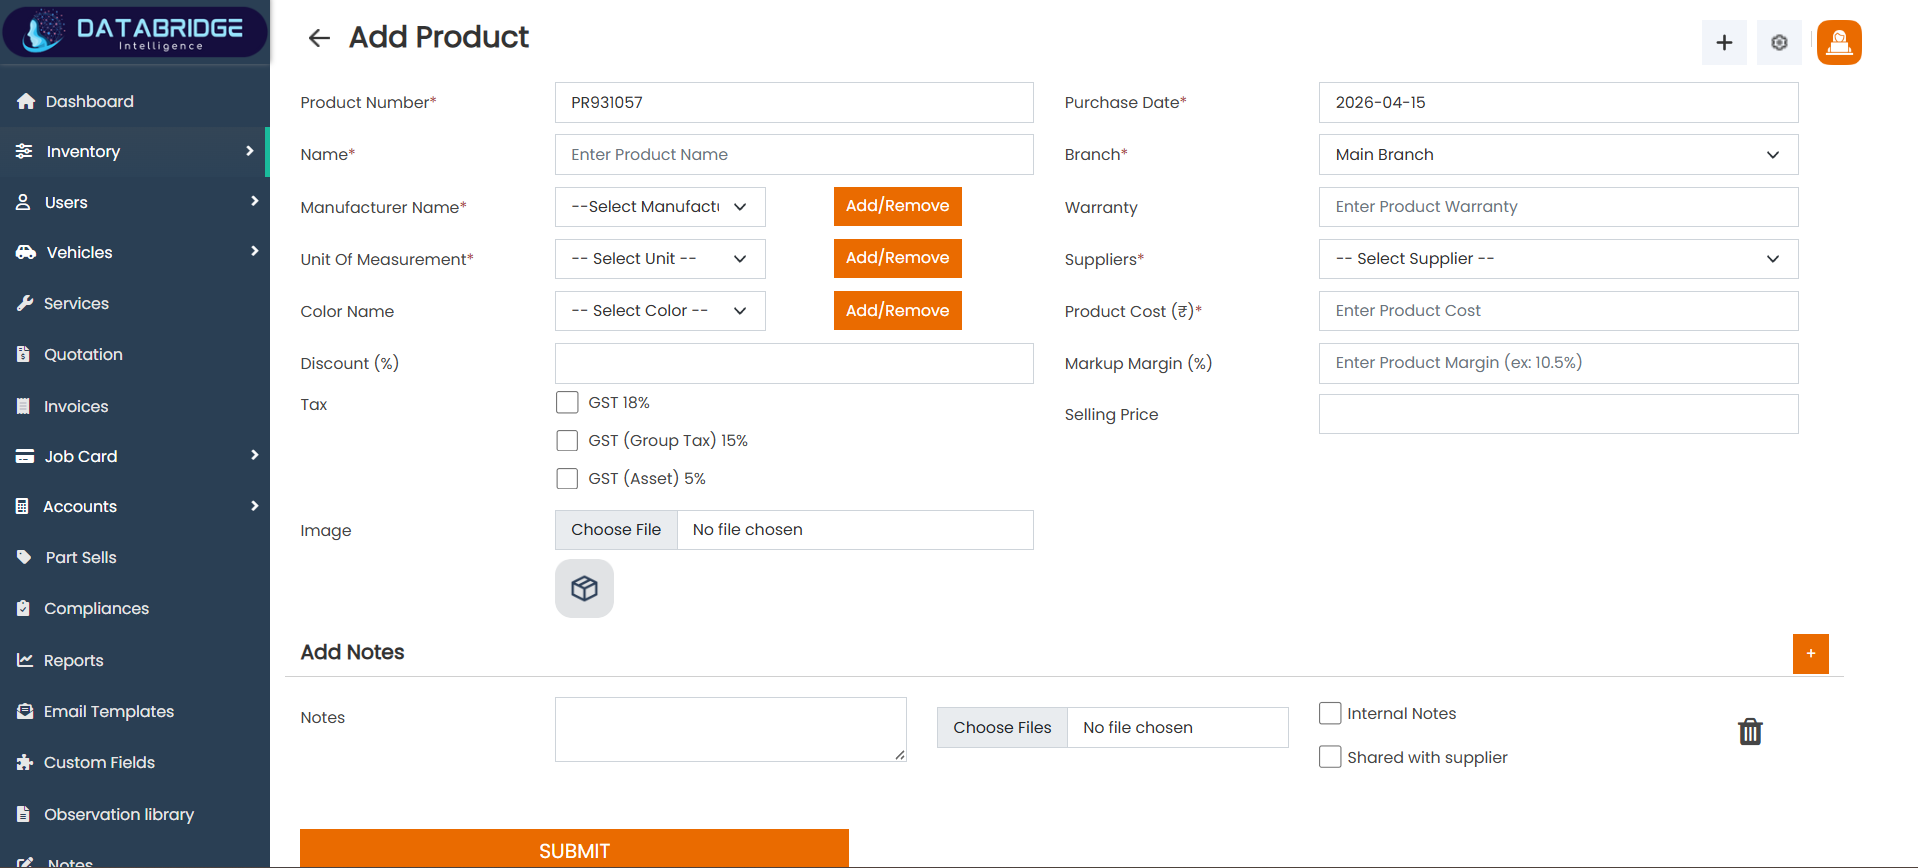
Add Product Module:
The Add Product module allows users to create and manage product records within the system. It captures essential details such as product name, manufacturer, unit of measurement, supplier, and pricing information. This screen plays an important role in inventory management by ensuring all product data is properly maintained. It also supports tax, discount, and margin calculations for accurate pricing.
Features:
-Product number and name fields
-Manufacturer and unit selection
-Supplier and branch selection
-Cost and selling price fields
-Tax and discount options
-Image upload and notes
Functionality
-Creates new product entry
-Calculates selling price
-Links product with supplier
-Stores tax and pricing data
-Updates inventory records
-Supports product management
1
Inventory
2
Product
3
Add Product
Purchase Module:
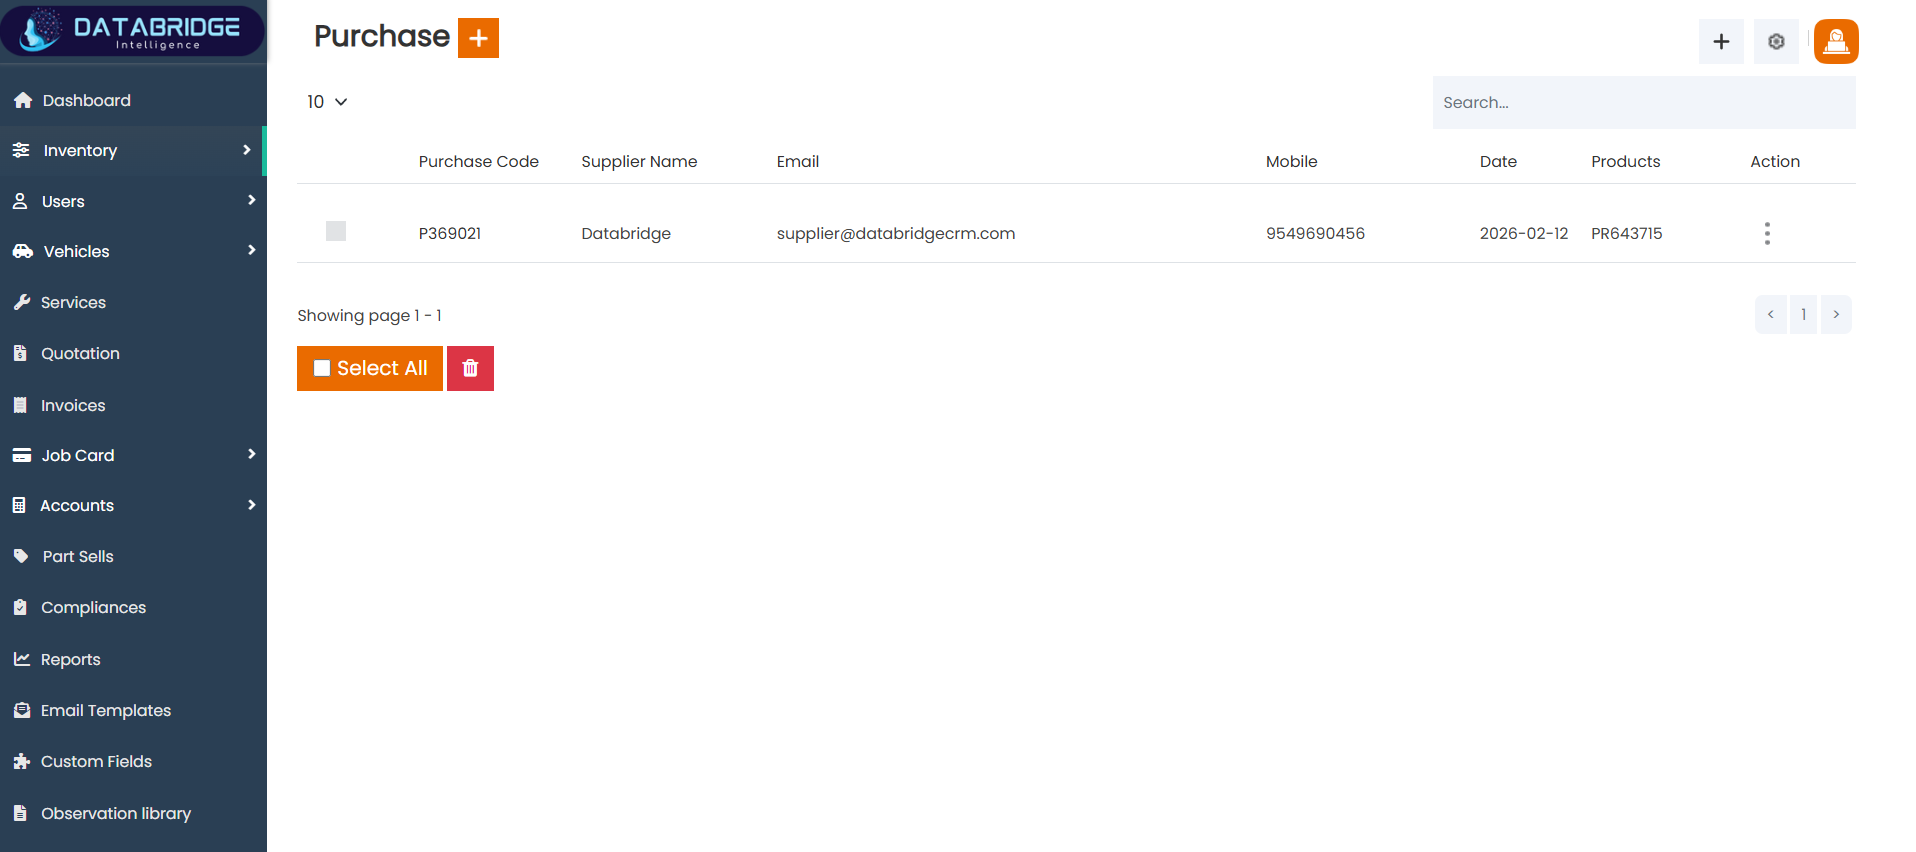
The Purchase List Module provides a centralized view of all purchase records within the system, allowing users to monitor and manage procurement activities efficiently. It displays essential details such as supplier information, purchase date, and associated products in a clear and structured table format. This screen helps users track all purchase transactions easily, ensuring better visibility and control over inventory procurement. By organizing all purchase data in one place, it simplifies record management and supports smooth operational workflow.
Features:
-Purchase table with supplier details Columns for email, mobile, and date
-Product reference in each purchase Search bar to find purchase records
-Select all and delete option Action menu for edit and delete
Functionality:
-Displays all purchase entries
-Allows quick search and filtering
-Supports bulk selection of records
-Enables edit and delete actions
-Tracks supplier purchase history
-Helps manage inventory purchases
1
Inventory
2
Purchase

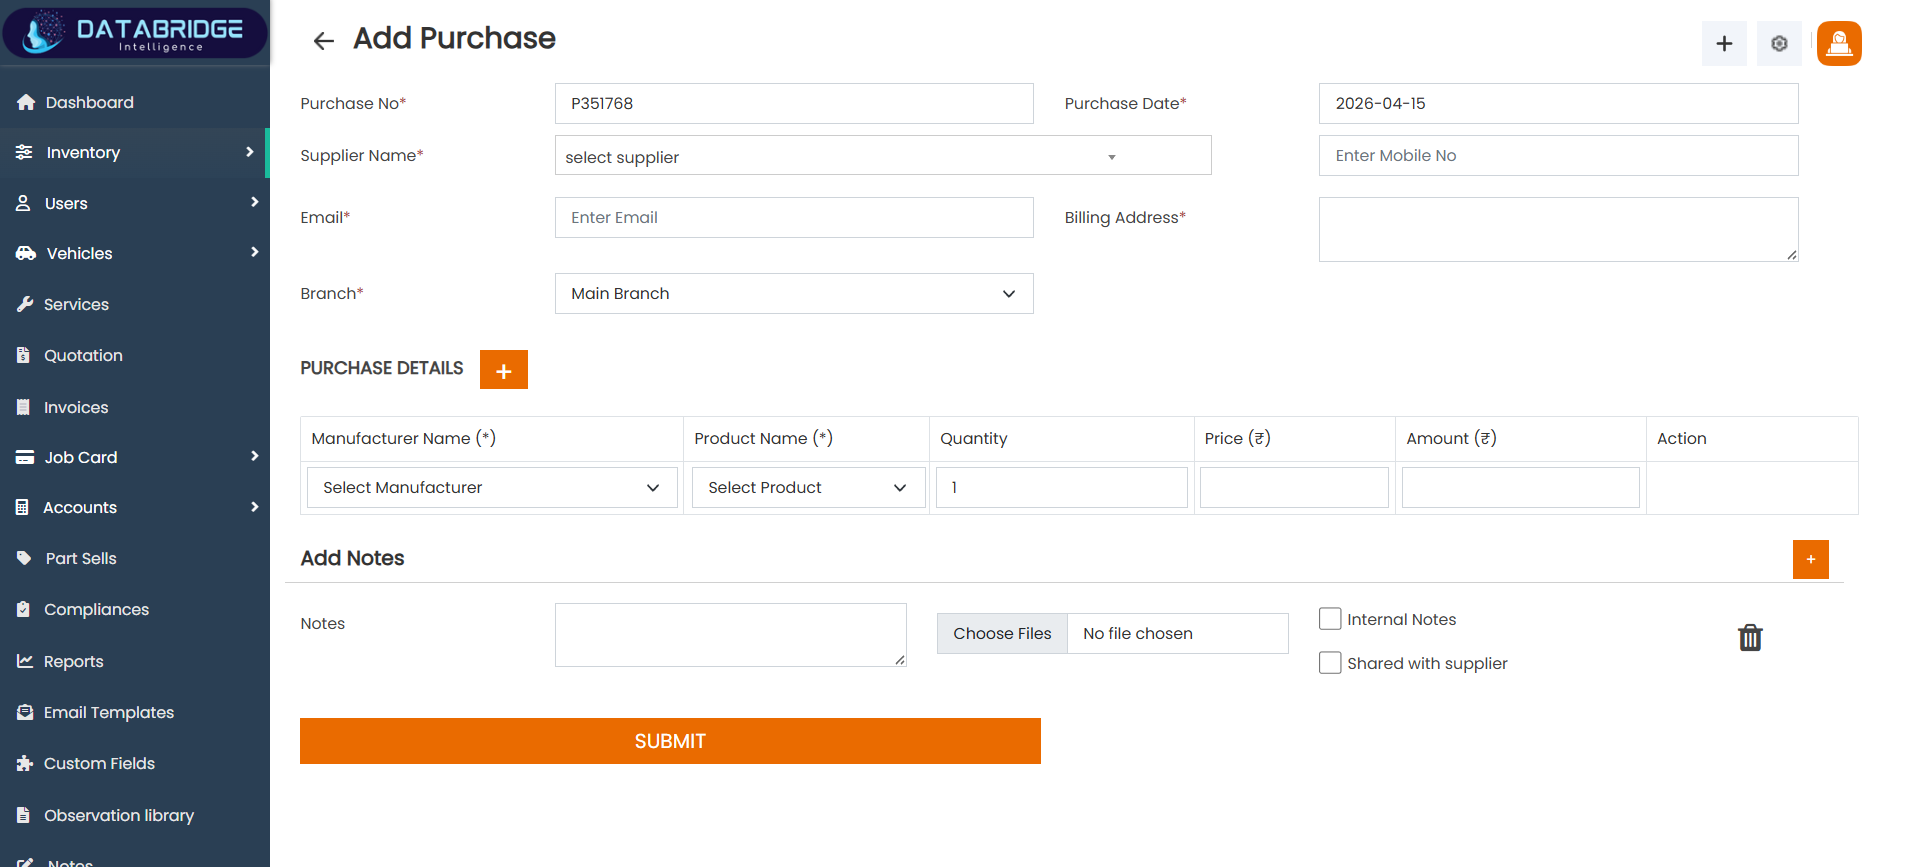
Add Purchase Module:
The Add Purchase module is used to record purchase transactions from suppliers. It captures supplier details, billing information, and a list of purchased products along with quantity and price. This screen supports adding multiple products in a single purchase entry. It ensures accurate stock updates and helps maintain proper purchase records for inventory management.
Features:
-Purchase number and date
-Supplier selection and details
-Product table with quantity and price
-Add multiple items option
-Notes and file upload
-Submit button for saving
Functionality:
-Creates purchase entry
-Links purchase with supplier
-Adds multiple products
-Calculates total amount
-Updates stock automatically
-Stores purchase history
1
Inventory
2
Purchase
3
Add Purchase
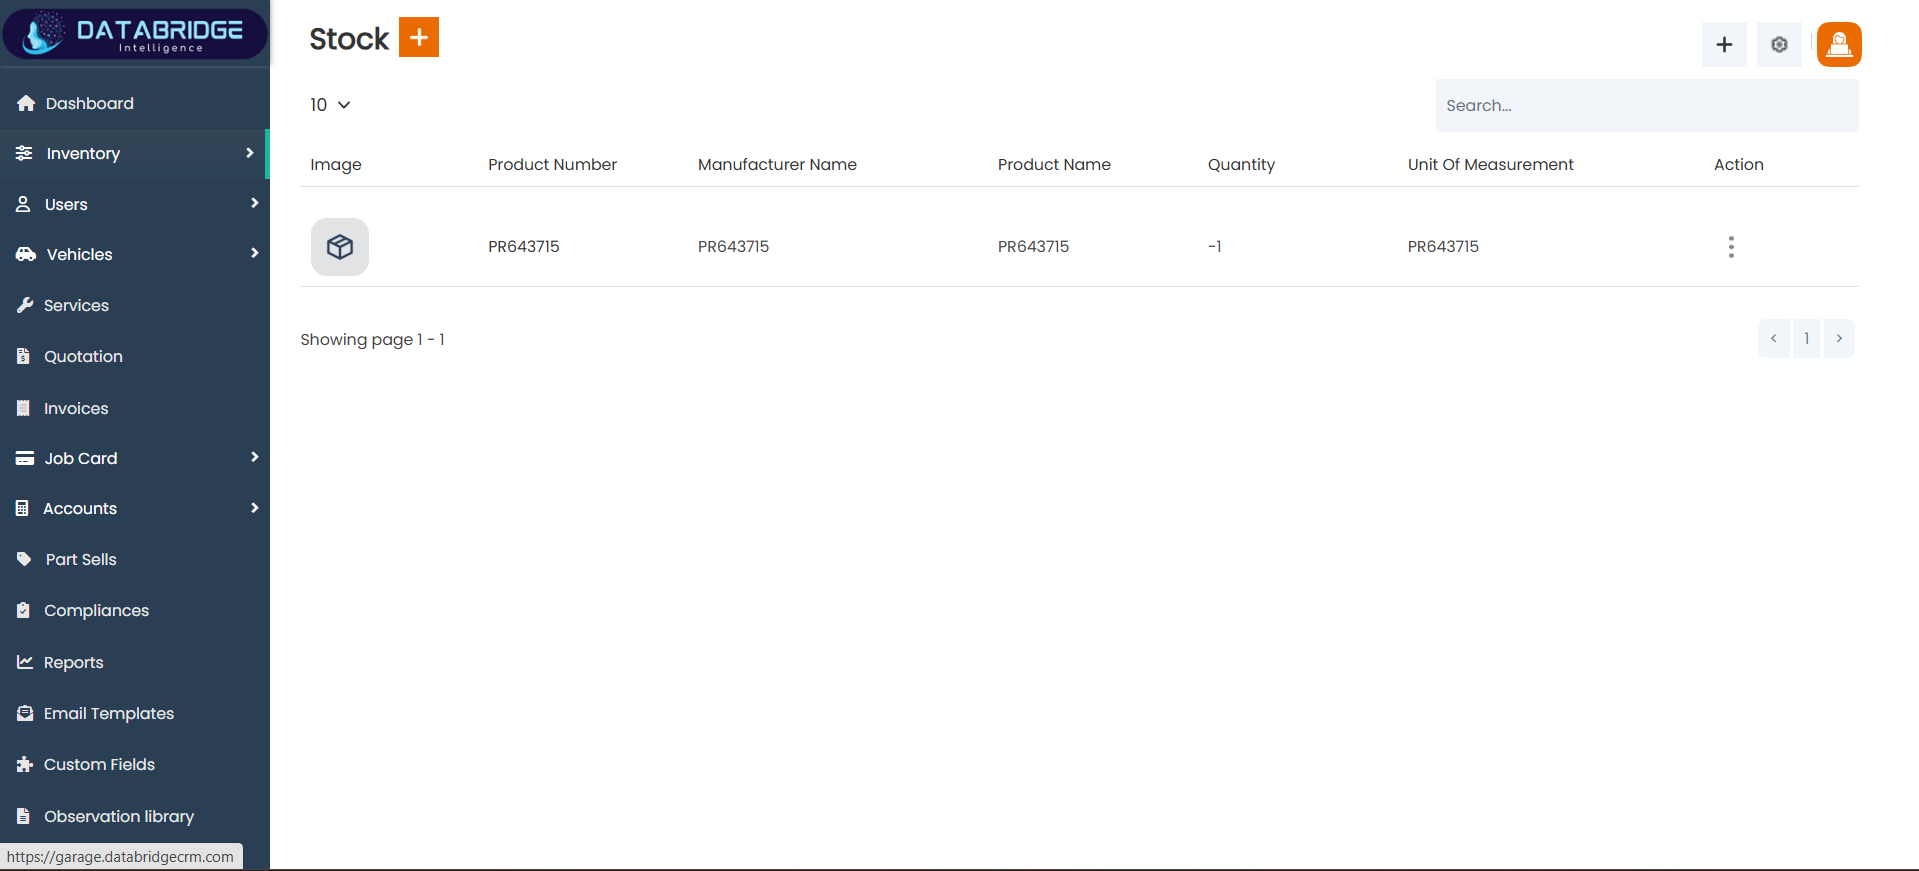
Stock Module:
The Stock module displays all available inventory items in the system in a structured tabular format. It provides complete visibility of product details such as product number, manufacturer, quantity, and unit of measurement. This screen helps administrators easily monitor stock levels and identify shortages or excess inventory. It plays a key role in maintaining accurate inventory records and ensuring smooth garage operations.
Features:
-Stock list with product details
-Columns for product, manufacturer, and quantity
-Unit of measurement display
-Search option for stock items
-Action menu for each item
-Pagination support
Functionality:
-Displays current stock levels
-Tracks product quantity automatically
-Updates stock after purchase/sale
-Allows quick search of items
-Helps avoid stock shortage
-Supports inventory monitoring
1
Inventory
2
Stock
Add Purchase Module:
The Add Purchase module is used to record purchase transactions from suppliers. It captures supplier details, billing information, and a list of purchased products along with quantity and price. This screen supports adding multiple products in a single purchase entry. It ensures accurate stock updates and helps maintain proper purchase records for inventory management.
Features:
-Purchase number and date
-Supplier selection and details
-Product table with quantity and price
-Add multiple items option
-Notes and file upload
-Submit button for saving
Functionality:
-Creates purchase entry
-Links purchase with supplier
-Adds multiple products
-Calculates total amount
-Updates stock automatically
-Stores purchase history
The Add Purchase module is used to record purchase transactions from suppliers. It captures supplier details, billing information, and a list of purchased products along with quantity and price. This screen supports adding multiple products in a single purchase entry. It ensures accurate stock updates and helps maintain proper purchase records for inventory management.
Features:
-Purchase number and date
-Supplier selection and details
-Product table with quantity and price
-Add multiple items option
-Notes and file upload
-Submit button for saving
Functionality:
-Creates purchase entry
-Links purchase with supplier
-Adds multiple products
-Calculates total amount
-Updates stock automatically
-Stores purchase history
1
Inventory
2
Stock
3
Add Stock

Add Customer Module:
The Add Customer module is used to create and manage customer profiles within the system. It captures personal details, login credentials, company information, and address details. This screen ensures that all customer data is stored in a structured format for future reference. It is essential for linking customers with services, vehicles, and transactions across the system.
Features:
-Personal information fields
-Login details (email, password)
-Company and tax details
-Address selection fields
-Notes and file upload
-Custom field option
Functionality:
-Creates new customer profile
-Stores contact and address info
-Links customer with services
-Supports login credentials
-Allows notes and attachments
-Used across all modules
1
Inventory
2
Right"+"
3
Customer
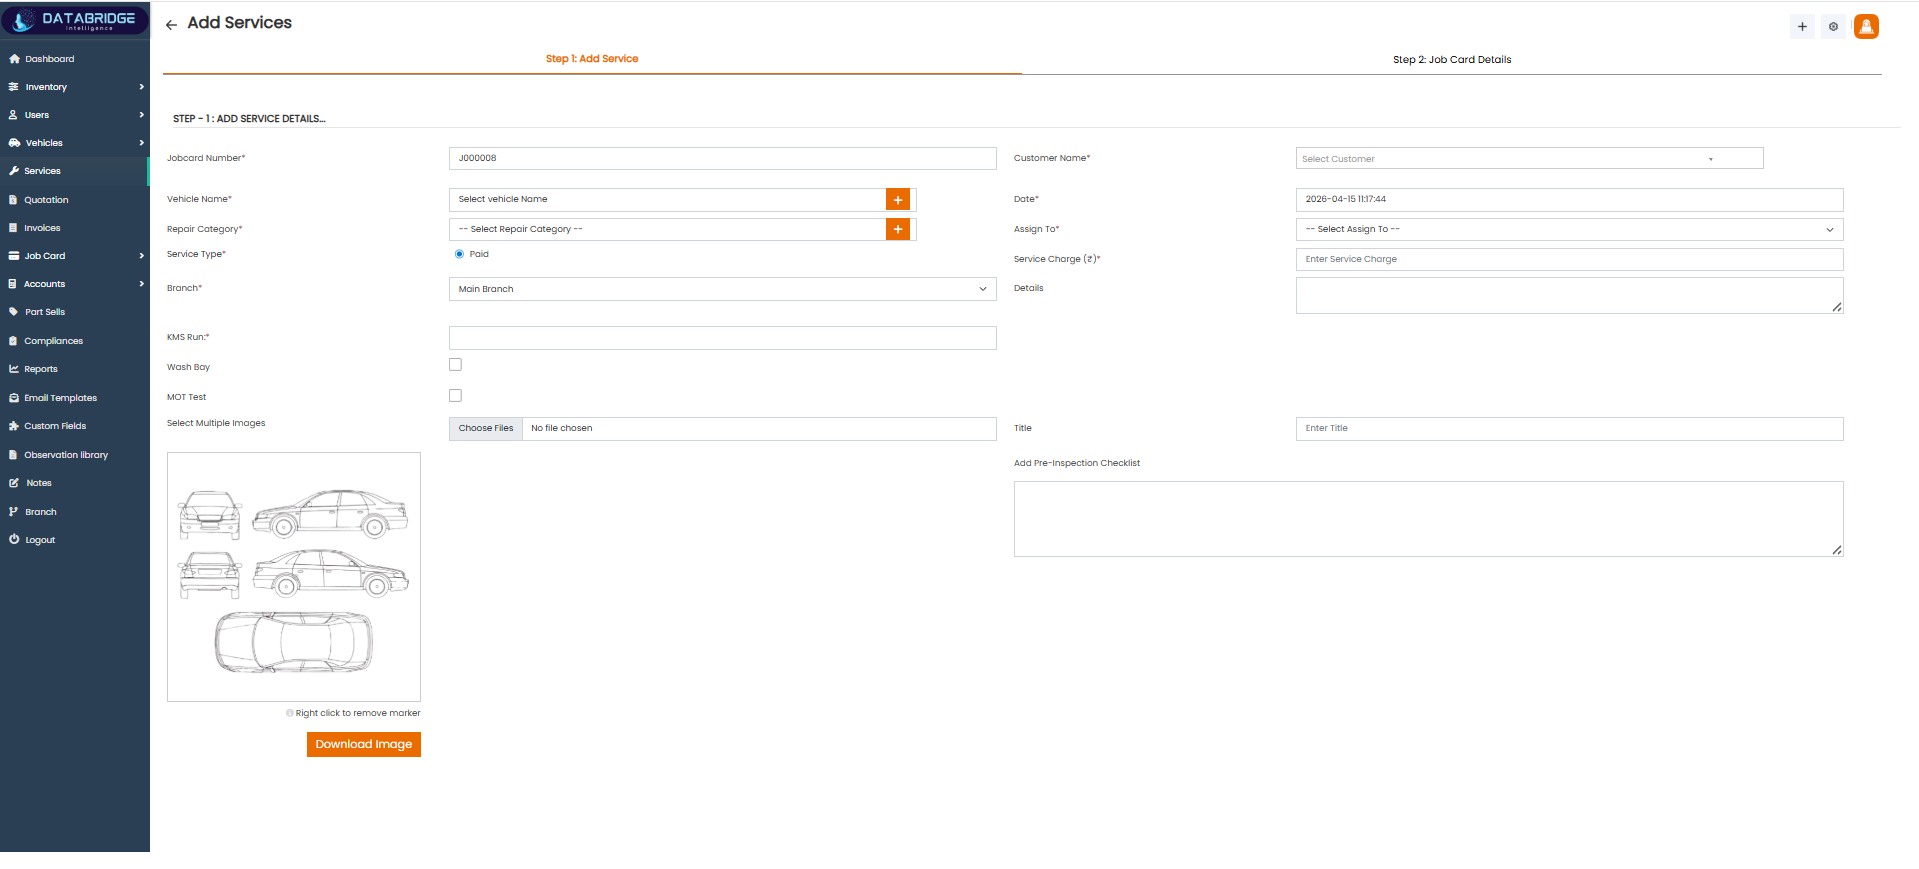
Add Service Screen:
The Add Service screen is used to create a new service entry and initiate a job card process within the garage CRM system. It allows users to enter complete service-related details such as job card number, vehicle information, repair category, and assigned staff. The screen is divided into two steps, where the first step focuses on service details and the second step leads to job card creation. It also supports adding images, service charges, and inspection-related notes, ensuring all service data is captured in a single place.
Features:
-Two-step process (Add Service + Job Card Details)
-Fields for vehicle, repair category, and service type
-Customer selection dropdown
-Assign service to staff option
-File upload for vehicle images
-Pre-inspection checklist input section
Functionality:
-Allows creation of a new service record
-Links service with customer and vehicle
-Assigns job to a specific staff member
-Captures service charges and details
-Supports image upload for inspection/reference
-Moves workflow to job card creation step
1
Inventory
2
Right"+"
3
Job Cards
4
Add Service
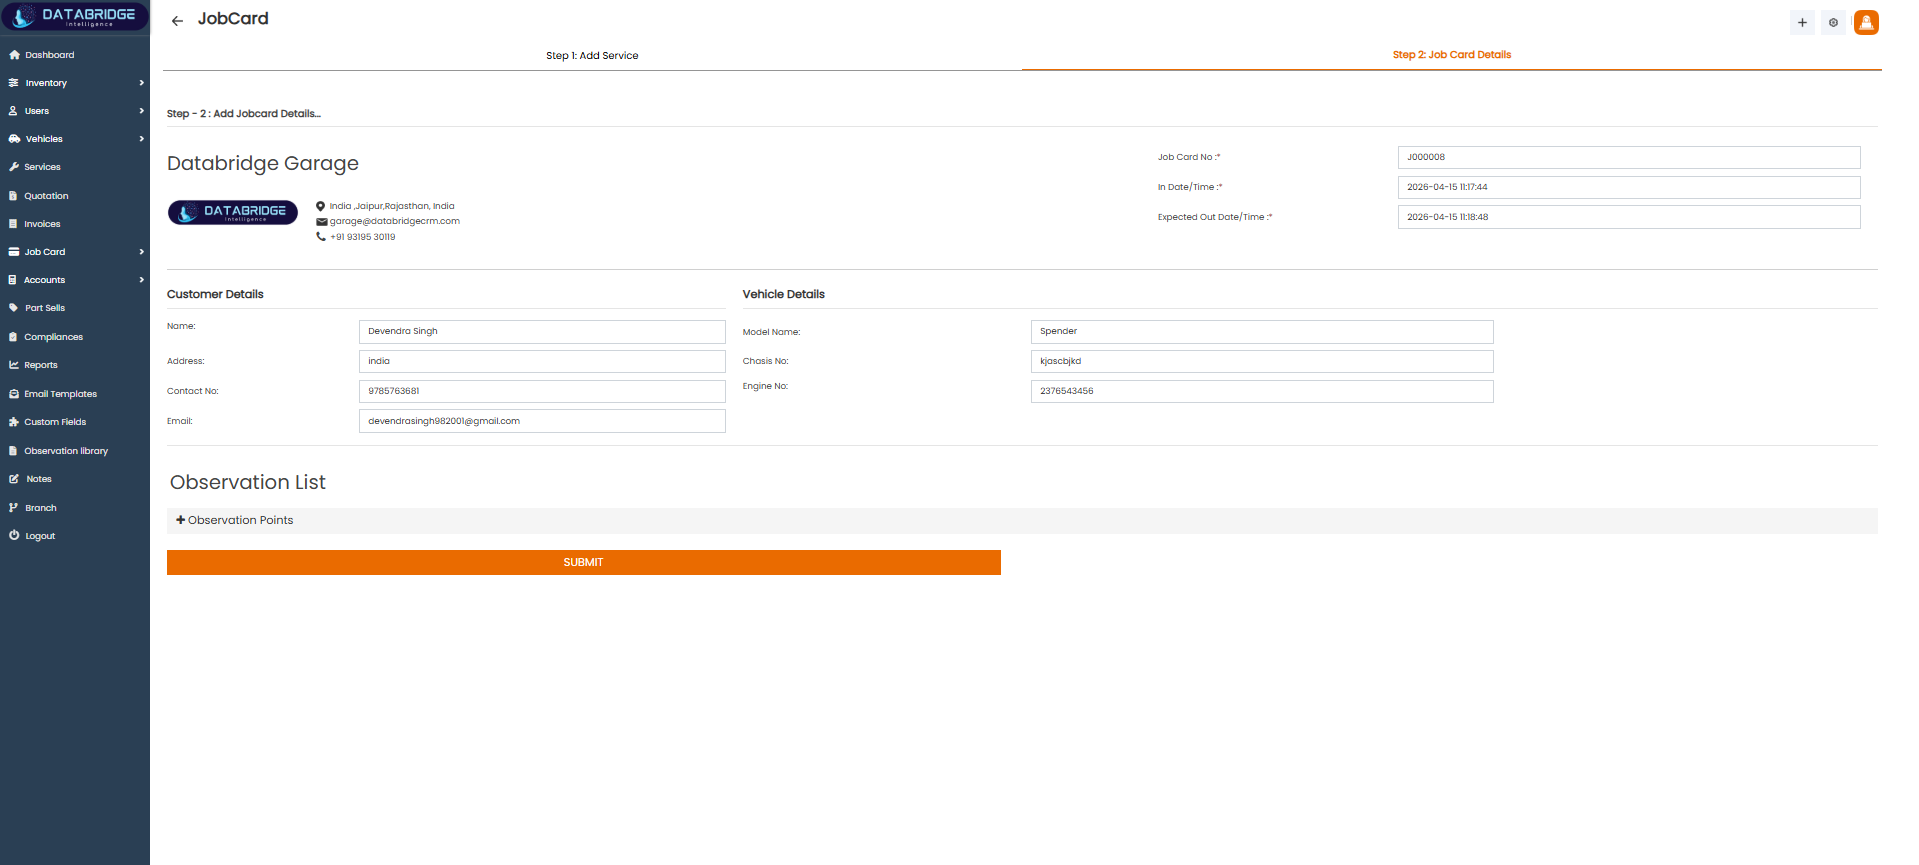
Job Card Details Screen:
The Job Card Details screen provides a complete overview of a service job after it is created. It includes detailed information about the garage, customer, and vehicle along with job card number and service timeline. This screen helps in documenting and tracking the service process efficiently by maintaining structured records. It also includes an observation section where inspection points can be added, making it useful for recording service checks and findings.
Features:
-Displays garage and contact information
-Shows job card number and timestamps
-Customer and vehicle detail sections
-Observation list section for inspection points
-Clean structured layout for easy reading
-Submit button for finalizing job card
Functionality:
-Displays complete job card information
-Tracks service start and expected completion time
-Stores customer and vehicle details for reference
-Allows adding observation/inspection points
-Supports structured service documentation
-Finalizes and saves job card details in system
1
Inventory
2
Right"+"
3
Job Cards
4
Job Card Details
User
The Users module manages all customer records in the system. It stores personal, contact, and vehicle details in one place. This module helps in easy customer tracking and service management. It ensures smooth communication and organized user data handling.
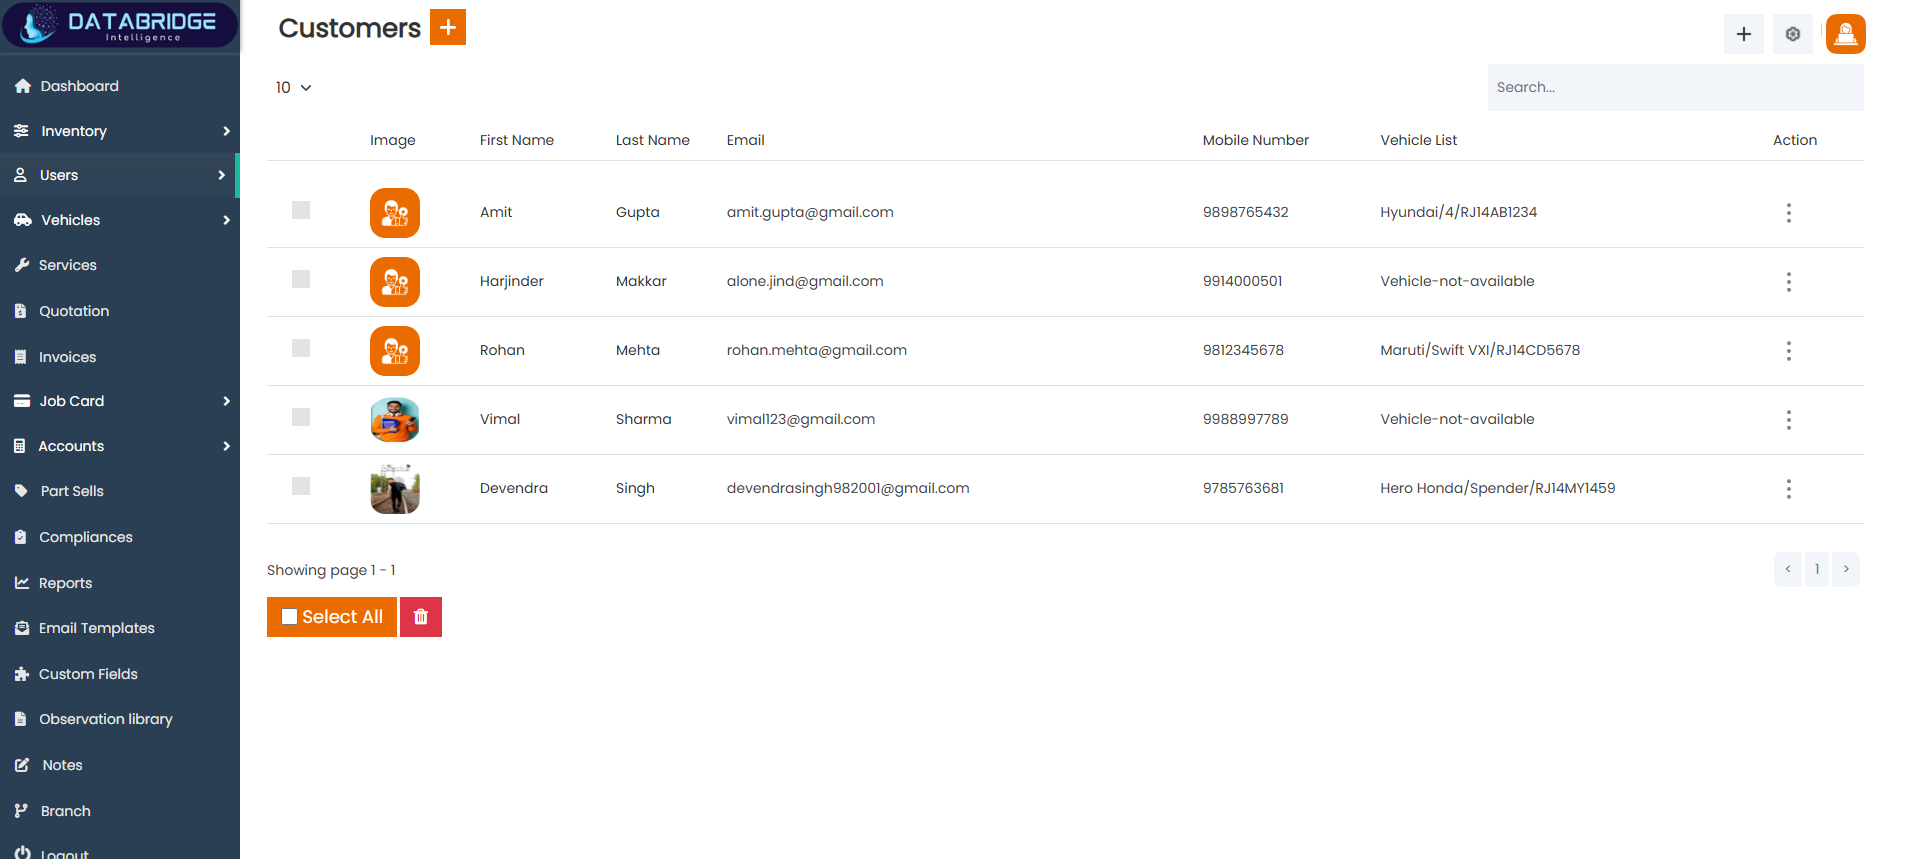
Customers:
The Users screen provides a complete list of all customers registered in the system, allowing users to easily view and manage customer records. It displays essential details such as name, email, mobile number, and associated vehicles in a structured table format. This screen helps in quickly identifying customers and their vehicle information, improving service tracking and communication. With search and action options available, it ensures efficient customer management within the garage CRM.
Features:
-Tabular view of all customers
-Displays name, email, and mobile number
-Shows linked vehicle details
-Search bar for quick customer lookup
-“+” button to add new customer
-Select All and delete option
Functionality:
-Displays all customer records in one place
-Allows quick search and filtering of users
-Enables adding new customers
-Supports bulk selection and deletion
-Provides action menu for edit/delete
-Links customers with their vehicles
1
User
2
Customers
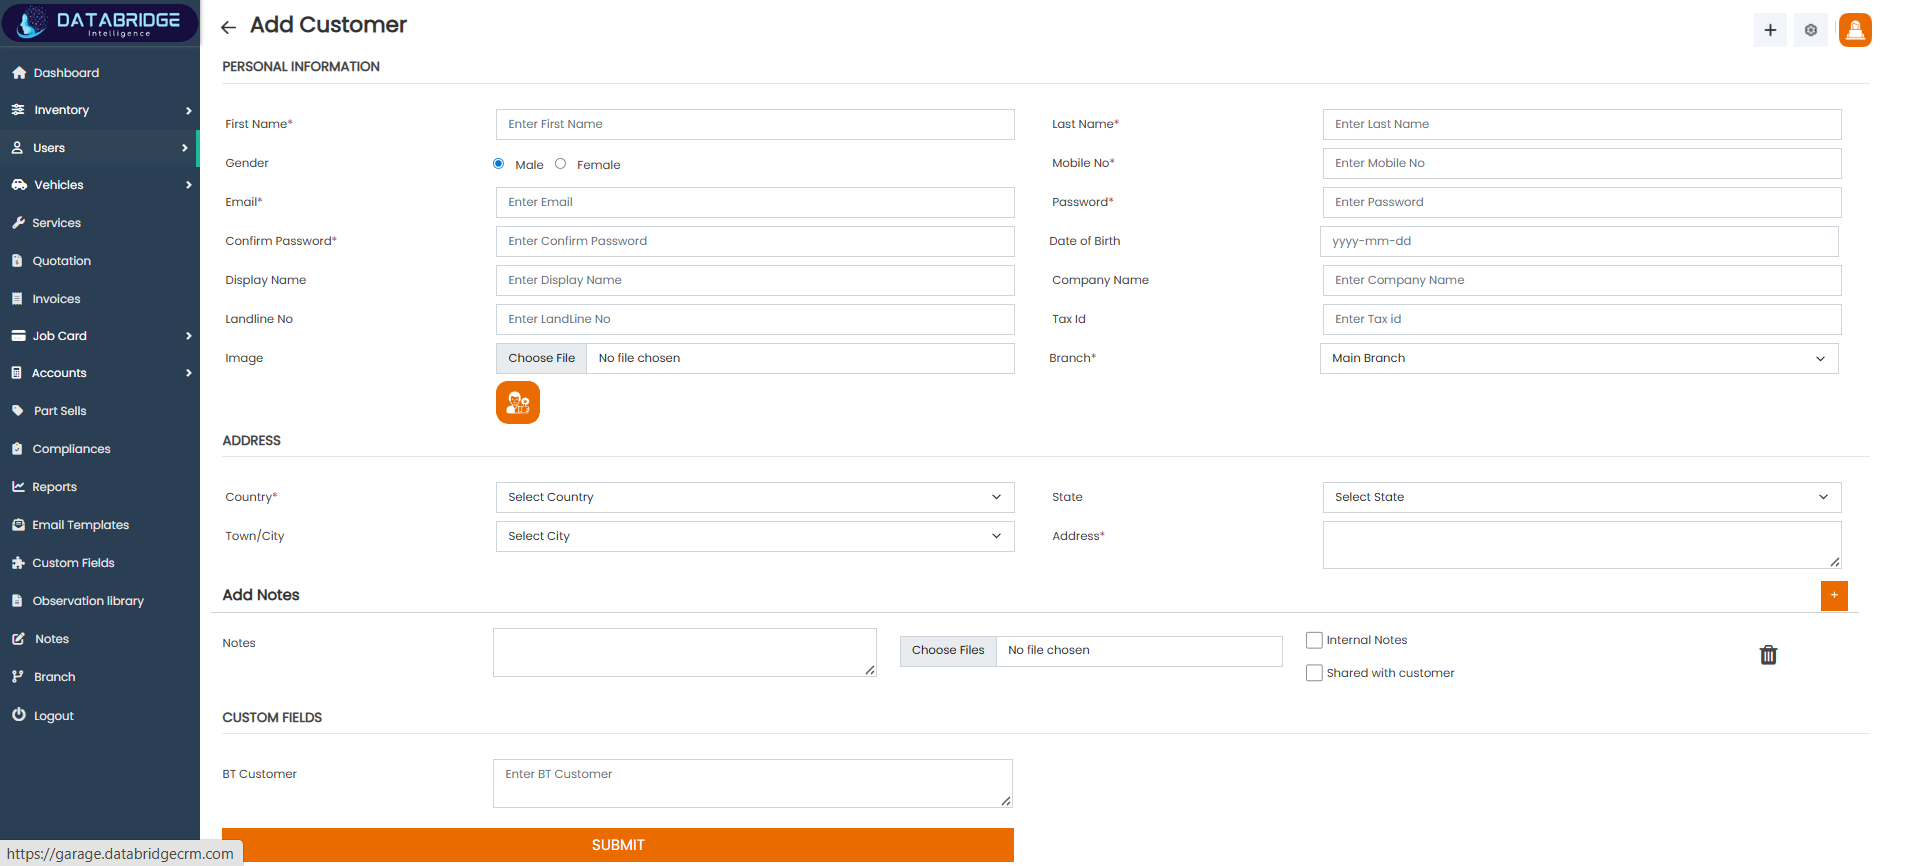
Add Customer:
The Add Customer screen is used to create and store new customer information in the system. It allows users to enter complete personal, contact, and address details along with optional company and tax information. The form is structured into sections such as personal information, address, notes, and custom fields, ensuring all required data is captured properly. This screen helps maintain accurate customer records, which are essential for service management and communication.
Features:
-Personal information section (name, email, mobile)
-Gender selection and password fields
-Address section with country and state
-File upload for customer image
-Notes and custom fields section
-Submit button to save data
Functionality:
-Allows adding new customer records
-Stores personal and contact details
-Supports image upload for profile
-Saves address and company information
-Enables adding internal and shared notes
-Maintains complete customer database for services
1
User
2
Customers
3
"+" Add Customers
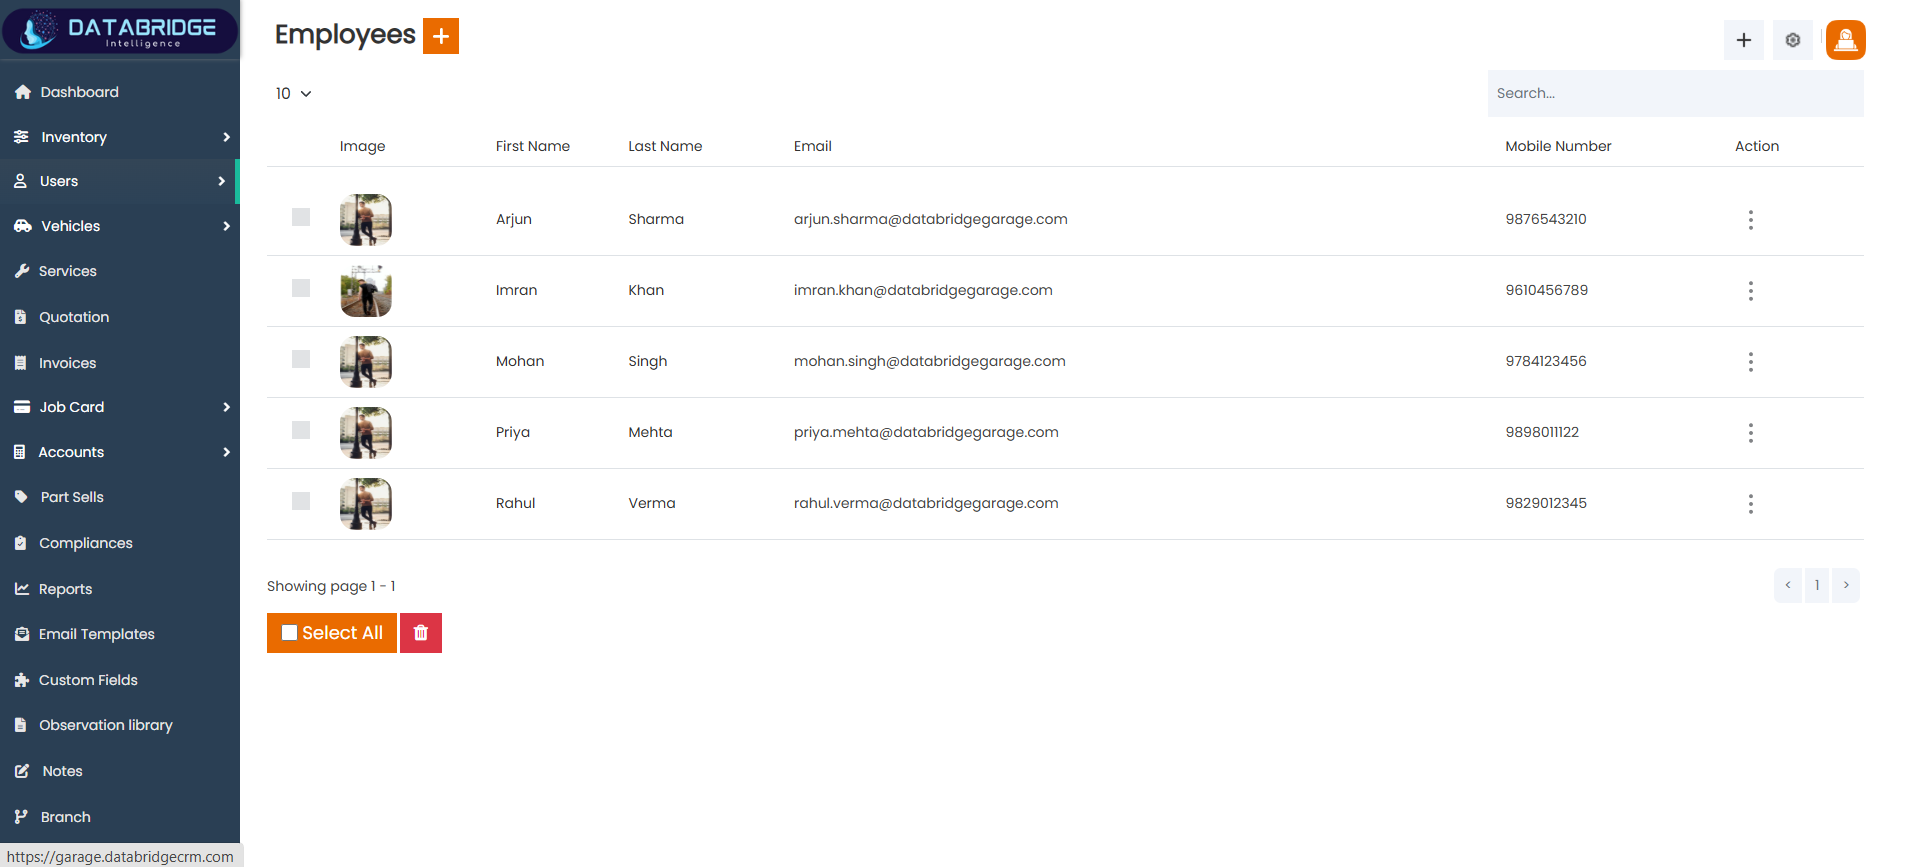
Employees:
The Employees screen provides a complete list of all staff members registered in the system, allowing easy management of employee records. It displays important details such as employee name, email, and mobile number in a structured table format. This screen helps administrators quickly view, search, and manage employee information, ensuring smooth workforce coordination. With action options and bulk operations available, it simplifies employee management within the garage CRM.
Features:
-Tabular view of all employees
-Displays name, email, and mobile number
-Search bar for quick lookup
-“+” button to add new employee
-Select All and delete option
-Action menu for edit/delete
Functionality:
-Displays all employee records
-Allows quick search and filtering
-Enables adding new employees
-Supports bulk selection and deletion
-Provides edit and delete actions
-Helps manage staff information efficiently
1
User
2
Employee
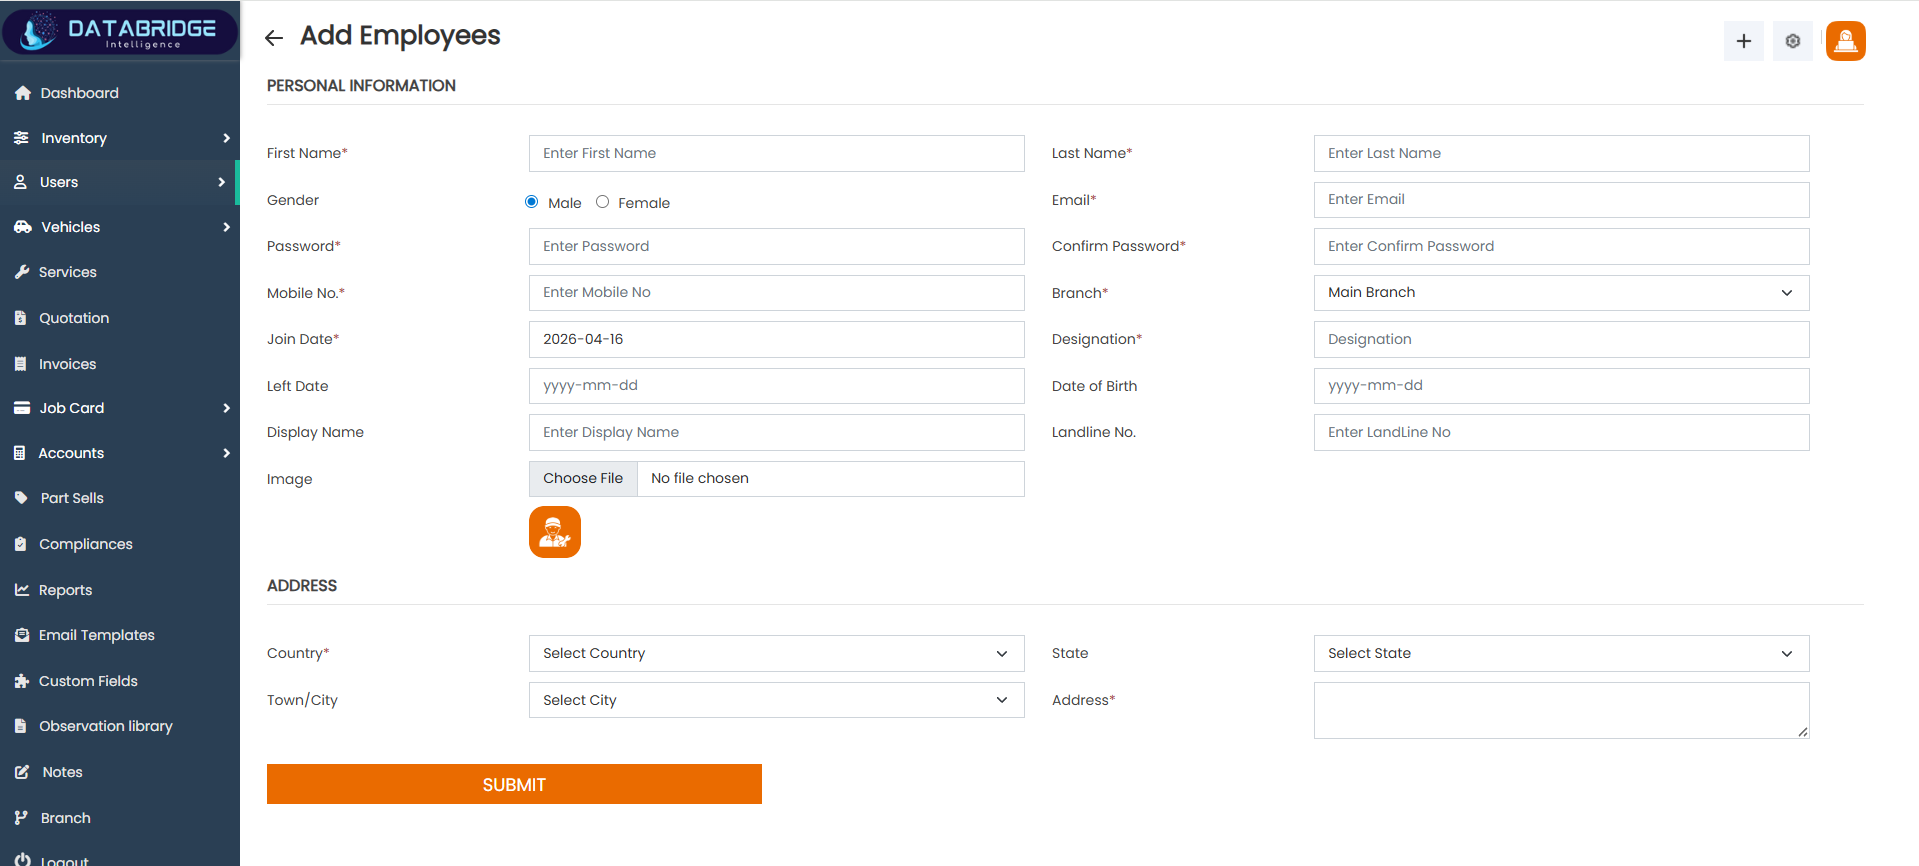
Add Employee:
The Add Employee screen is used to register new staff members into the system by capturing their personal, contact, and job-related details. It includes fields such as name, email, mobile number, designation, and branch, along with optional details like date of birth and profile image. The form is divided into sections for personal information and address, ensuring organized data entry. This screen helps maintain accurate employee records, which are essential for assigning tasks and managing operations.
Features:
-Personal information fields (name, email, mobile)
-Gender selection and password setup
-Fields for designation and branch
-Date fields (joining date, birth date)
-Image upload option
-Address section with country and state
Functionality:
-Allows adding new employee records
-Stores personal and job-related details
-Supports profile image upload
-Saves branch and designation information
-Maintains employee database for task assignment
Ensures proper staff management within system
1
User
2
Employee
3
Add Employee
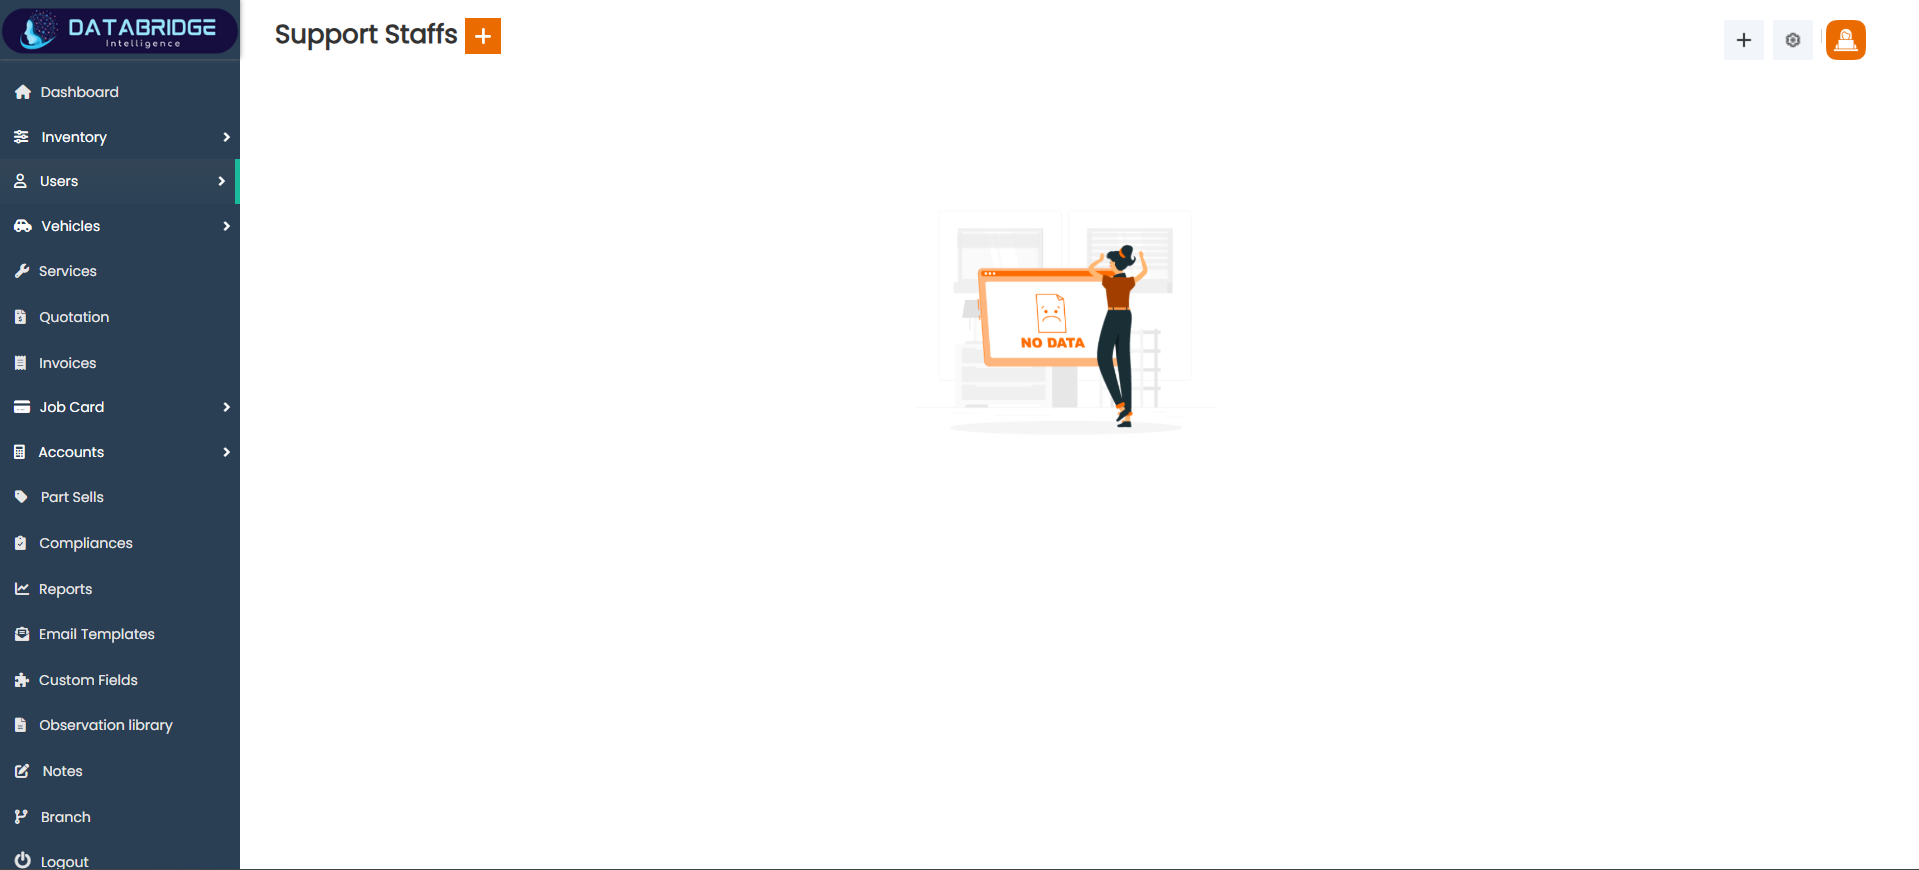
Support Staff List:
The Support Staff screen provides an overview of all support staff members available in the system, helping administrators manage non-core employees such as helpers, assistants, or operational staff. Currently, the screen displays a “No Data” state when no records are available, indicating that no support staff have been added yet. This screen serves as the central place to view, add, and manage support staff records once they are created, ensuring smooth operational support within the organization.
Features:
-“No Data” placeholder when no records exist
-“+” button to add new support staff
-Clean and minimal interface for easy navigation
-Integration with sidebar modules
-Action-ready layout for future records
Functionality:
-Displays support staff records when available
-Shows empty state when no data is present
-Allows navigation to Add Support Staff screen
-Acts as a management hub for support staff
-Prepares system for future staff entries
1
User
2
Support Staff
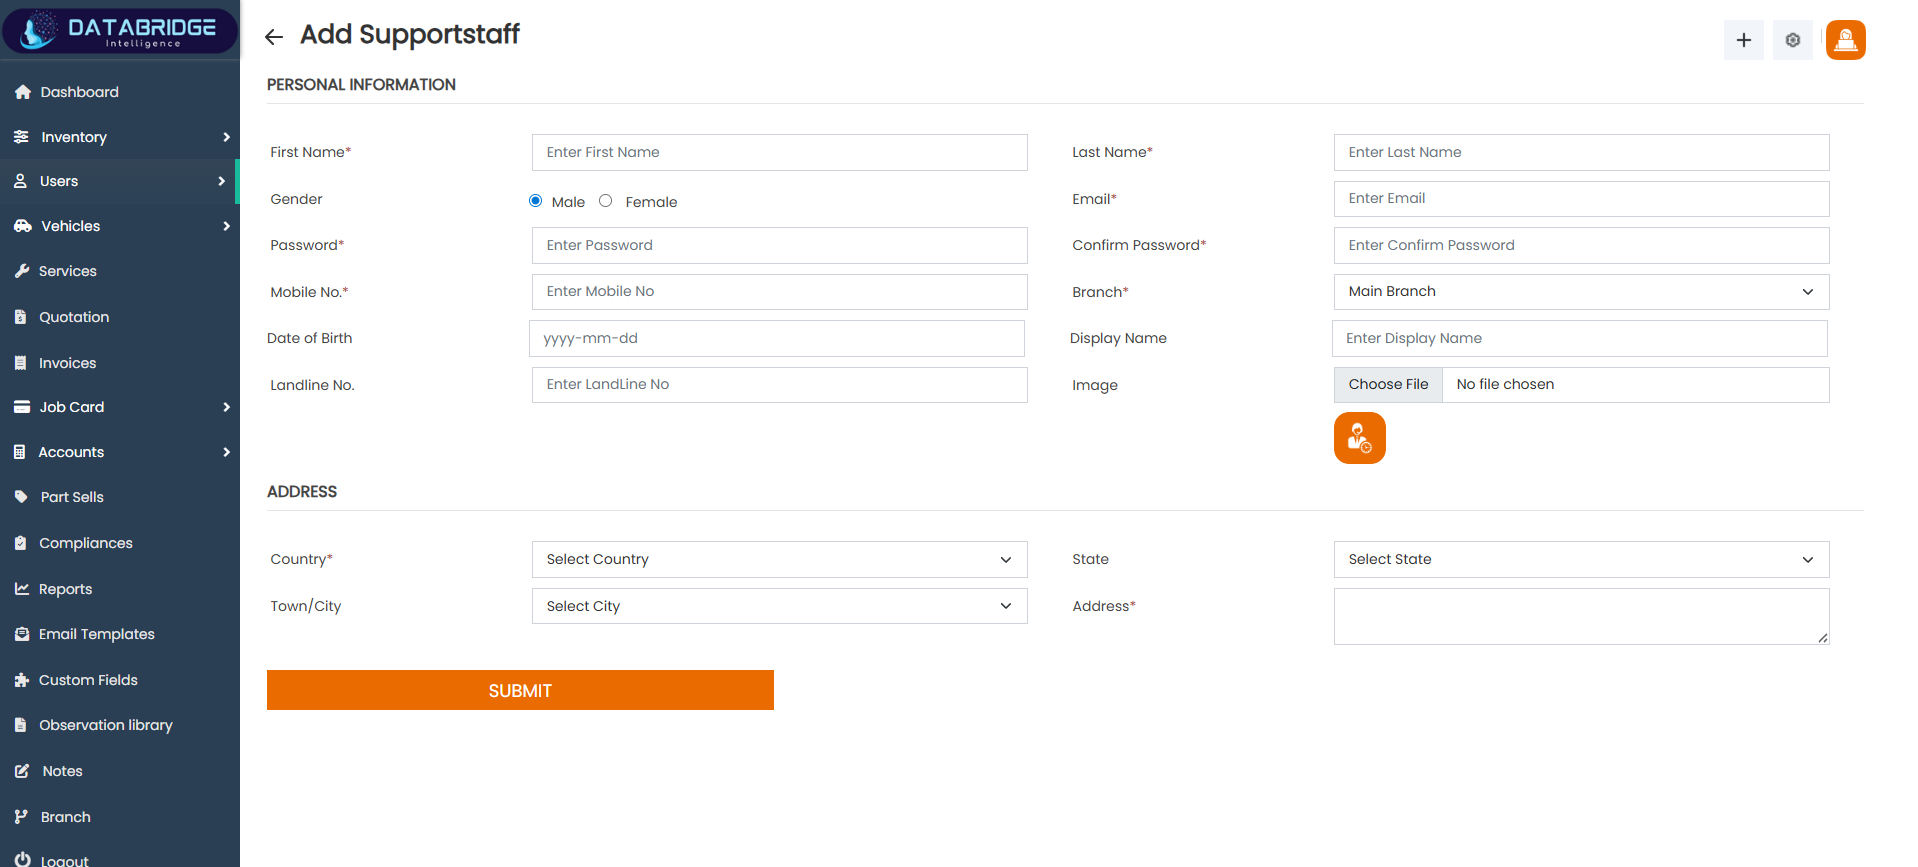
Add Support Staff:
The Add Support Staff screen allows administrators to register new support staff members by entering their personal and contact information. The form is structured into sections such as personal information and address, ensuring organized data entry. It includes fields like name, email, mobile number, password, branch, and optional details like date of birth and display name. This screen helps maintain a dedicated database of support staff, which can be used for operational assignments and internal management.
Features:
-Personal information fields (first name, last name, email)
-Gender selection and password setup
-Mobile and landline number fields
-Branch selection dropdown
-Image upload option
-Address section with country, state, and city
Functionality:
-Allows adding new support staff records
-Stores personal and contact details securely
-Supports profile image upload
-Assigns staff to a specific branch
-Maintains support staff database
-Helps manage operational workforce efficiently
1
User
2
Support Staff
3
Add Support Staff
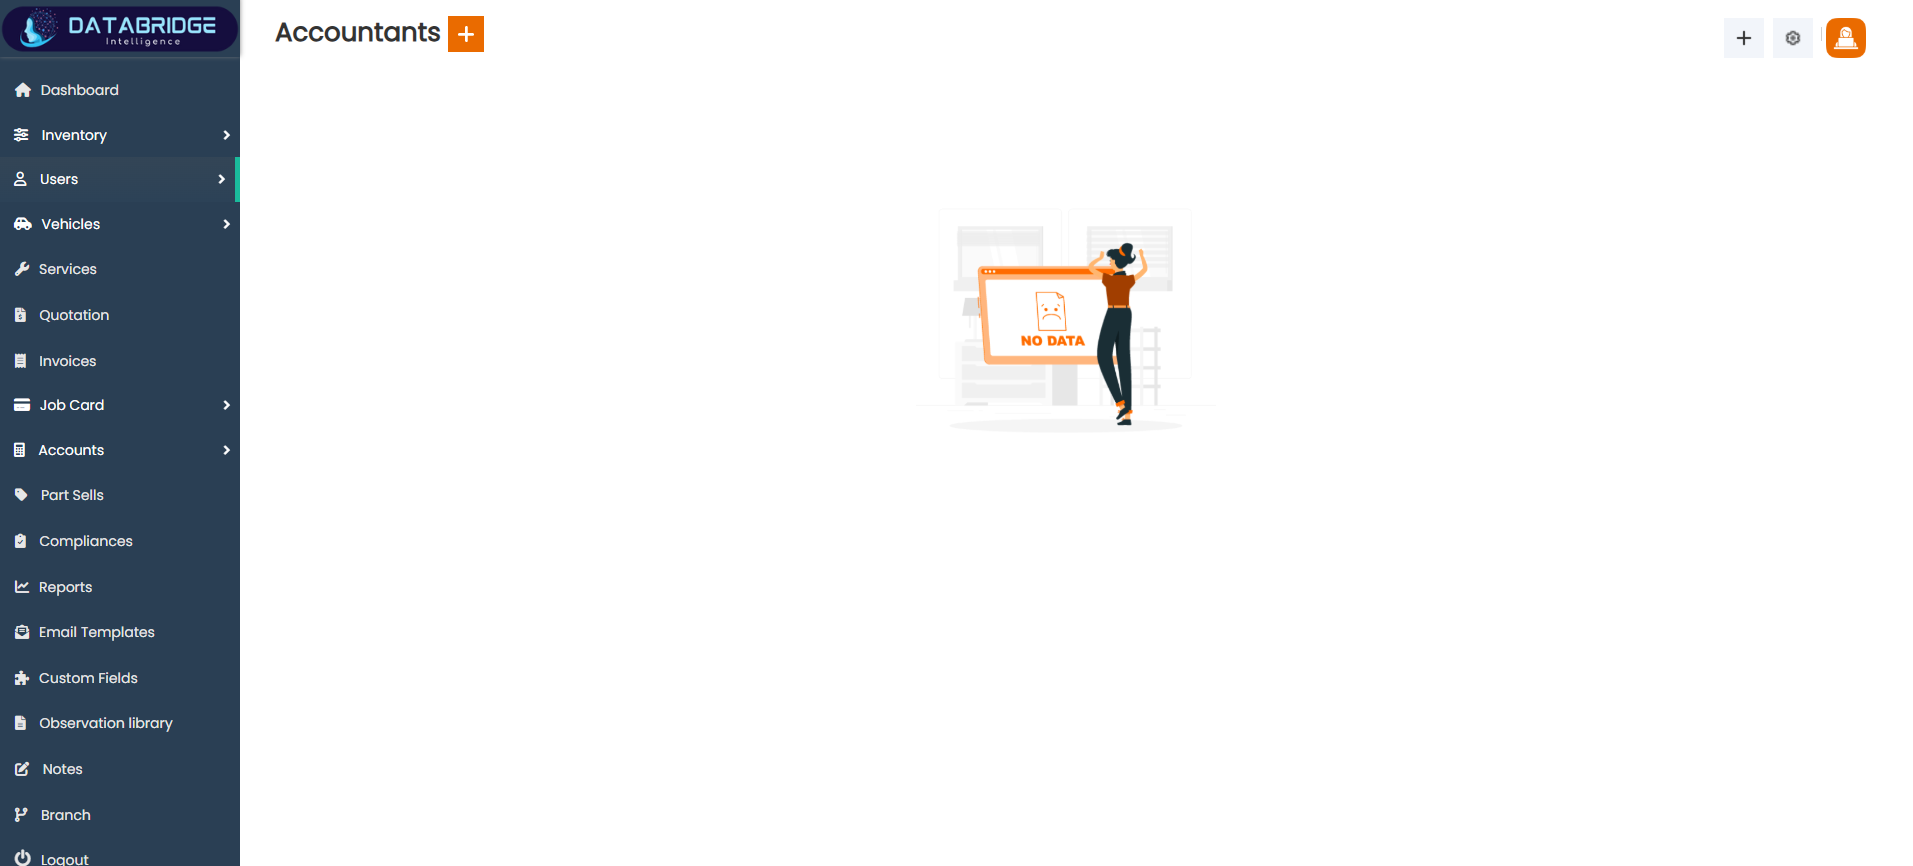
Accountants List:
The Accountants screen provides an overview of all accountant records within the system, enabling administrators to manage financial personnel efficiently. At present, the screen displays a “No Data” state, indicating that no accountant records have been added yet. This screen acts as a centralized place to view, organize, and manage accountants once data is available, ensuring proper handling of financial operations and responsibilities within the organization.
Features:
-“+” button to add new accountant
-Clean and minimal interface
-Sidebar navigation integration
-Action-ready layout for future data
Functionality
-Displays accountant records when available
-Shows empty state when no data is present
-Allows navigation to Add Accountant screen
-Acts as a central management panel
-Prepares system for financial staff trackin[g
1
User
2
Accountants
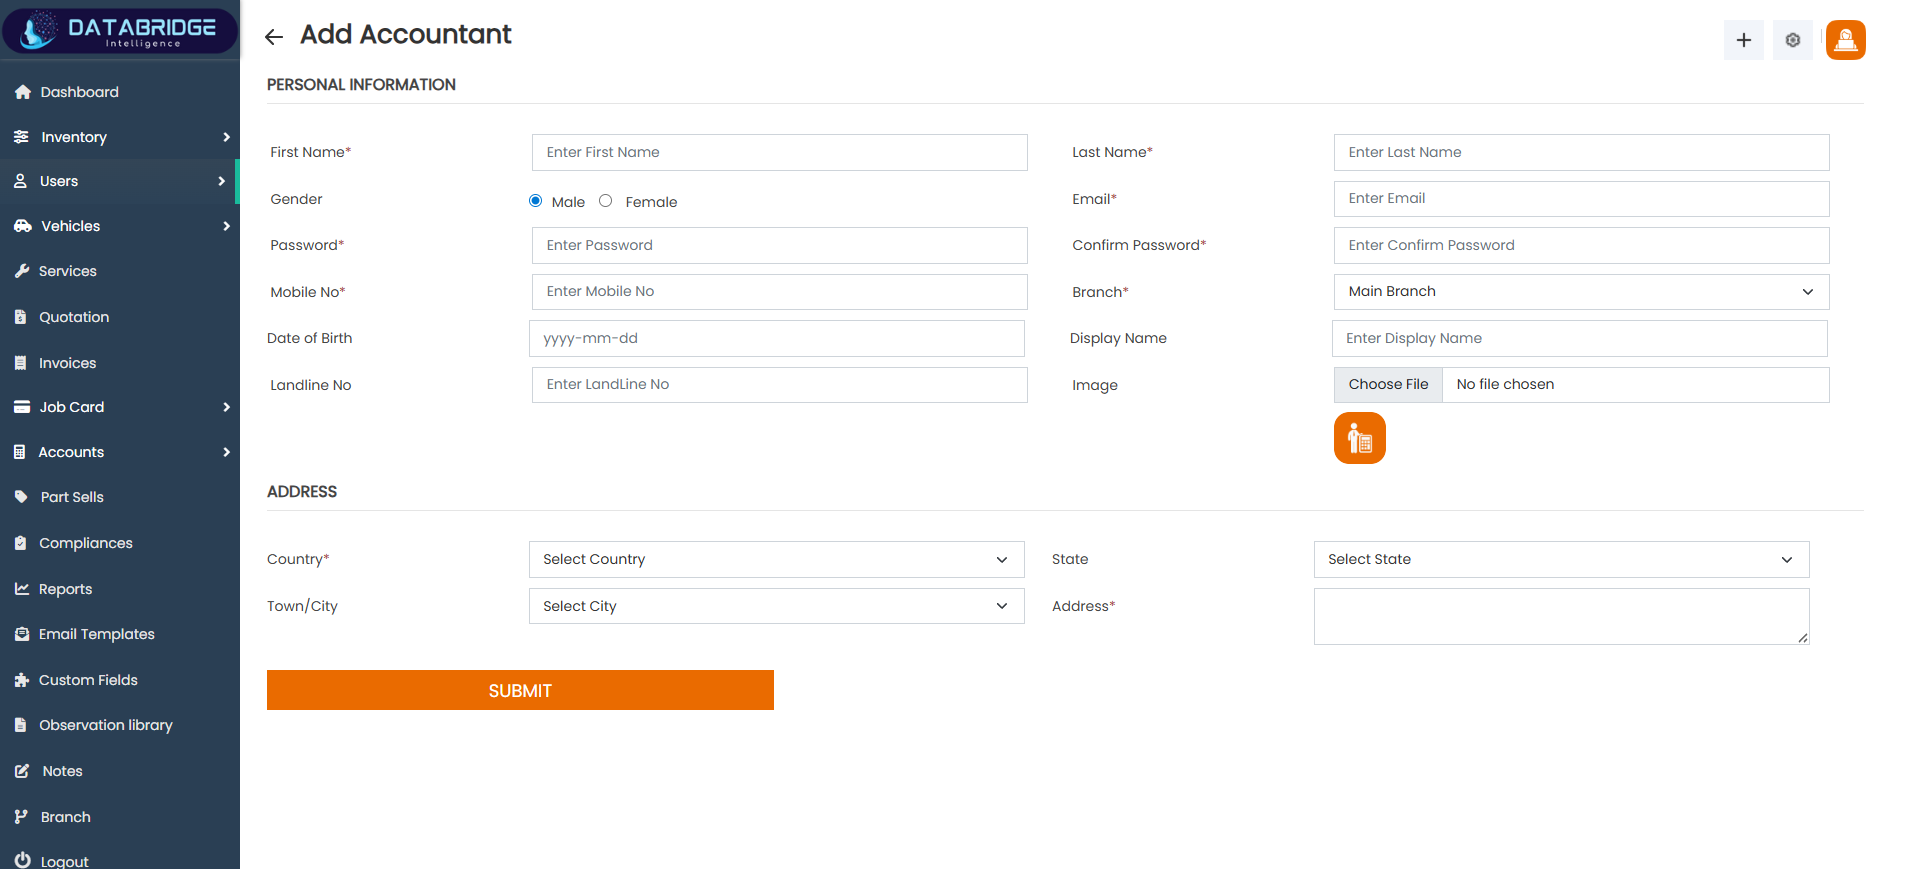
Add Accountant:
The Add Accountant screen allows administrators to create and manage accountant profiles by entering essential personal and professional details. The form is structured into sections such as personal information and address, ensuring organized and accurate data entry. It includes fields like name, email, password, mobile number, branch, and additional details such as date of birth and display name. This screen helps maintain a dedicated database of accountants, ensuring smooth financial operations and proper assignment of accounting responsibilities.
Features:
-Personal information fields (first name, last name, email)
-Gender selection and password setup
-Mobile and landline number fields
-Branch selection dropdown
-Image upload option
-Address section with country, state, and city
Functionality:
-Allows adding new accountant records
-Stores personal and contact details securely
-Supports profile image upload
-Assigns accountants to specific branches
-Maintains accountant database
-Helps manage financial staff efficiently
1
User
2
Accountants
3
Add Accountants
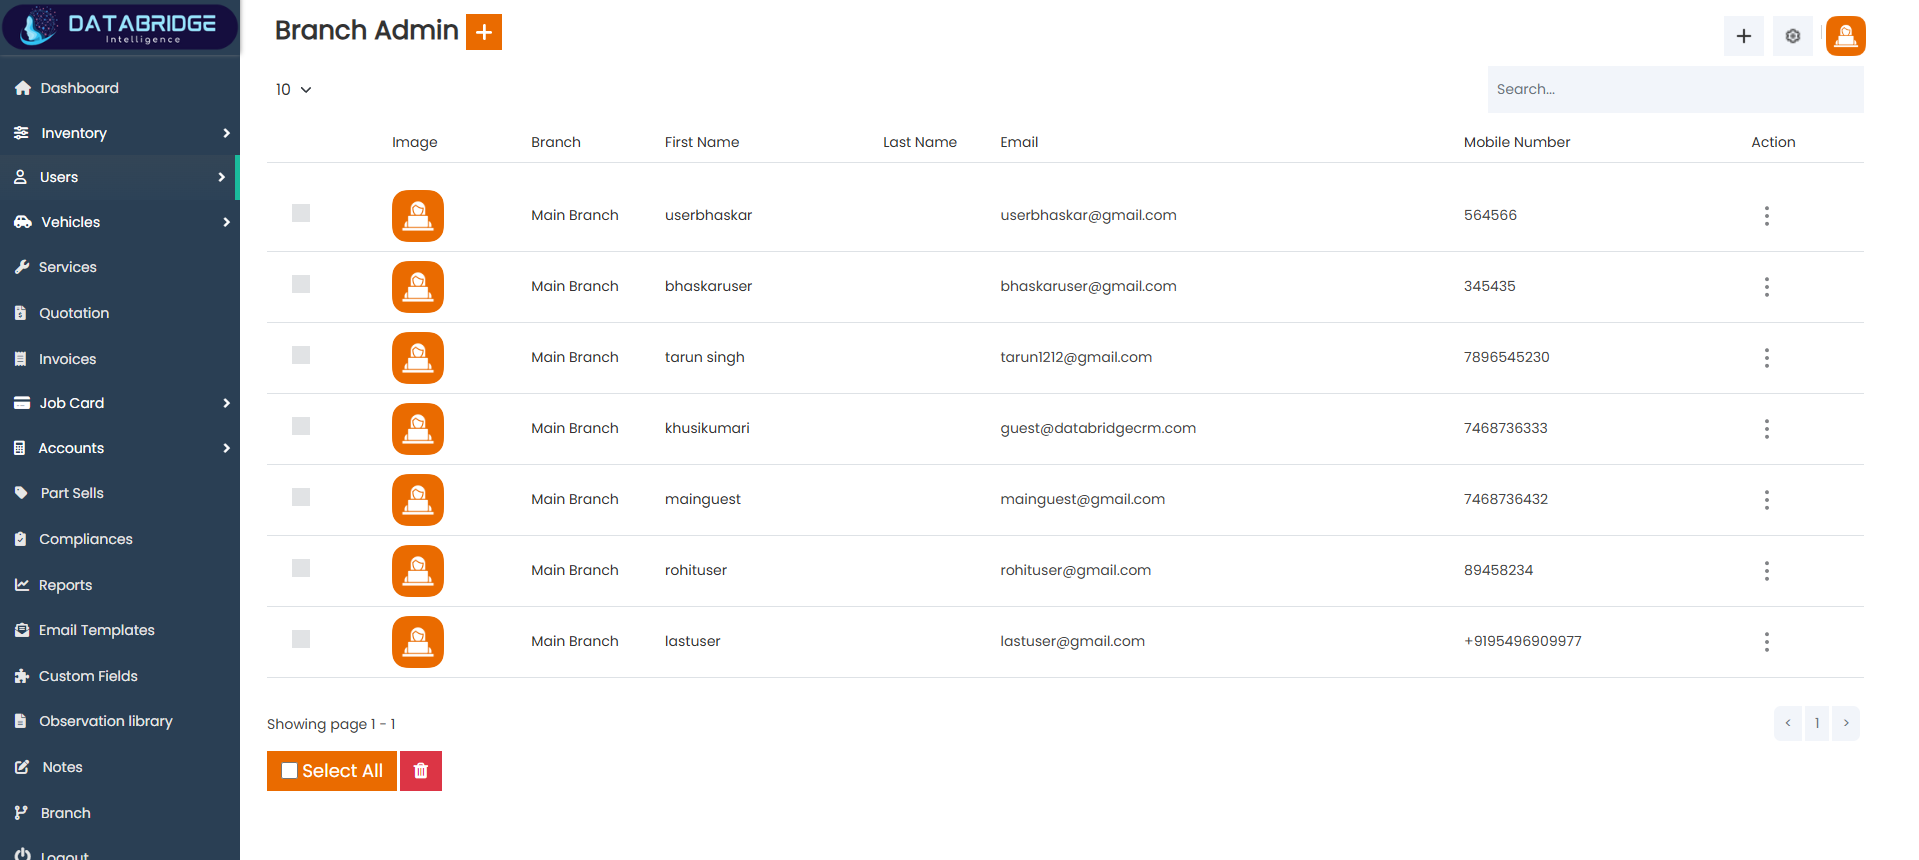
Branch Admin List:
The Branch Admin screen displays a complete list of all branch administrators available in the system, allowing centralized management of users responsible for handling operations at different branches. It presents key details such as branch name, user name, email, and mobile number in a structured table format. This screen helps in monitoring and organizing administrative roles across branches, ensuring that each branch has a designated admin for smooth functioning and control.
Features:
-Table view of all branch admins
-Columns for branch, name, email, and mobile number
-Profile image display
-Search bar for quick lookup
-“Select All” and delete option
-Action menu for edit and delete
-Pagination support
Functionality:
-Displays all branch admin records
-Enables searching and filtering of admins
-Supports bulk selection and deletion
-Allows edit and delete actions per record
-Helps manage branch-level administration
-Ensures proper assignment of admin roles
1
User
2
Branch Admin
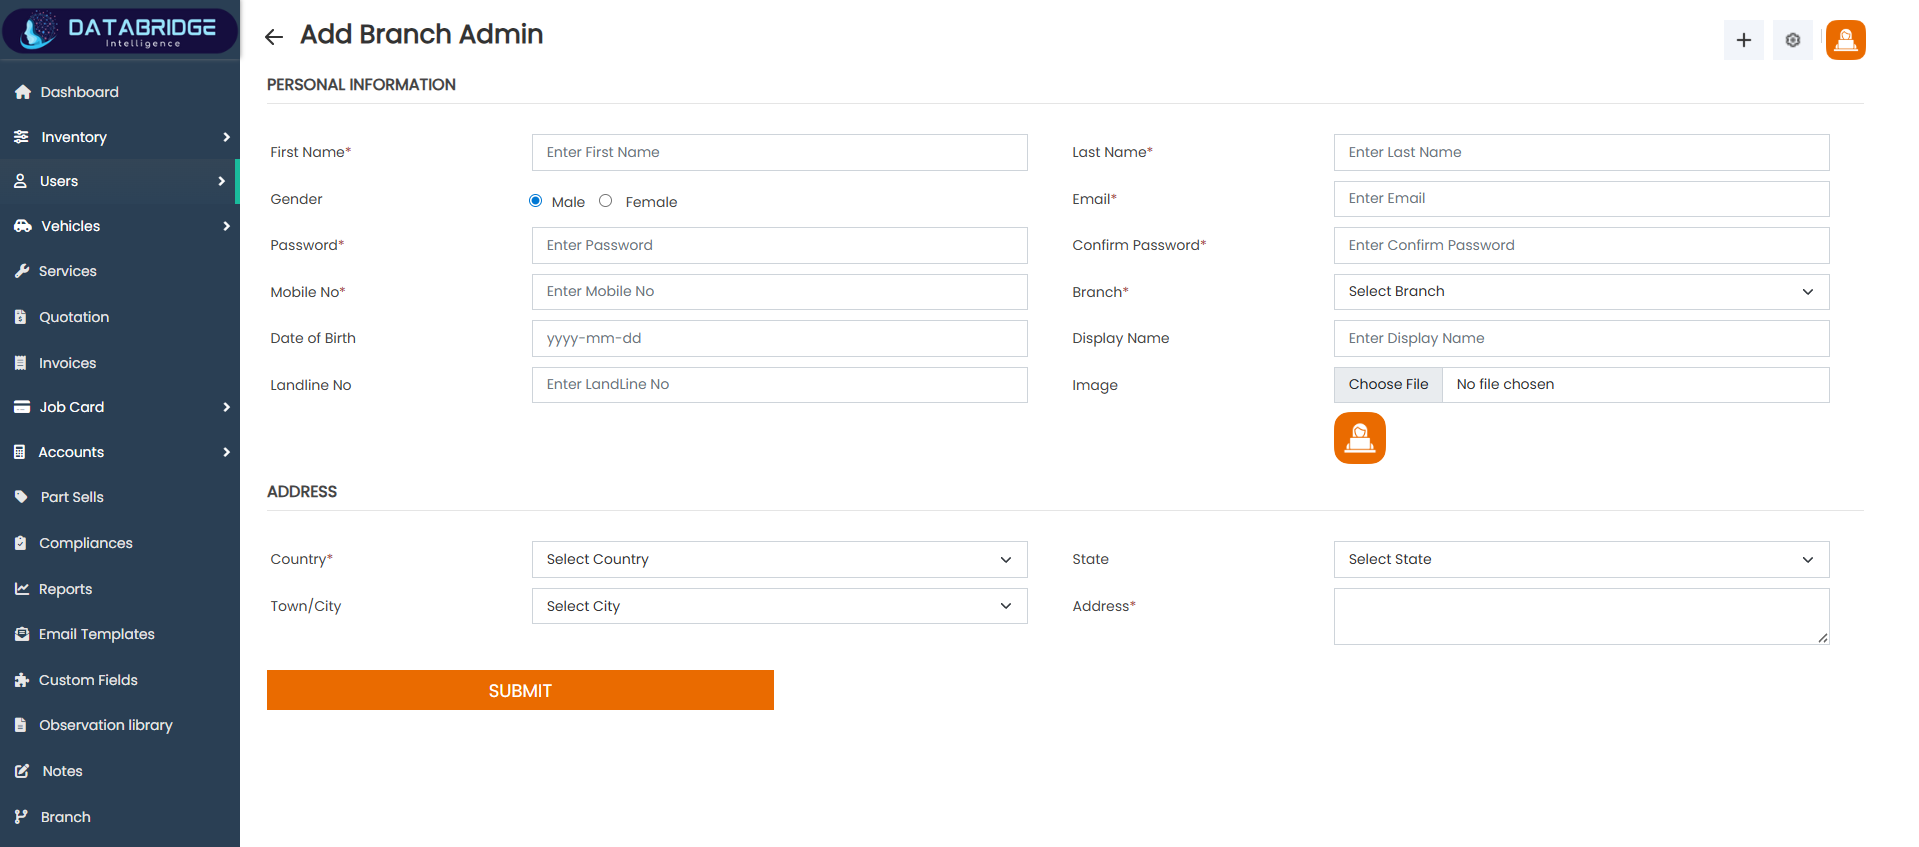
Add Branch Admin:
The Add Branch Admin screen allows administrators to create new branch admin accounts by entering their personal, login, and contact details. The form is divided into structured sections such as personal information and address to ensure clarity and proper data organization. It includes fields for name, email, password, mobile number, and branch assignment, making it easy to assign administrative control to a specific branch. This screen plays a key role in managing decentralized operations by enabling the creation of branch-specific admin users.
Features:
-Personal information fields (first name, last name, email)
-Gender selection and password setup
-Mobile and landline number fields
-Branch selection dropdown
-Image upload option
-Address section with country, state, and city
Functionality:
-Allows adding new branch admin users
-Stores login and personal details securely
-Assigns admins to specific branches
-Supports profile image upload
-Maintains branch admin database
-Enables decentralized system management
1
User
2
Branch Admin
3
Add Branch Admin
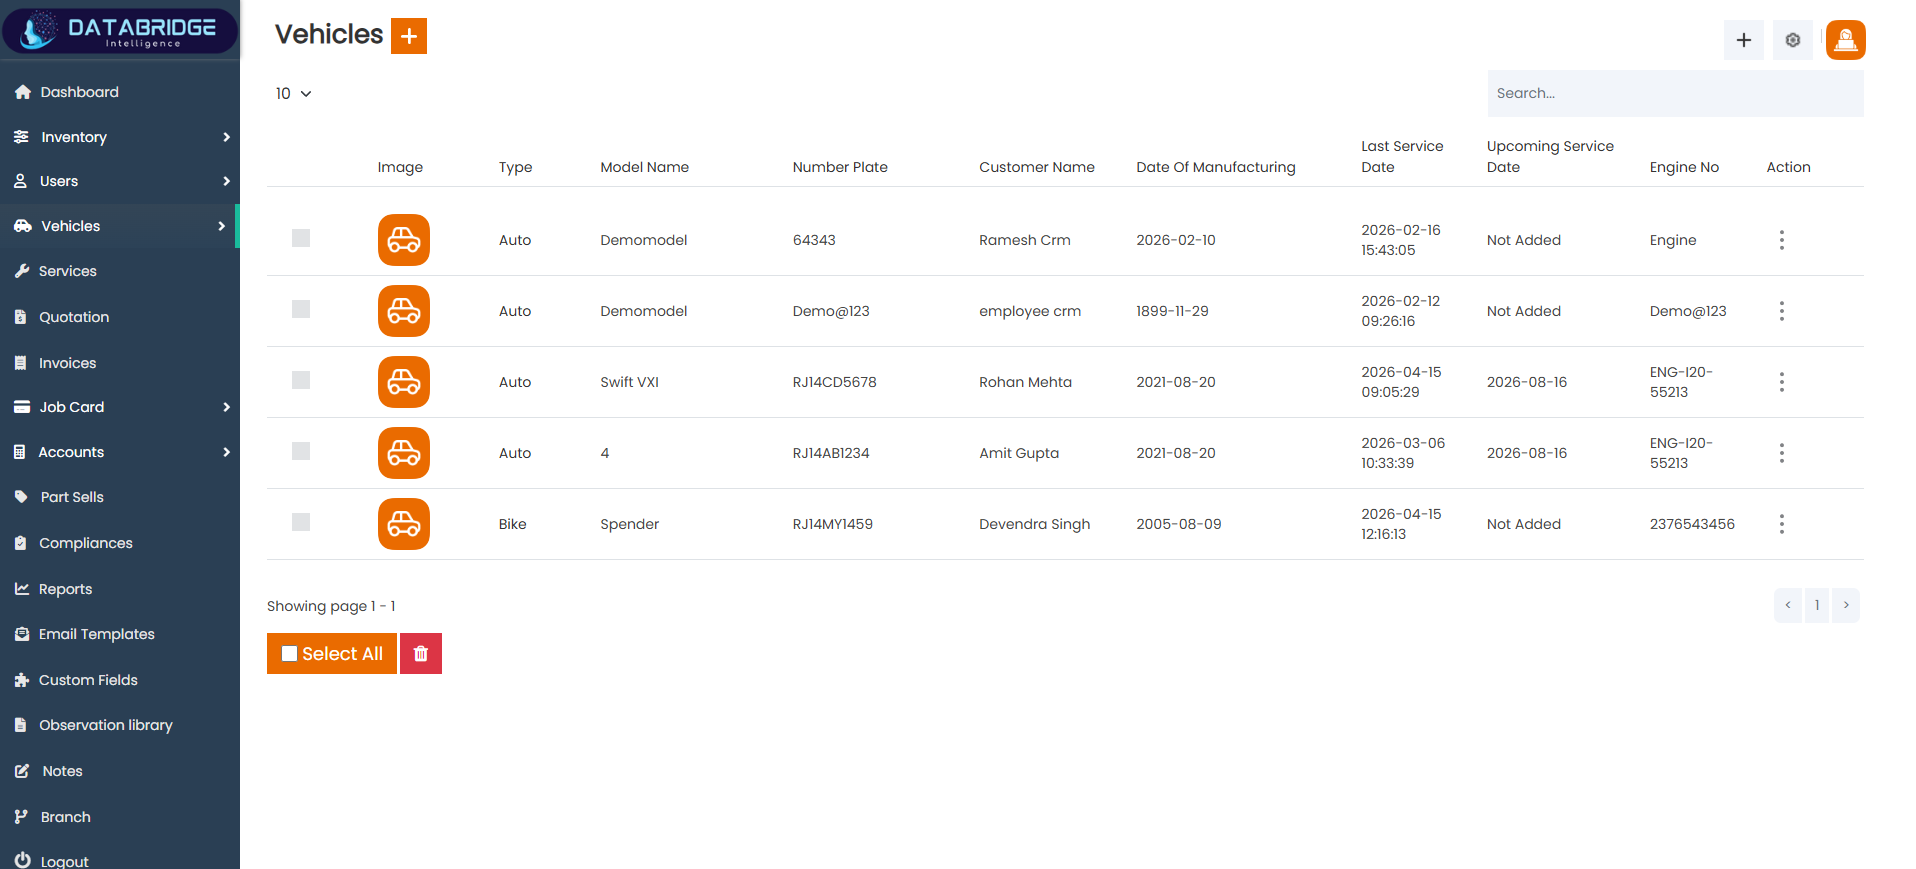
Vehicles List:
The Vehicles screen displays a comprehensive list of all registered vehicles within the system, providing essential details such as vehicle type, model, number plate, customer name, manufacturing date, and service history. This screen enables efficient tracking and management of vehicles associated with customers, ensuring smooth service operations and maintenance scheduling.
Features:
-Table view of all vehicles
-Columns for type, model, number plate, and customer
-Service tracking (last & upcoming service dates)
-Engine number and manufacturing details
-Search functionality
-Bulk selection and delete option
-Action menu for edit and delete
Functionality:
-Displays all registered vehicles
-Tracks service history and upcoming service dates
-Links vehicles to customers
-Enables search and filtering
-Supports bulk deletion
-Allows edit and update of vehicle details
1
Vehicles
2
Vehicles List
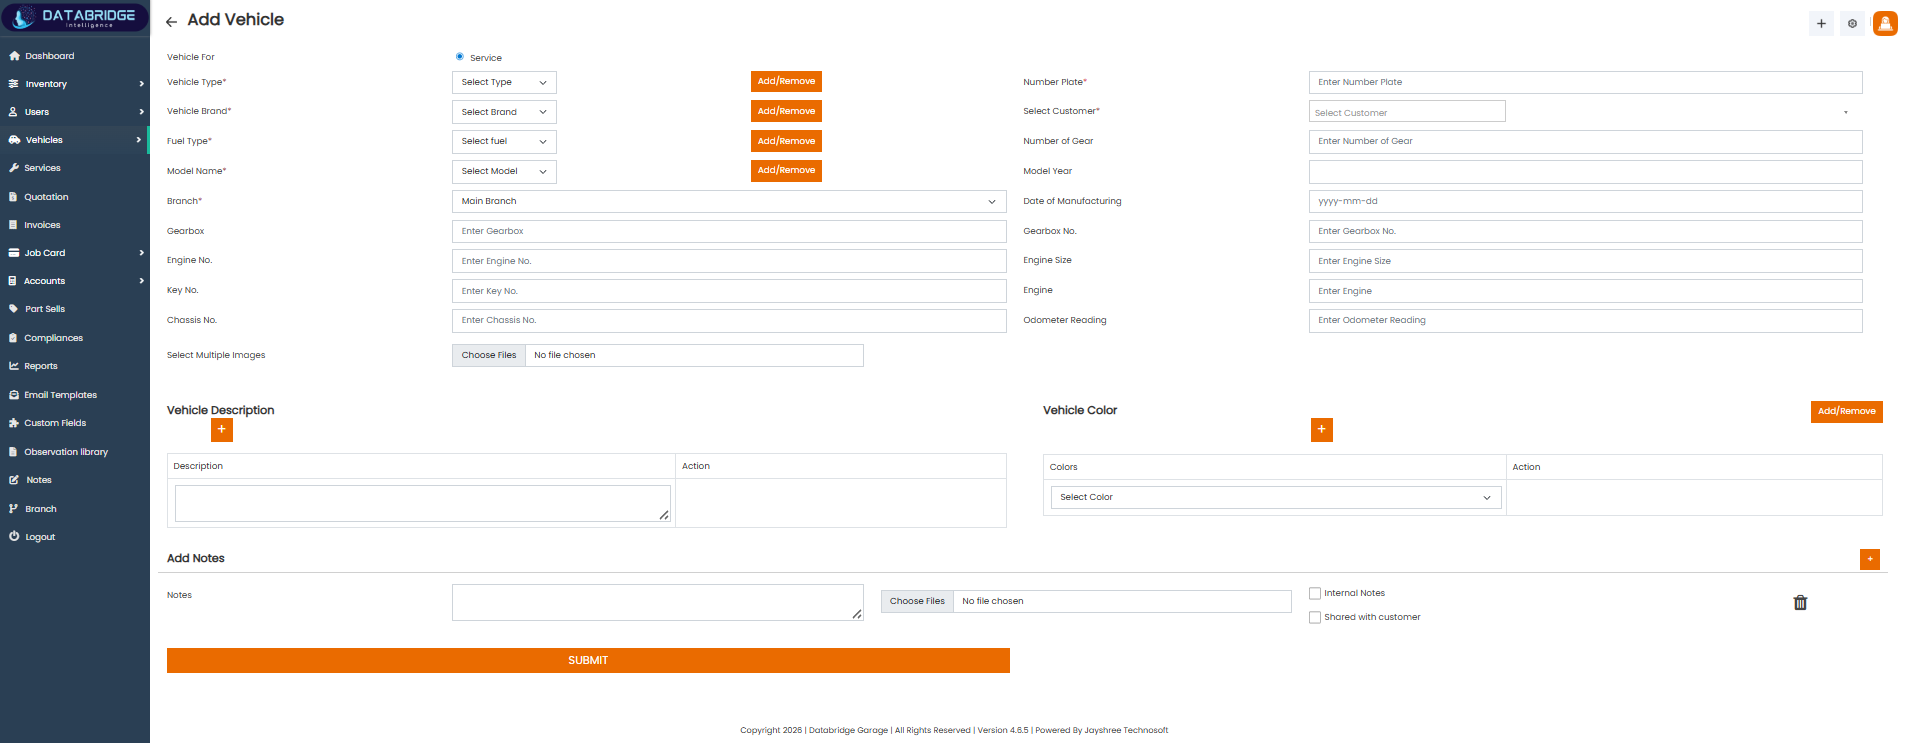
Add Vehicle:
The Add Vehicle screen allows users to register a new vehicle by entering detailed technical and ownership information. The form is divided into structured sections including vehicle details, specifications, and additional attributes like colors and descriptions. It ensures accurate vehicle registration and supports complete lifecycle tracking within the system.
Features:
-Vehicle type, brand, and model selection
-Customer selection dropdown
-Number plate and manufacturing details
-Engine, gearbox, and chassis information
-Odometer reading input
-Multiple image upload support
-Vehicle description and color management
-Notes section with file attachment
Functionality:
-Adds new vehicles to the system
-Stores technical and ownership details
-Associates vehicle with a customer
-Supports multiple images and descriptions
-Tracks vehicle specifications
-Enables complete vehicle lifecycle management
1
Vehicles
2
Vehicles List
3
Add Vehicles List
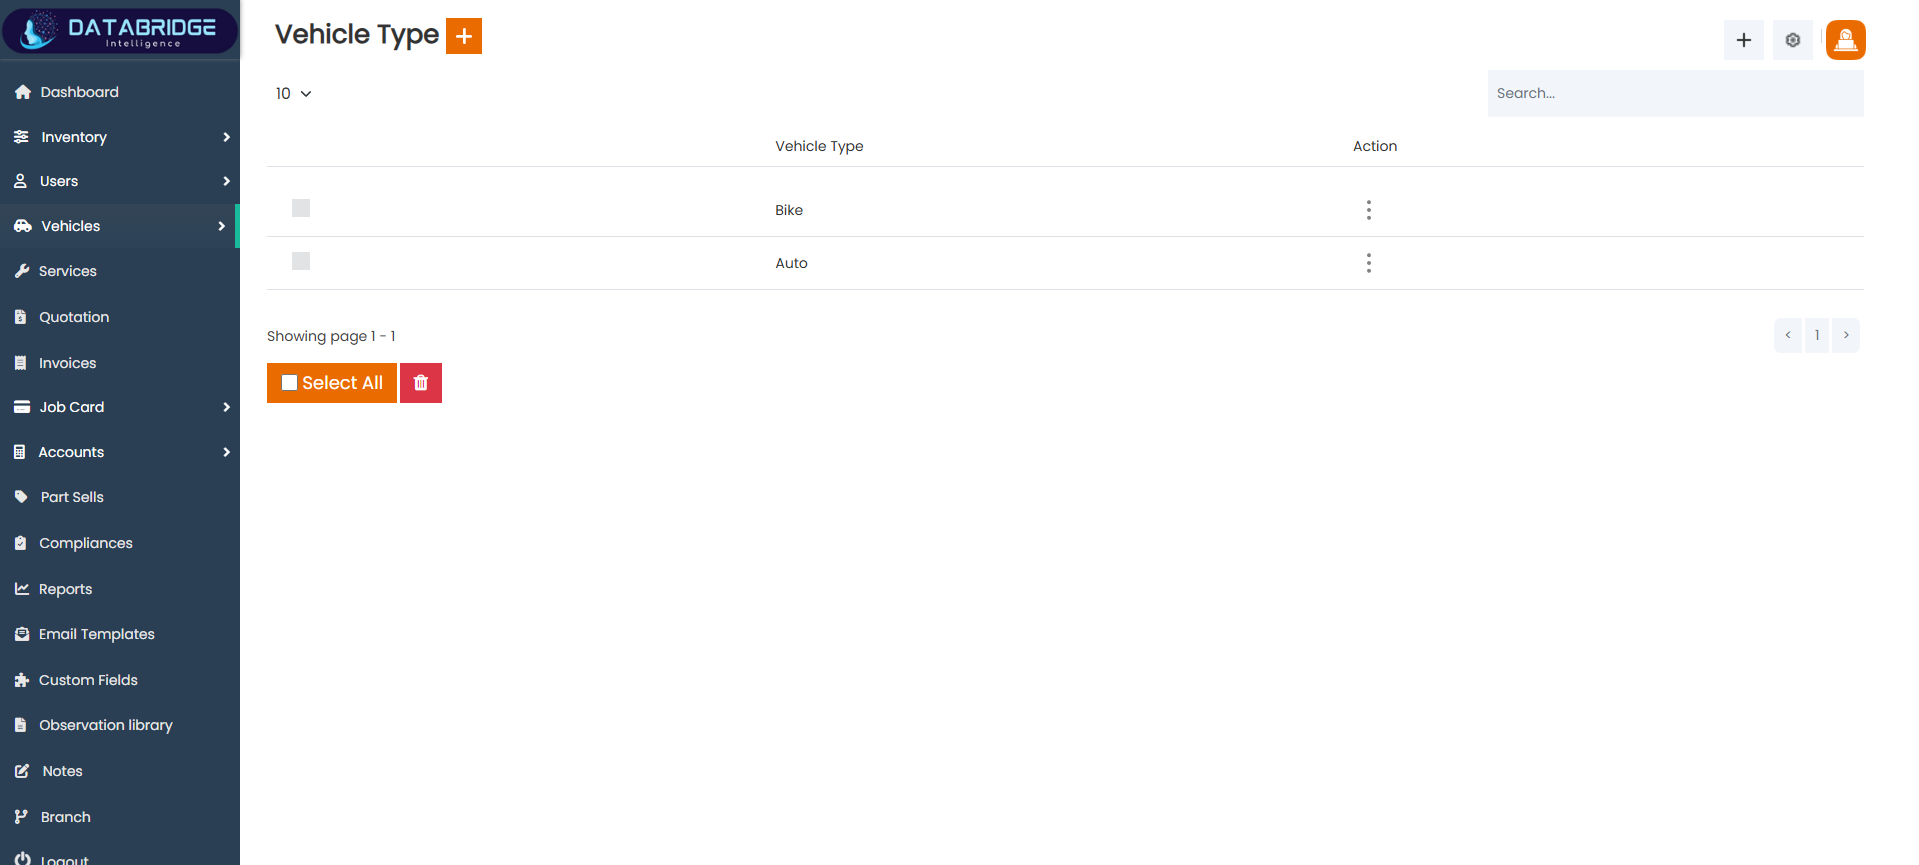
Vehicle Type List:
The Vehicle Type screen displays all available vehicle categories such as bikes, cars, and other types. It helps in organizing vehicles into predefined categories, making data classification and filtering more efficient across the system.
Features:
-List of vehicle types
-Simple table structure
-Search functionality
-Bulk select and delete option
-Action menu for edit/delete
Functionality:
-Displays all vehicle categories
-Enables creation and management of types
-Supports editing and deletion
-Helps categorize vehicles efficiently
1
Vehicles
2
Vehicle Type List
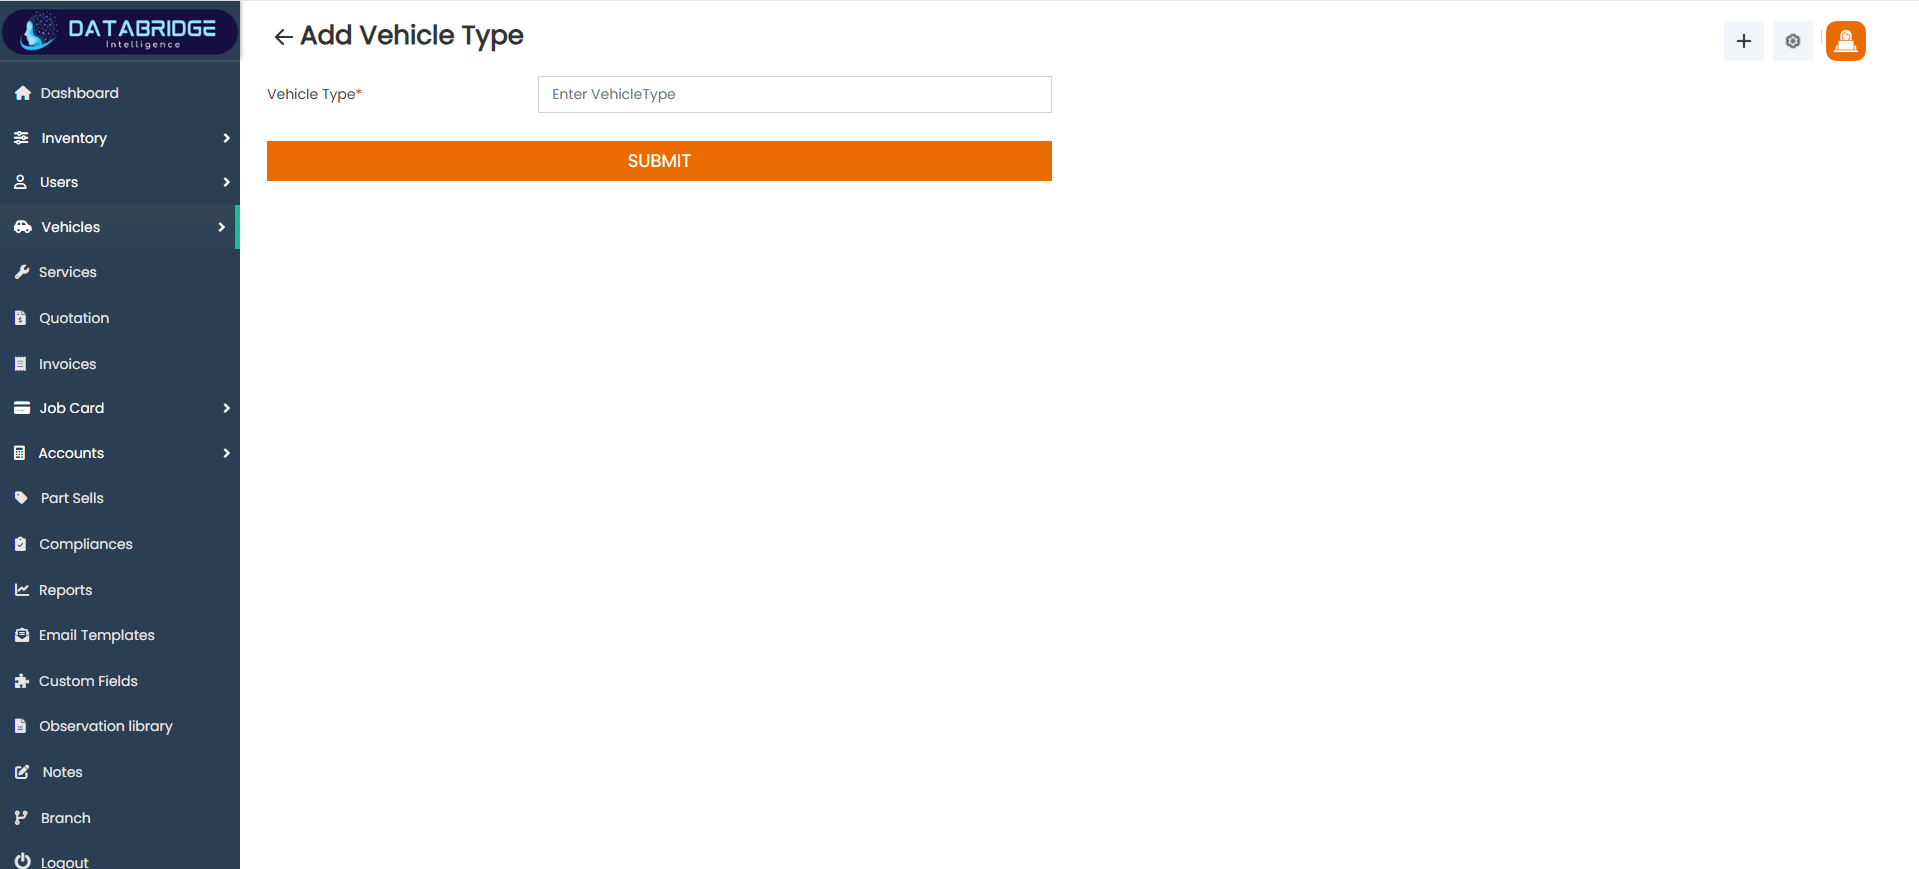
Add Vehicle Type:
The Add Vehicle Type screen allows users to create new vehicle categories by entering a type name. This helps in expanding the system to accommodate different types of vehicles as per business requirements.
Features:
-Input field for vehicle type name
-Simple and clean interface
-Submit button for saving
Functionality:
-Adds new vehicle types
-Updates classification structure
-Ensures flexibility in vehicle categorization
1
Vehicles
2
Vehicle Type List
3
Add Vehicle Type List
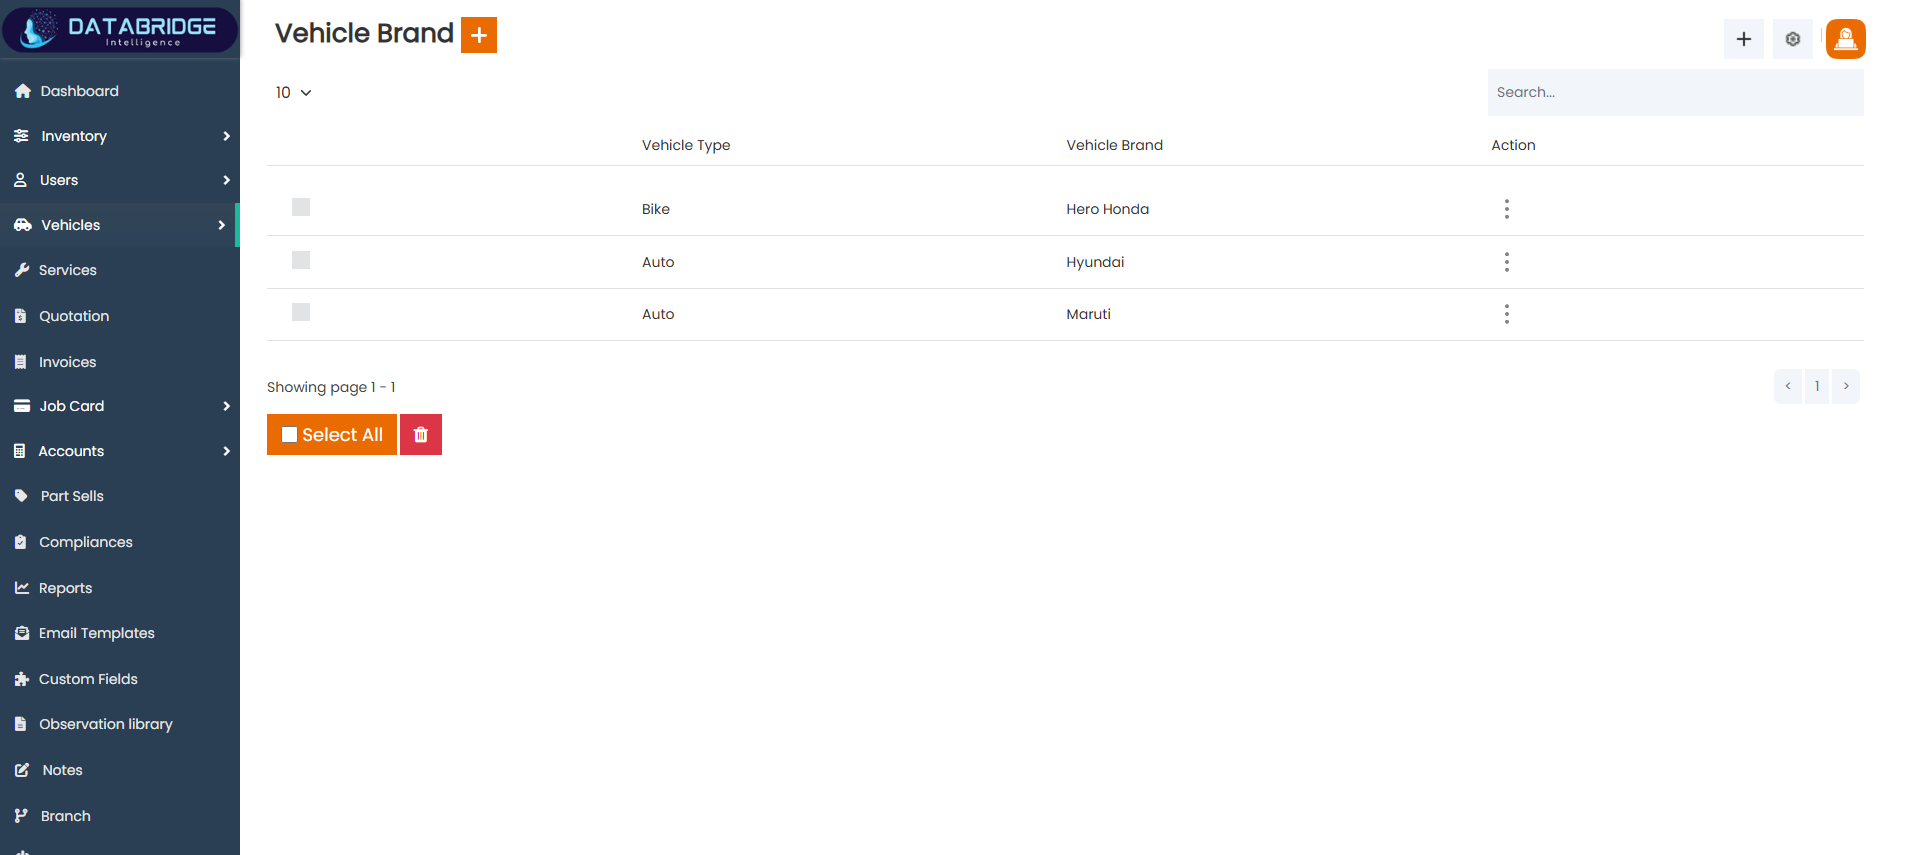
Vehicle Brand List:
The Vehicle Brand screen displays all available vehicle brands mapped to their respective vehicle types. It helps maintain a structured hierarchy of vehicle data, ensuring accurate mapping between type and brand.
Features:
-Table view of vehicle brands
-Mapping with vehicle type
-Search functionality
-Bulk select and delete option
-Action menu for edit/delete
Functionality:
-Displays all vehicle brands
-Links brands with vehicle types
-Enables edit and delete operations
-Maintains structured vehicle hierarchy
1
Vehicles
2
Vehicle Brand List
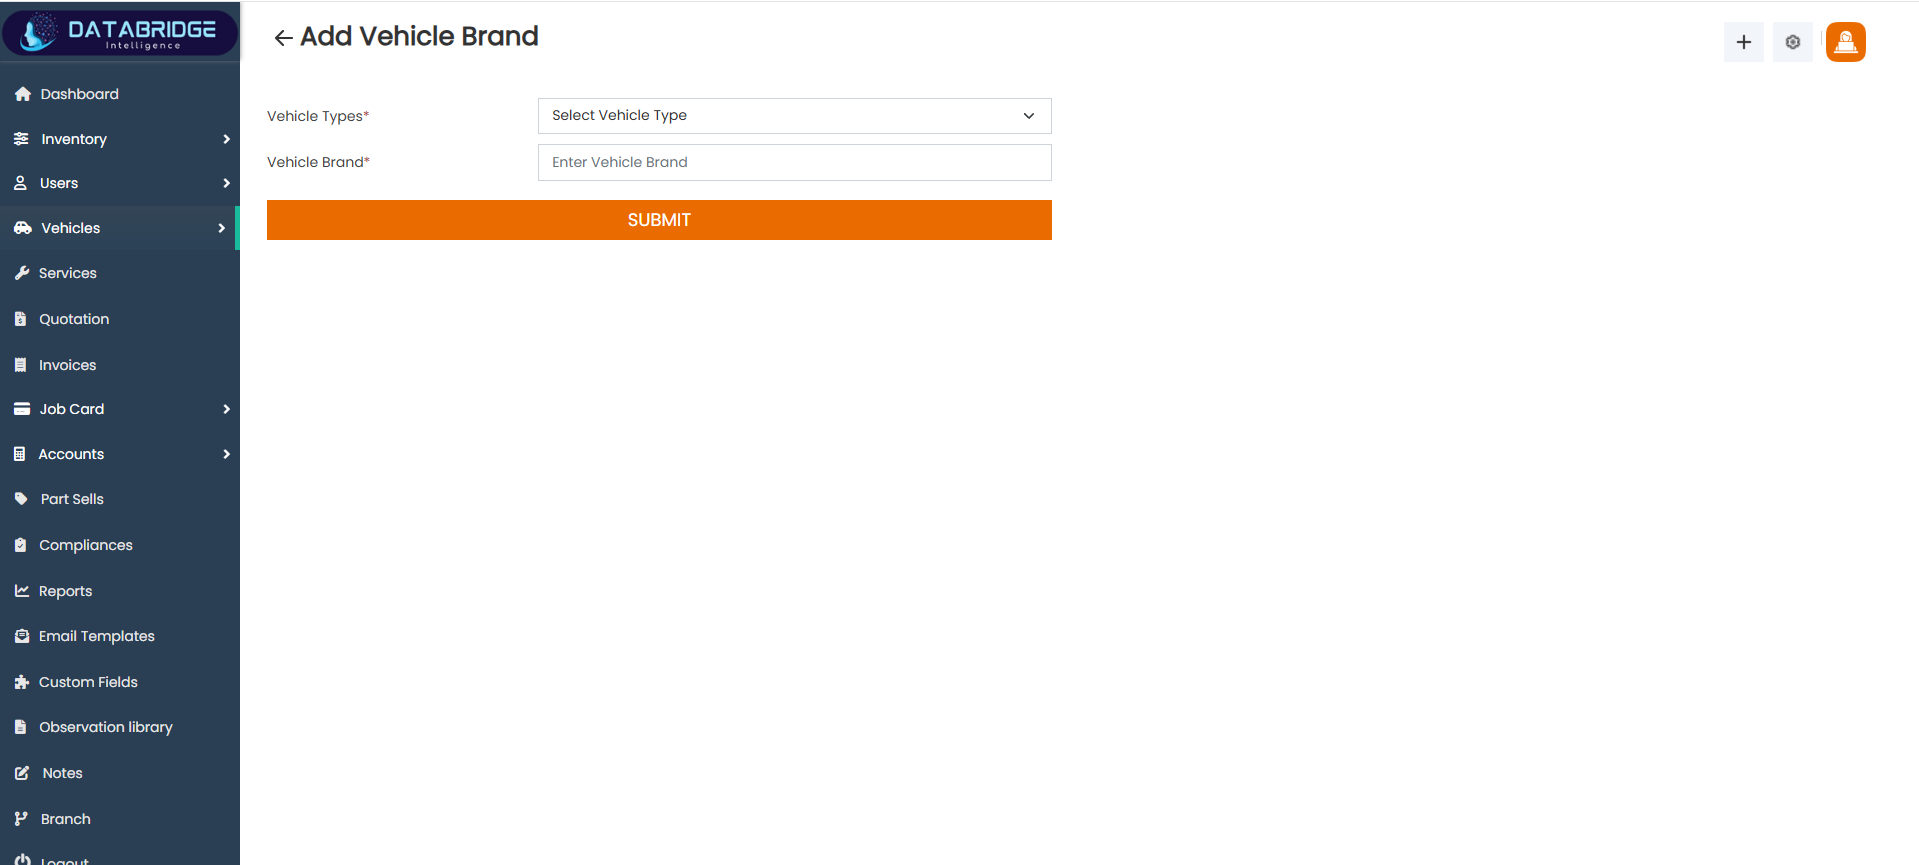
Add Vehicle Brand:
The Add Vehicle Brand screen allows users to create new vehicle brands and associate them with a specific vehicle type. This ensures proper classification and organization of vehicle data.
Features:
-Dropdown for selecting vehicle type
-Input field for brand name
-Submit button
Functionality
-Adds new vehicle brands
-Maps brands to vehicle types
-Maintains consistency in vehicle data
1
Vehicles
2
Vehicle Brand List
3
Add Vehicle Brand List
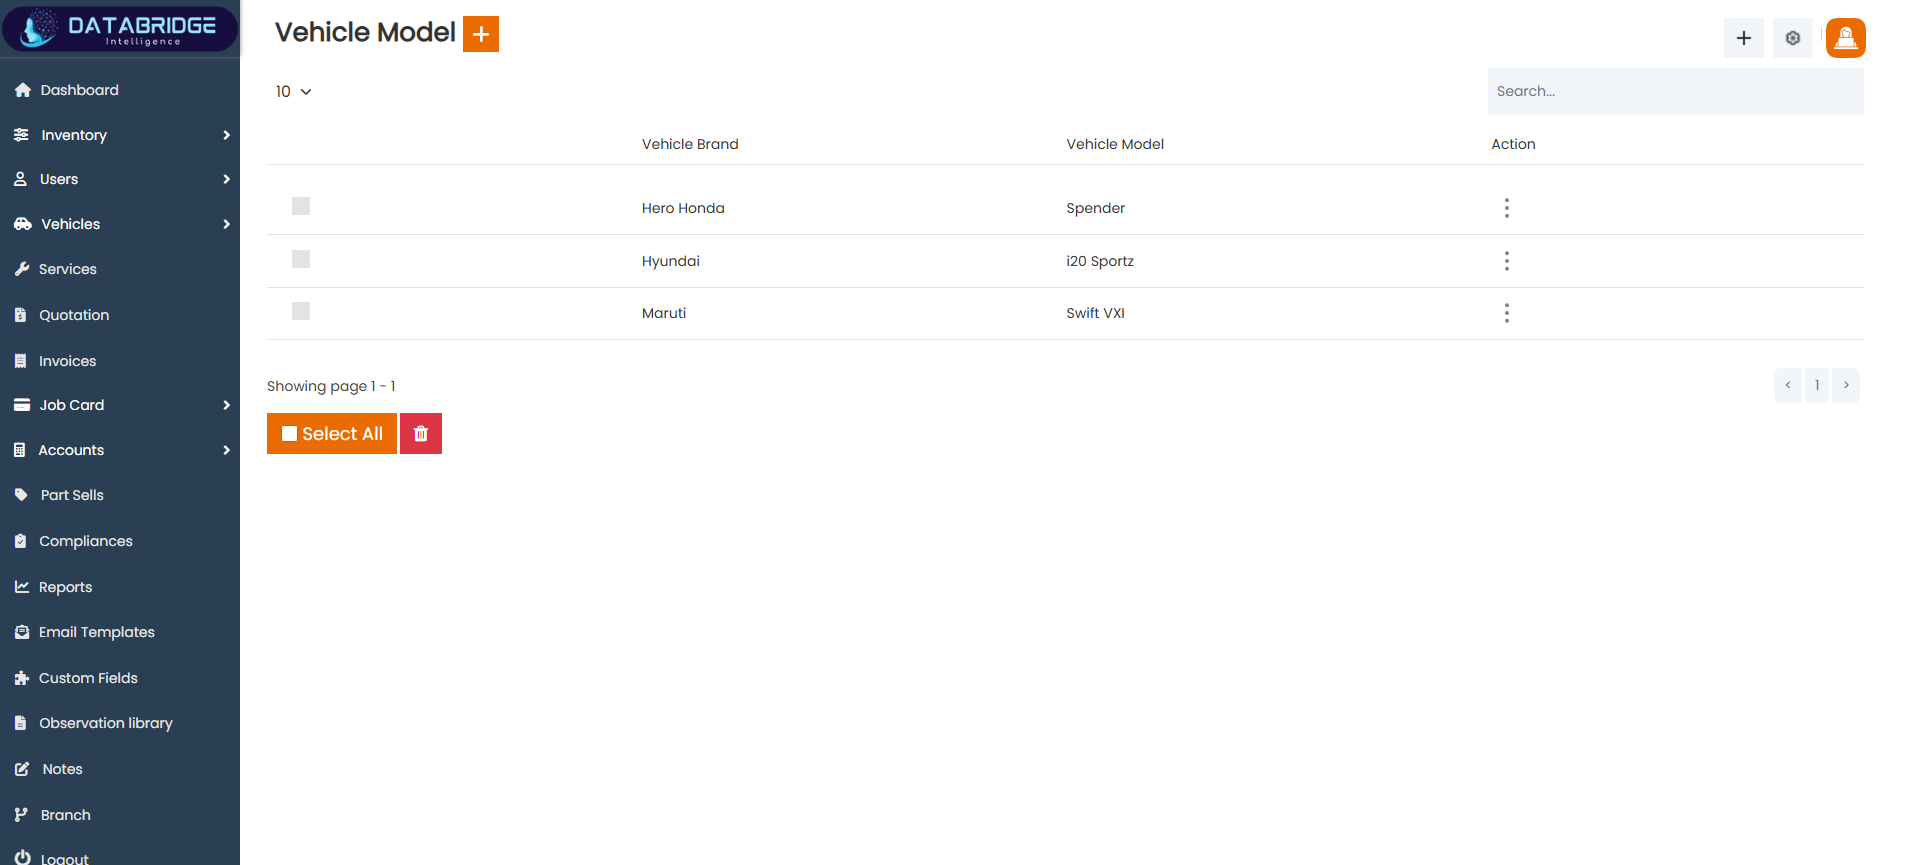
Vehicle Model List:
The Vehicle Model screen displays all vehicle models along with their associated brands. It helps in maintaining detailed classification of vehicles for better tracking and filtering.
Features:
-Table view of models
-Mapping with vehicle brands
-Search functionality
-Bulk select and delete option
-Action menu for edit/delete
Functionality:
-Displays all vehicle models
-Links models to brands
-Supports edit and delete operations
-Improves data organization
1
Vehicle
2
Vehicle Model List
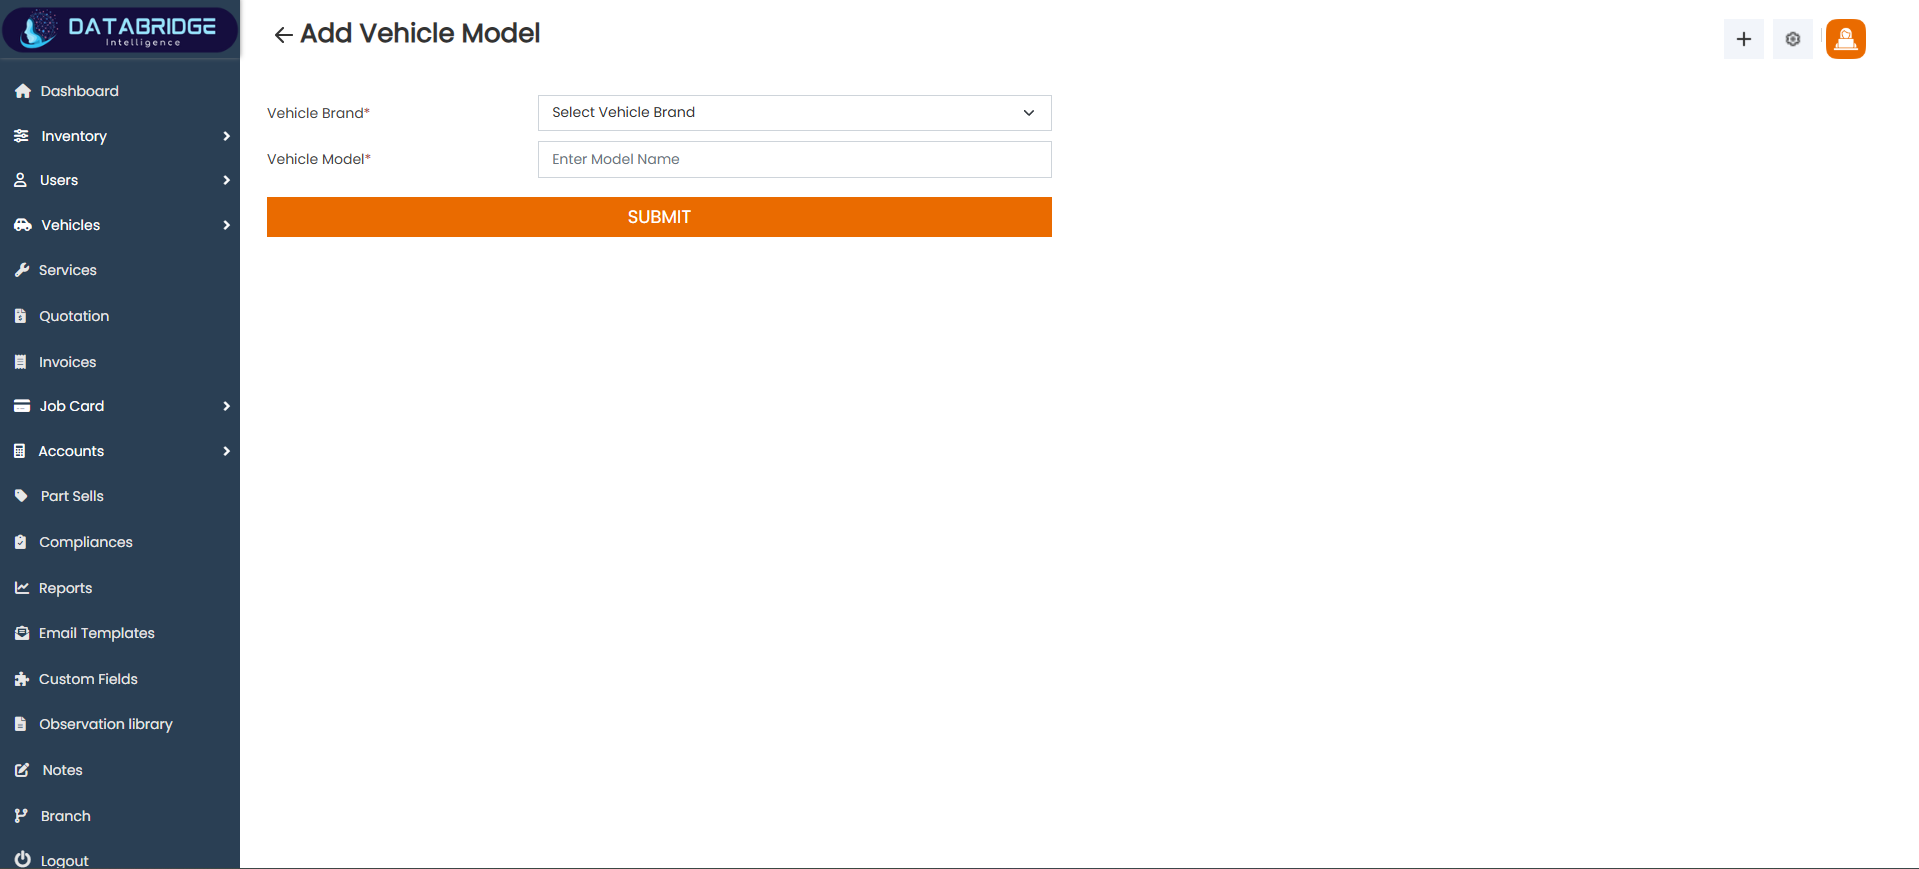
Add Vehicle Model:
The Add Vehicle Model screen allows users to create new vehicle models and associate them with a selected brand. This ensures detailed classification of vehicles in the system.
Features:
-Dropdown for selecting vehicle brand
-Input field for model name
-Submit button
Functionality:
-Adds new vehicle models
-Maps models to brands
-Enhances vehicle data structure
1
Vehicle
2
Vehicle Model List
3
Add Vehicle Model List
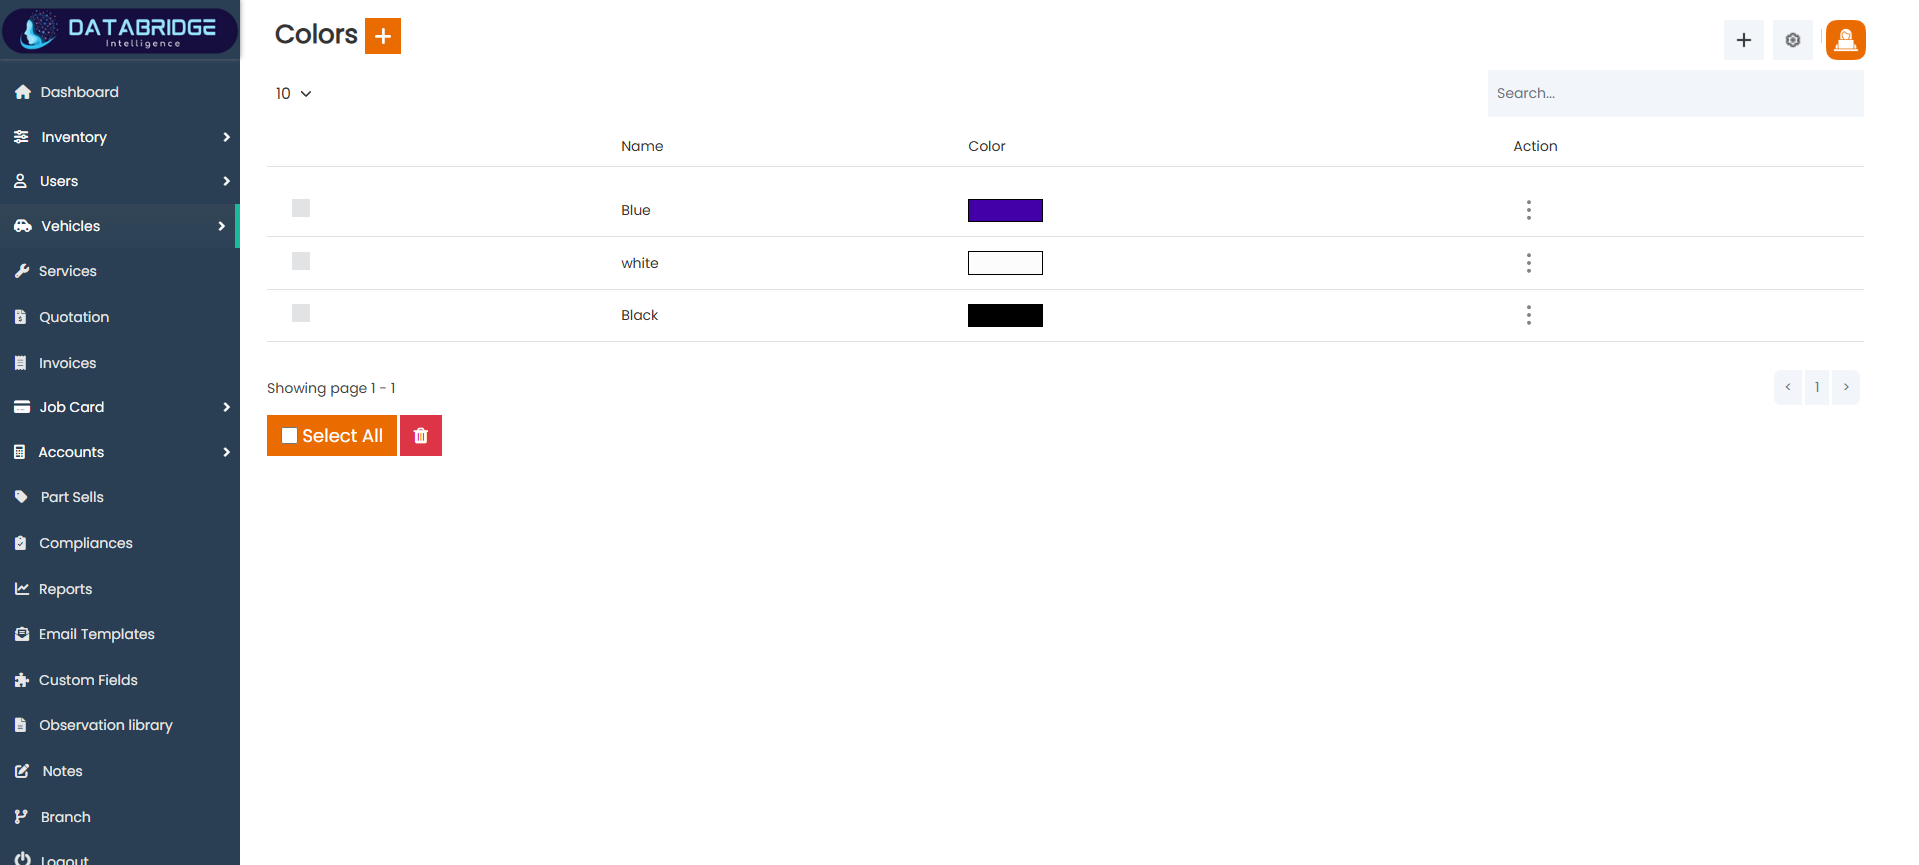
Color List:
The Colors screen displays all available vehicle colors along with a visual representation of each color. It helps in managing and assigning color attributes to vehicles.
Features:
-List of colors with visual preview
-Color name display
-Search functionality
-Bulk select and delete option
-Action menu for edit/delete
Functionality:
-Displays all available colors
-Supports edit and deletion
-Helps assign colors to vehicles
-Maintains color database
1
Vehicle
2
Color List
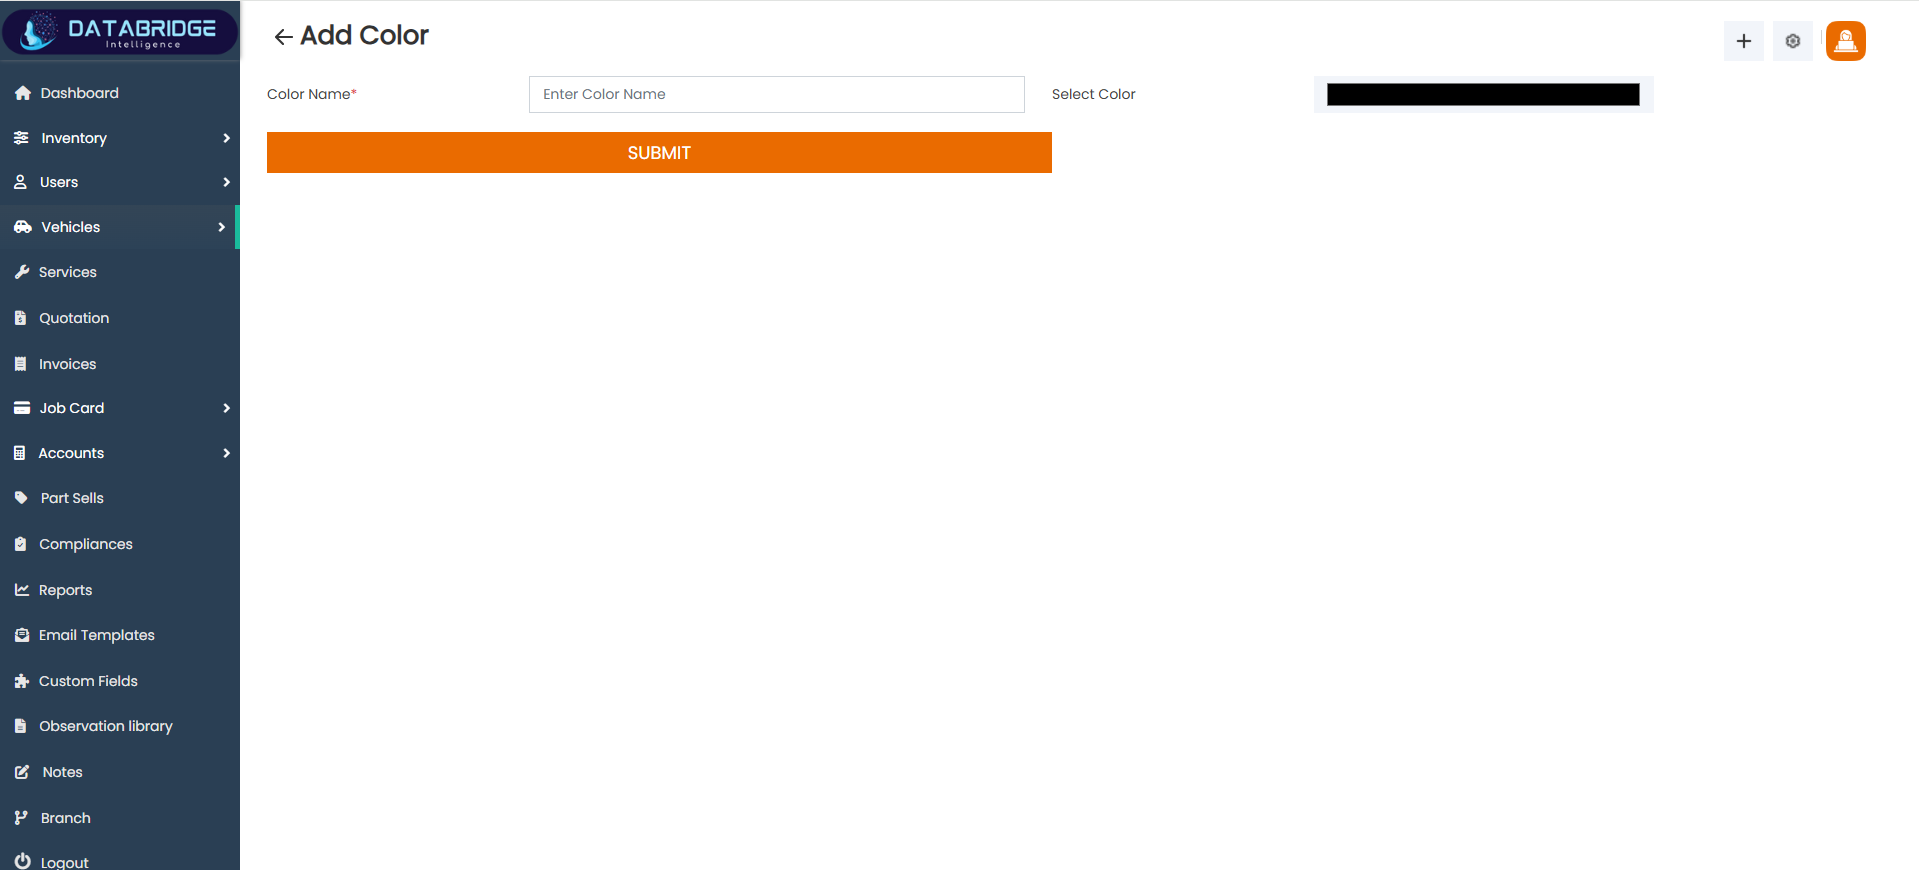
Add Color:
The Add Color screen allows users to define new vehicle colors by specifying a color name and selecting a color value. This ensures accurate and visually identifiable vehicle attributes.
Features:
-Input field for color name
-Color picker for selection
-Submit button
Functionality:
-Adds new colors to the system
-Stores color values and names
-Enables color assignment to vehicles
1
Vehicle
2
Color List
3
Add Color List
Services
The Services module is designed to handle end-to-end service operations, including job creation, assignment, tracking, and completion. It integrates customer and vehicle data to streamline service processes and improve operational efficiency.
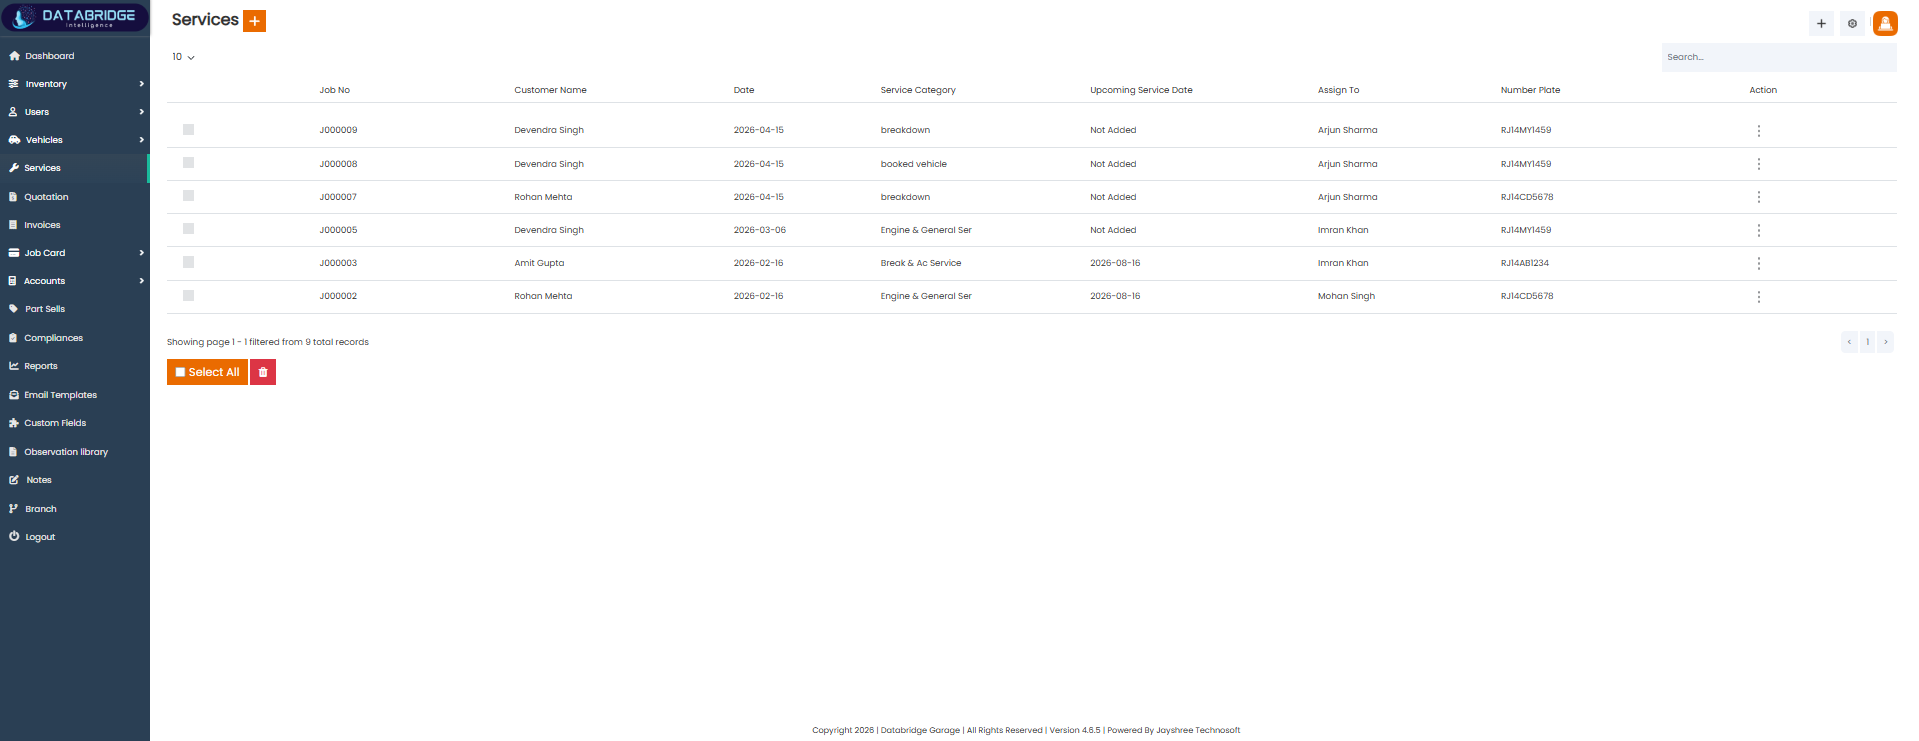
Services List:
The Services List screen provides a complete overview of all service jobs created in the system. It displays job-wise details including customer information, service type, assigned staff, and vehicle details. This screen helps in tracking ongoing and completed services efficiently.
Features:
-Tabular view of service records
-Job number identification
-Customer name and service date display
-Service category classification
-Assigned staff tracking
-Upcoming service date visibility
-Vehicle number plate display
-Search and pagination support
-Bulk select and delete option
Functionality
-Displays all service job records
-Tracks service lifecycle and status
-Links job cards with customers and vehicles
-Enables staff assignment visibility
-Supports filtering and searching
-Helps manage service history
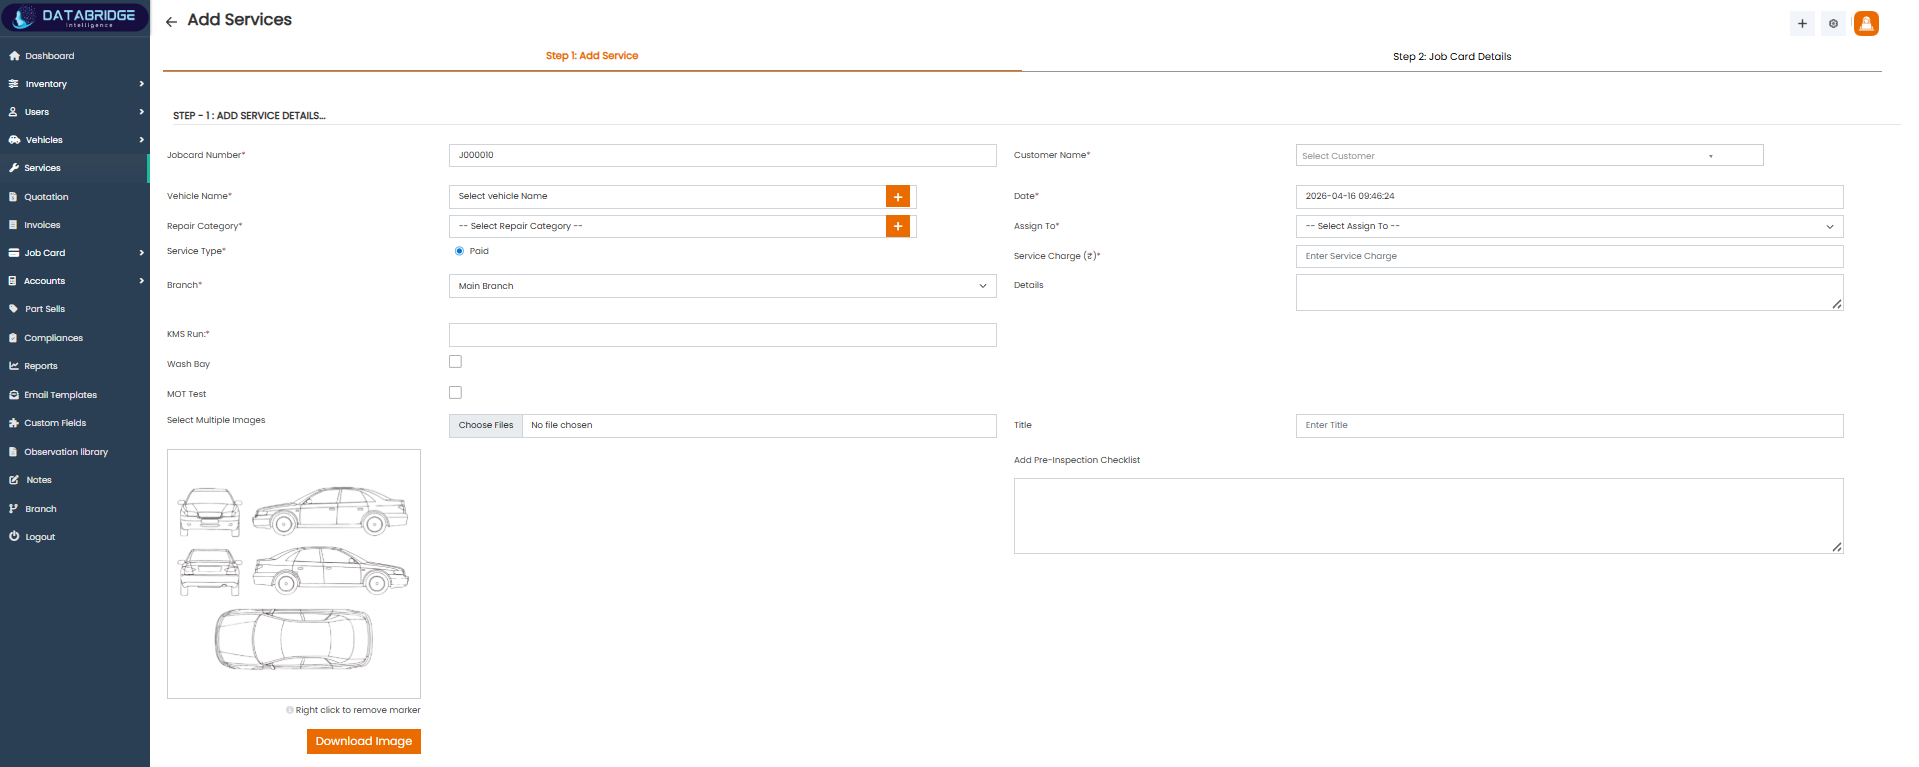
Add Services (Step 1: Add Service Details):
This screen is the first step in creating a service job. It captures all service-related details such as vehicle, repair category, service type, assigned staff, and additional service notes. It acts as the initial data entry point before generating a job card.
Features:
-Auto-generated Jobcard number
-Vehicle selection dropdown
-Repair category selection with add option
-Service type selection (Paid/Free)
-Branch selection
-Customer selection
-Assign staff option
-Service charge input
-KMS run input field
-Additional service options (Wash Bay, MOT Test)
-Image upload for vehicle inspection
-Pre-inspection checklist section
-Title and description fields
Functionality
-Creates a new service entry
-Links service with customer and vehicle
-Assigns service to staff members
-Records service charges and details
-Allows uploading inspection images
-Captures pre-service inspection data
-Moves workflow to Job Card creation
1
Services
2
Add Service Details

Job Card (Step 2: Job Card Details):
This screen represents the second step of the service workflow where job card details are finalized. It consolidates customer, vehicle, and service information into a structured job record used for execution and tracking of services.
Features:
-Job card number display
-In date/time and expected out date/time
-Garage information section
-Customer details (name, address, contact, email)
-Vehicle details (model, chassis number, engine number)
-Observation list with add option
-Submit button for final confirmation
Functionality:
-Finalizes job card creation
-Displays linked customer and vehicle data
-Tracks service timing and delivery
-Allows adding observation points
-Stores complete job execution details
-Maintains service workflow continuity
1
Services
2
Job Card Details
Quotation
The Quotation module is used to create, manage, and track service cost estimates for customers before actual work is performed. It allows users to define service details, select vehicles and customers, and calculate estimated charges including applicable taxes. This module ensures transparency by providing a clear breakdown of costs and helps customers make informed decisions. Additionally, it supports record-keeping, status tracking, and seamless conversion of quotations into service jobs or invoices.
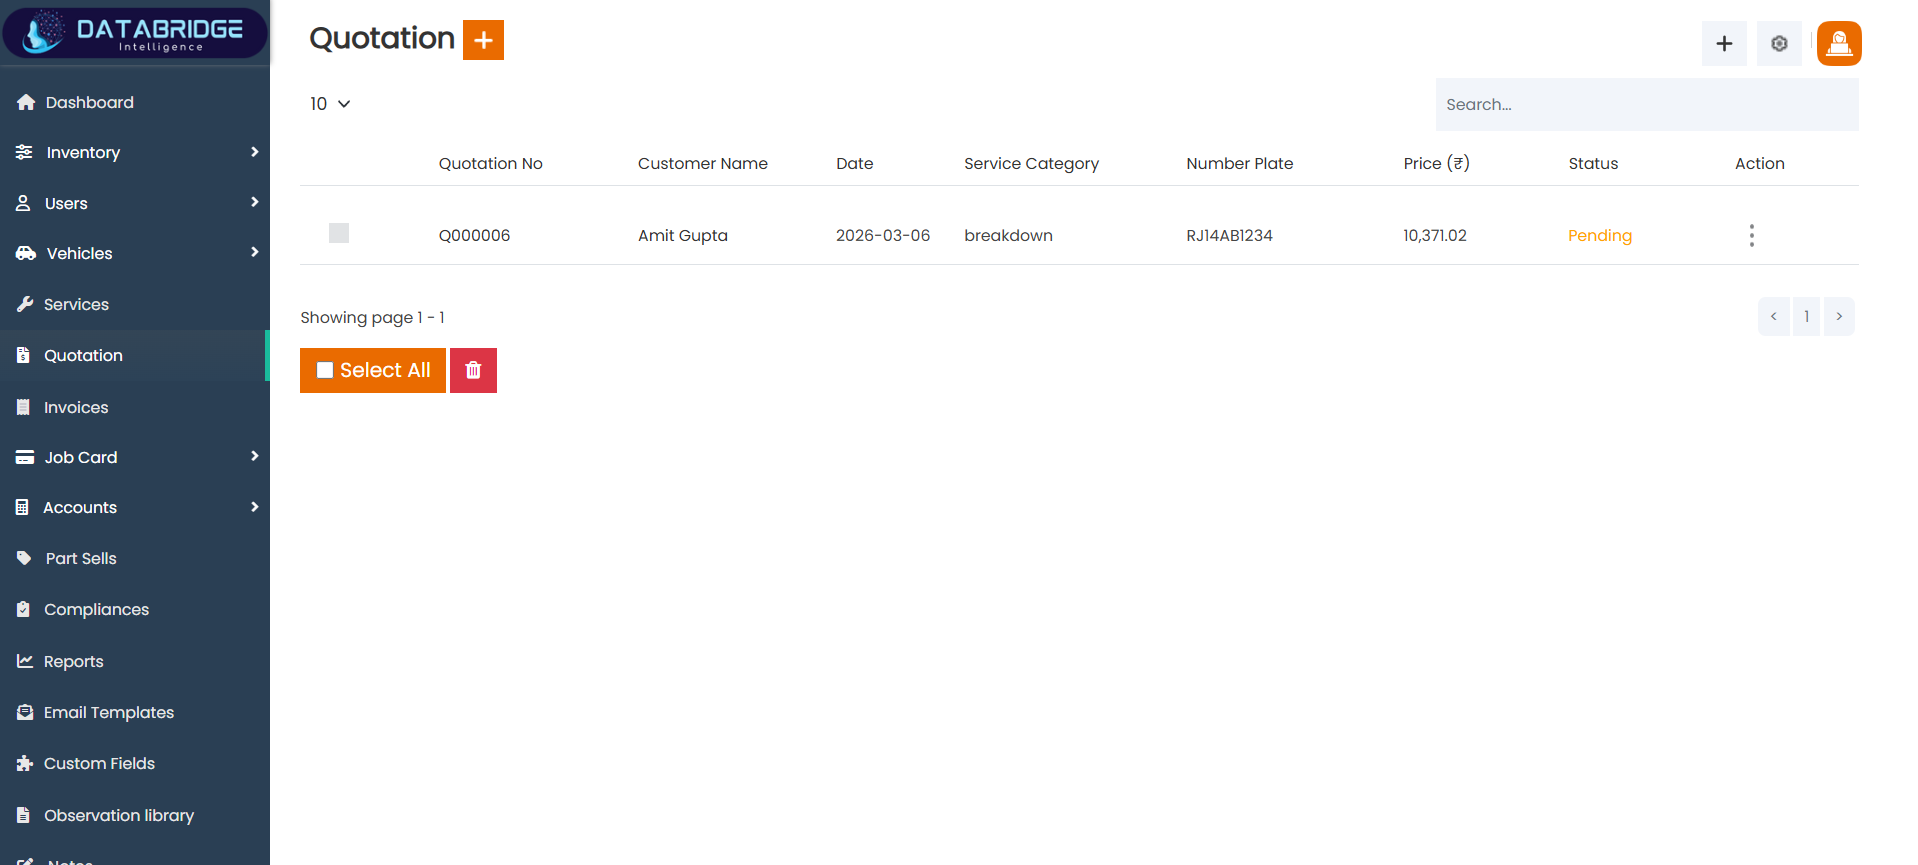
Quotation List:
The Quotation List screen displays all generated quotations within the system. It provides a clear overview of quotation details including customer information, service category, pricing, and current status. This screen helps users track pending and completed quotations efficiently.
Features:
-Tabular view of quotation records
-Unique quotation number display
-Customer name and date tracking
-Service category and vehicle number display
-Price visibility with currency
-Status indicator (e.g., Pending, Approved)
-Search and pagination functionality
-Bulk select and delete option
Functionality:
-Displays all quotation records
-Tracks quotation status and progress
-Links quotations with customers and vehicles
-Enables quick search and filtering
-Supports bulk operations
-Helps manage quotation history
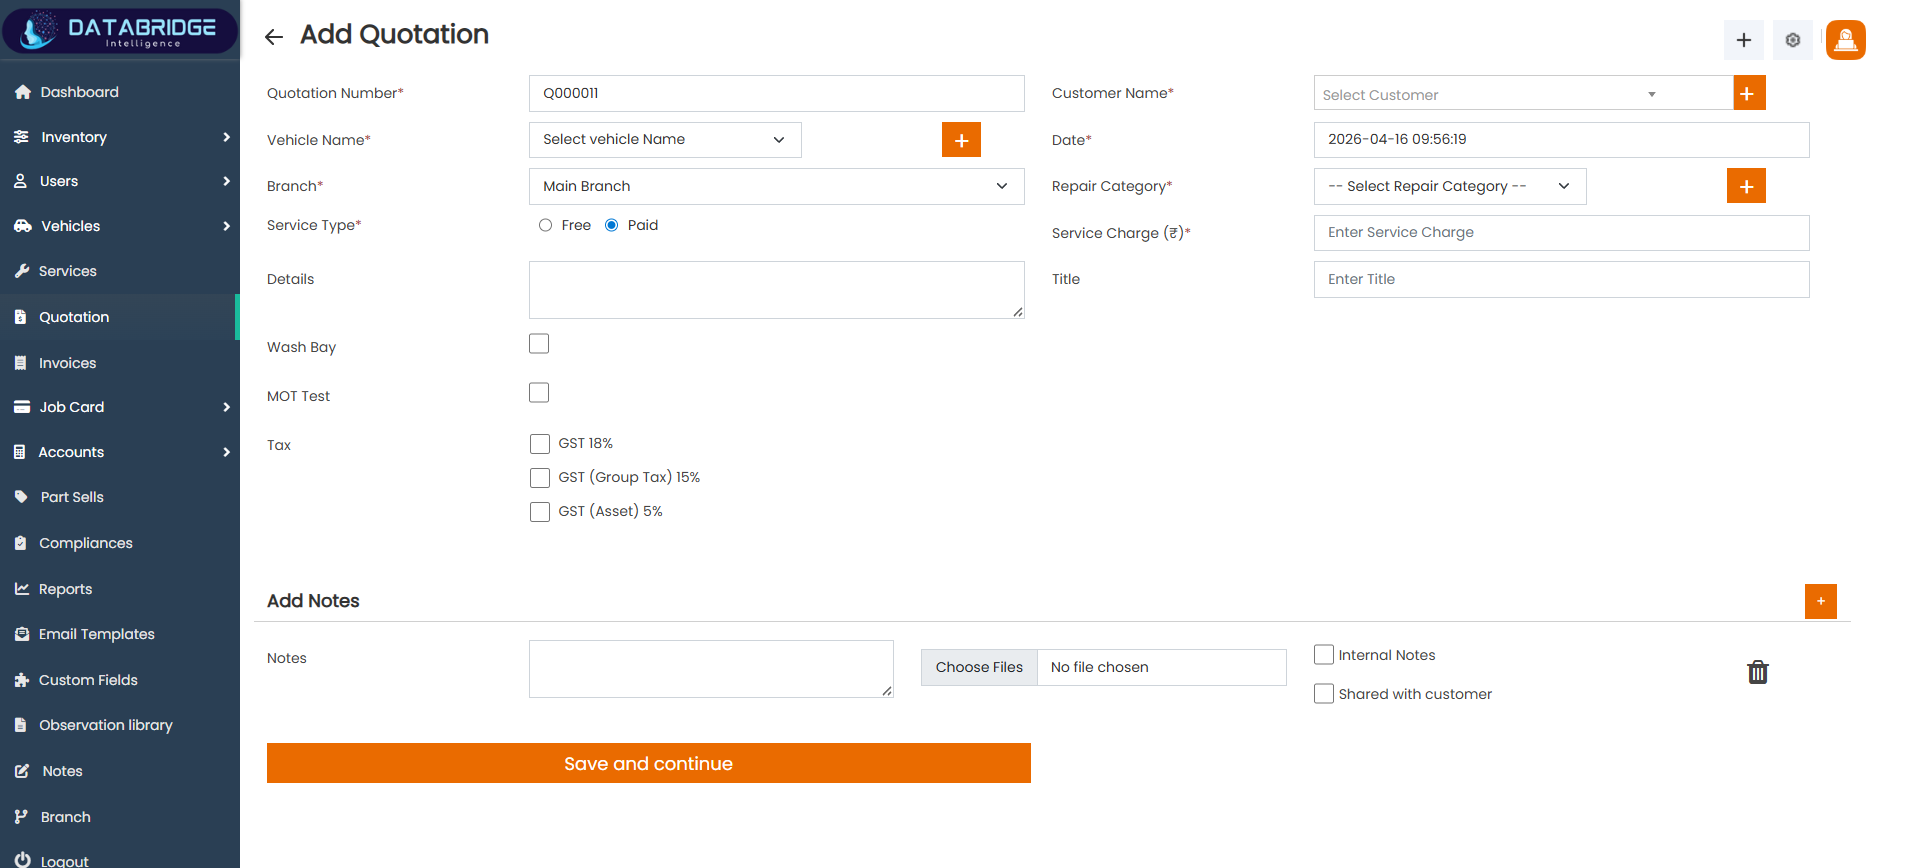
Add Quotation:
The Add Quotation screen allows users to create new service quotations by entering customer, vehicle, and service details. It includes pricing, tax options, and additional notes, enabling accurate cost estimation before service execution.
Features:
-Auto-generated quotation number
-Customer selection with add option
-Vehicle selection dropdown
-Branch selection
-Repair category selection with add option
-Service type selection (Free/Paid)
-Service charge input field
-Tax options (GST 18%, Group Tax, Asset Tax)
-Title and description fields
-Additional service options (Wash Bay, MOT Test)
-Notes section with file upload
-Internal and shared notes options
-“Save and Continue” workflow button
Functionality:
-Creates new quotations
-Calculates service cost with taxes
-Links quotation with customer and vehicle
-Stores service details and notes
-Supports document attachment
-Enables workflow continuation for further processing
-Maintains quotation records for future reference
1
Quotation
2
Add Quotation
Invoice
The Invoice module is used to generate, manage, and track billing details for services and product sales within the system. It provides a clear breakdown of charges, including total amount, paid amount, and pending dues for each customer. This module ensures accurate financial record-keeping and helps in monitoring payment statuses such as paid, partially paid, or pending. Additionally, it supports documentation, note management, and streamlines the overall billing and payment process for better financial control.
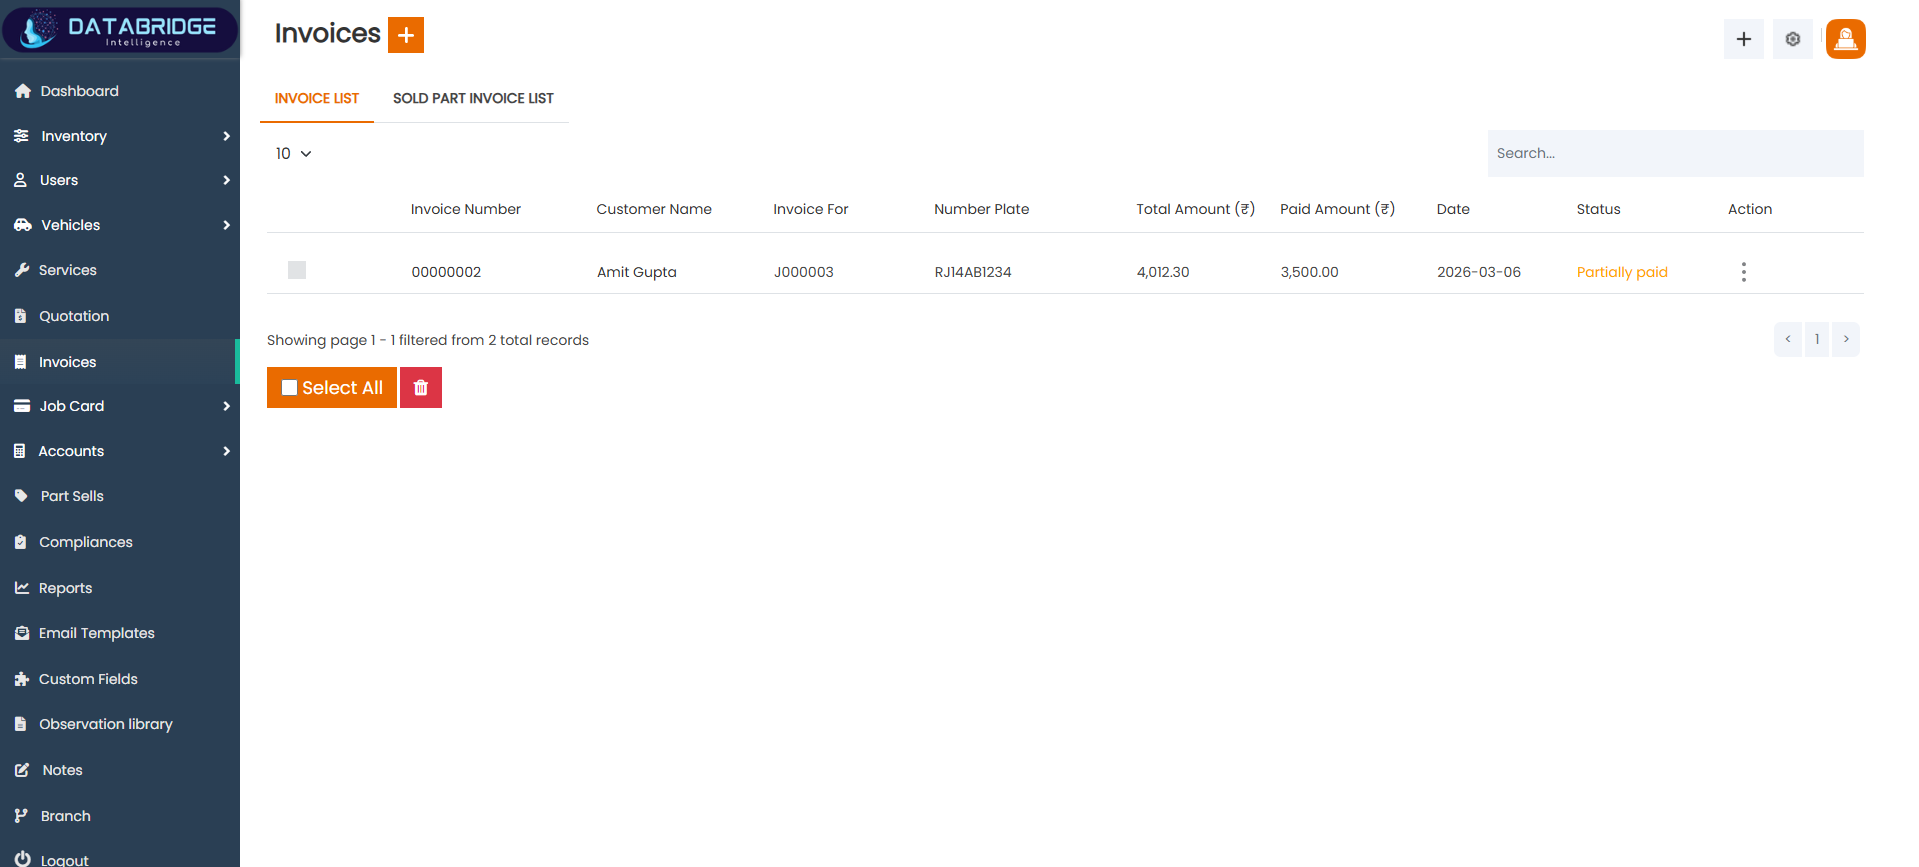
Invoice List:
The Invoice List screen provides a comprehensive overview of all generated invoices within the system. It allows users to track billing details such as invoice number, customer information, related job/service, payment status, and total amounts. This screen helps in managing financial records efficiently and monitoring pending or completed payments.
Features:
-Displays list of invoices with key details like Invoice Number, Customer Name, Job Reference, and Amounts
-Shows payment status such as Paid, Partially Paid, or Pending
-Includes search functionality for quick invoice lookup
-Supports pagination and record count selection
-Bulk selection option with delete functionality
-Action menu for edit/view/delete operations
Functionality:
-Users can view all invoices in a tabular format
-Users can search invoices using keywords
-Users can perform bulk actions like delete
-Users can navigate through pages using pagination controls
-Users can access detailed actions via the options menu
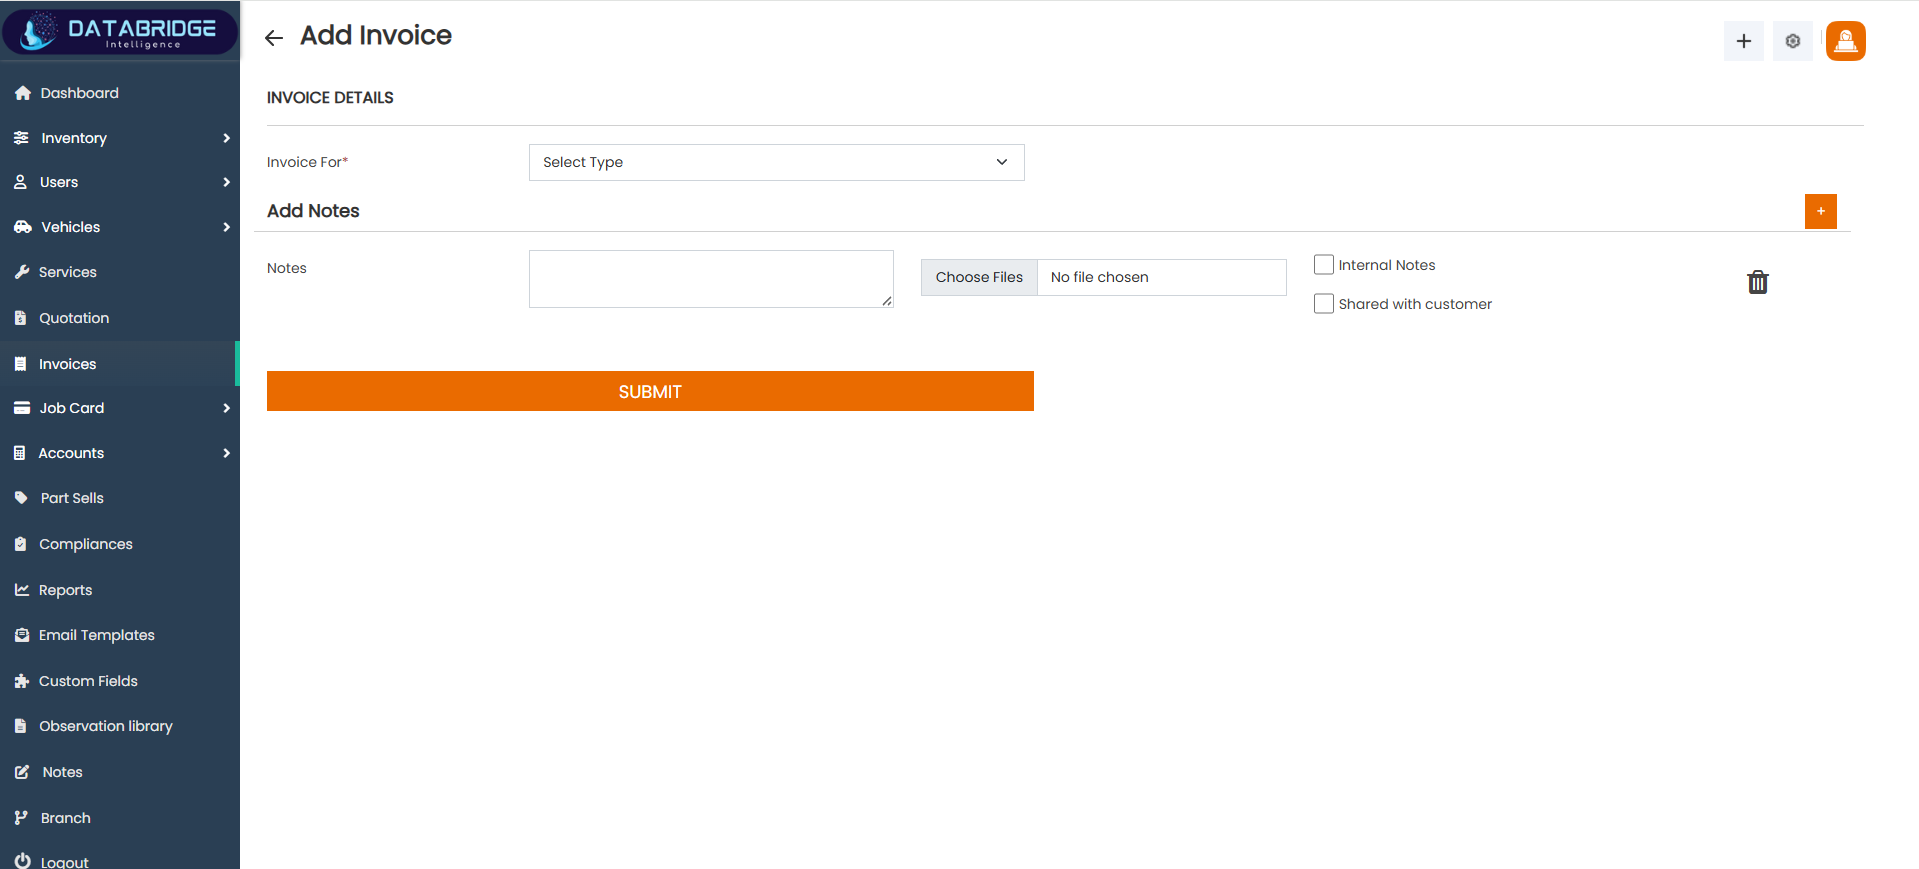
Add Invoice:
The Add Invoice screen is used to create new invoices for services or product sales. It allows users to define the type of invoice, add notes, and attach supporting documents. This screen ensures proper billing generation and documentation for customer transactions.
Features:
-Dropdown to select invoice type (service/parts/etc.)
-Notes section to add additional invoice details
-File upload option for attachments
-Internal notes and customer-visible notes options
-Simple and clean form interface for quick invoice creation
Functionality:
-Users can select the type of invoice to generate
-Users can add detailed notes related to billing
-Users can upload supporting files or documents
-Users can mark notes as internal or shareable with the customer
-Users can submit the form to create a new invoice in the system
1
Invoice
2
Add Invoice
Job Card
The Job Card module is used to create, manage, and track service jobs for vehicles within the system. It captures complete details including customer information, vehicle data, assigned technicians, and service type, ensuring a structured workflow for every job. This module helps monitor the status of each job card such as open, in progress, completed, or upcoming, improving service tracking and efficiency. Additionally, it supports observations, scheduling, and coordination between teams, making it essential for smooth workshop operations and service management.
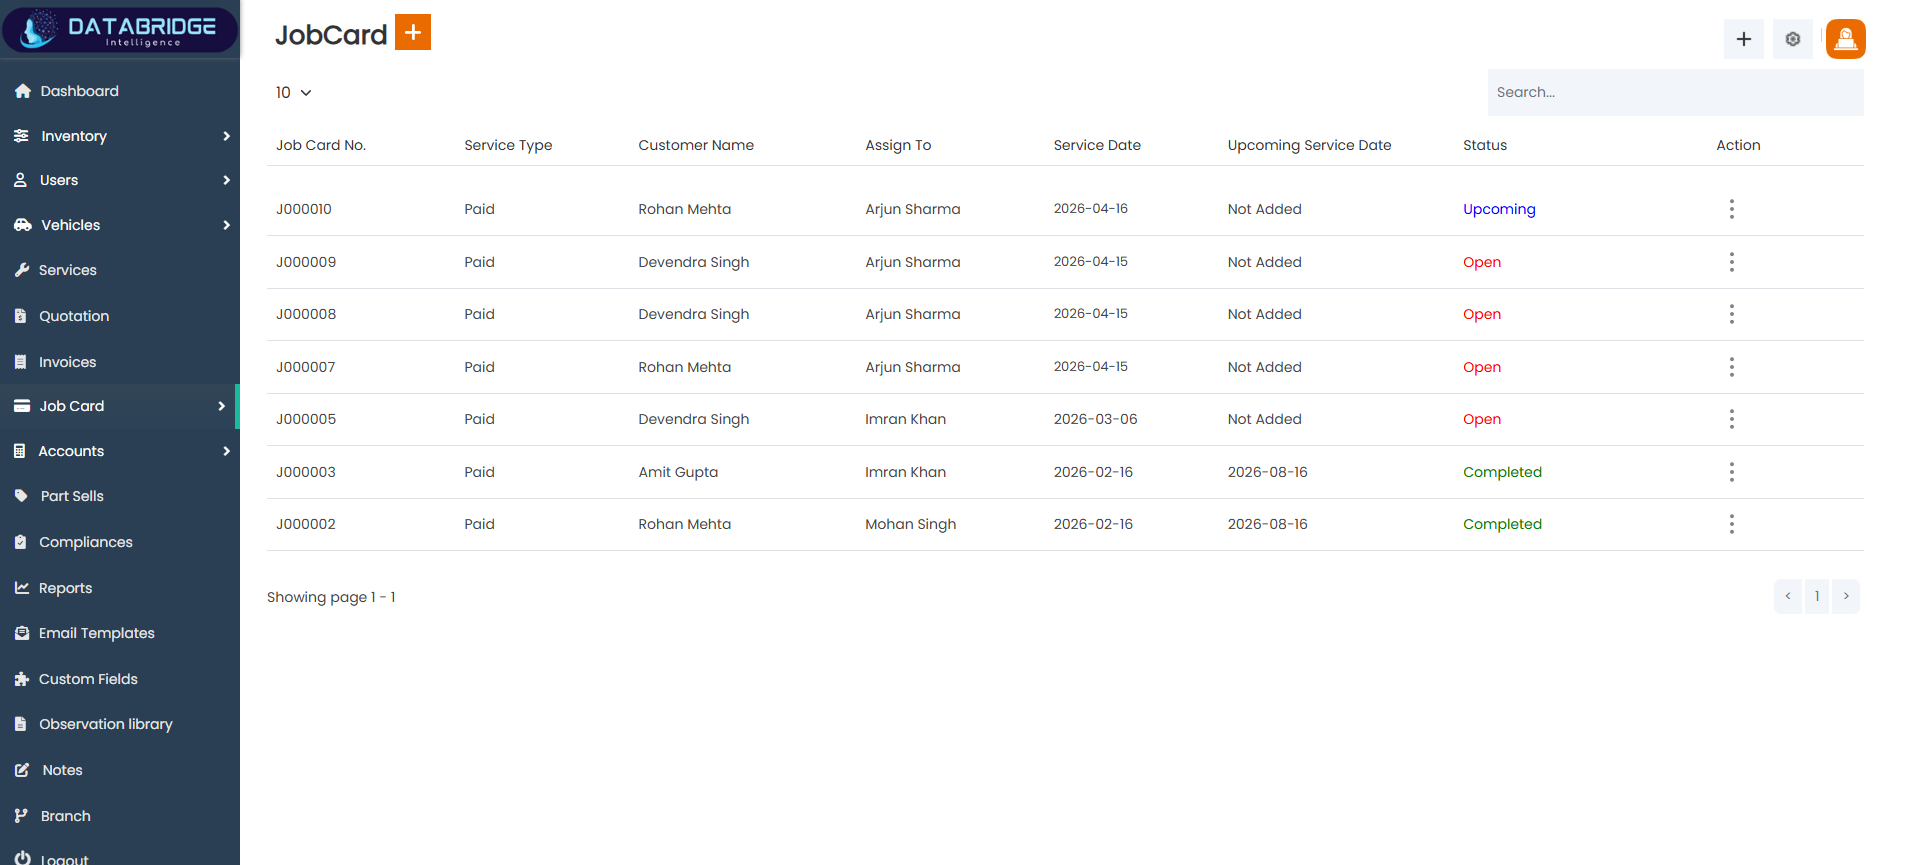
Job Card List:
The Job Card List screen provides a centralized view of all service job cards created in the system. It helps users monitor ongoing, completed, and upcoming service jobs along with assigned staff and service dates. This screen acts as a tracking dashboard for workshop operations and service workflow management.
Features:
-Displays job card details such as Job Card Number, Service Type, Customer Name, and Assigned Staff
-Shows service date and upcoming service schedule
-Status indicators (Open, Completed, Upcoming) with visual distinction
-Search functionality for quick job lookup
-Pagination and record display controls
-Action menu for managing individual job cards
Functionality:
-Users can view all job cards in a structured table format
-Users can track job status and progress easily
-Users can search and filter job records
-Users can navigate between pages using pagination
-Users can access edit/view actions through the action menu
1
Job Card
2
Job Card

Add Service (Step 1: Add Service Details):
This screen is the first step in creating a job card, where users enter service-related details for a vehicle. It captures essential information such as job card number, vehicle, repair category, service type, and assigned technician. It ensures proper service registration before proceeding to detailed job card creation.
Features:
-Auto-generated or manual Job Card Number entry
-Vehicle selection with add-new option
-Repair category selection with quick add feature
-Service type selection (Free/Paid)
-Assignment of service staff
-Input fields for service charges and additional details
-Options for KMS run, wash bay, and MOT test
-Image upload and visual marking tool for vehicle inspection
-Pre-inspection checklist section
Functionality:
-Users can input and manage service-related information
-Users can assign technicians for the job
-Users can upload images and mark vehicle condition
-Users can define service charges and notes
-Users can proceed to the next step for job card details
1
Job Card
2
Job Card
3
Add Service Details
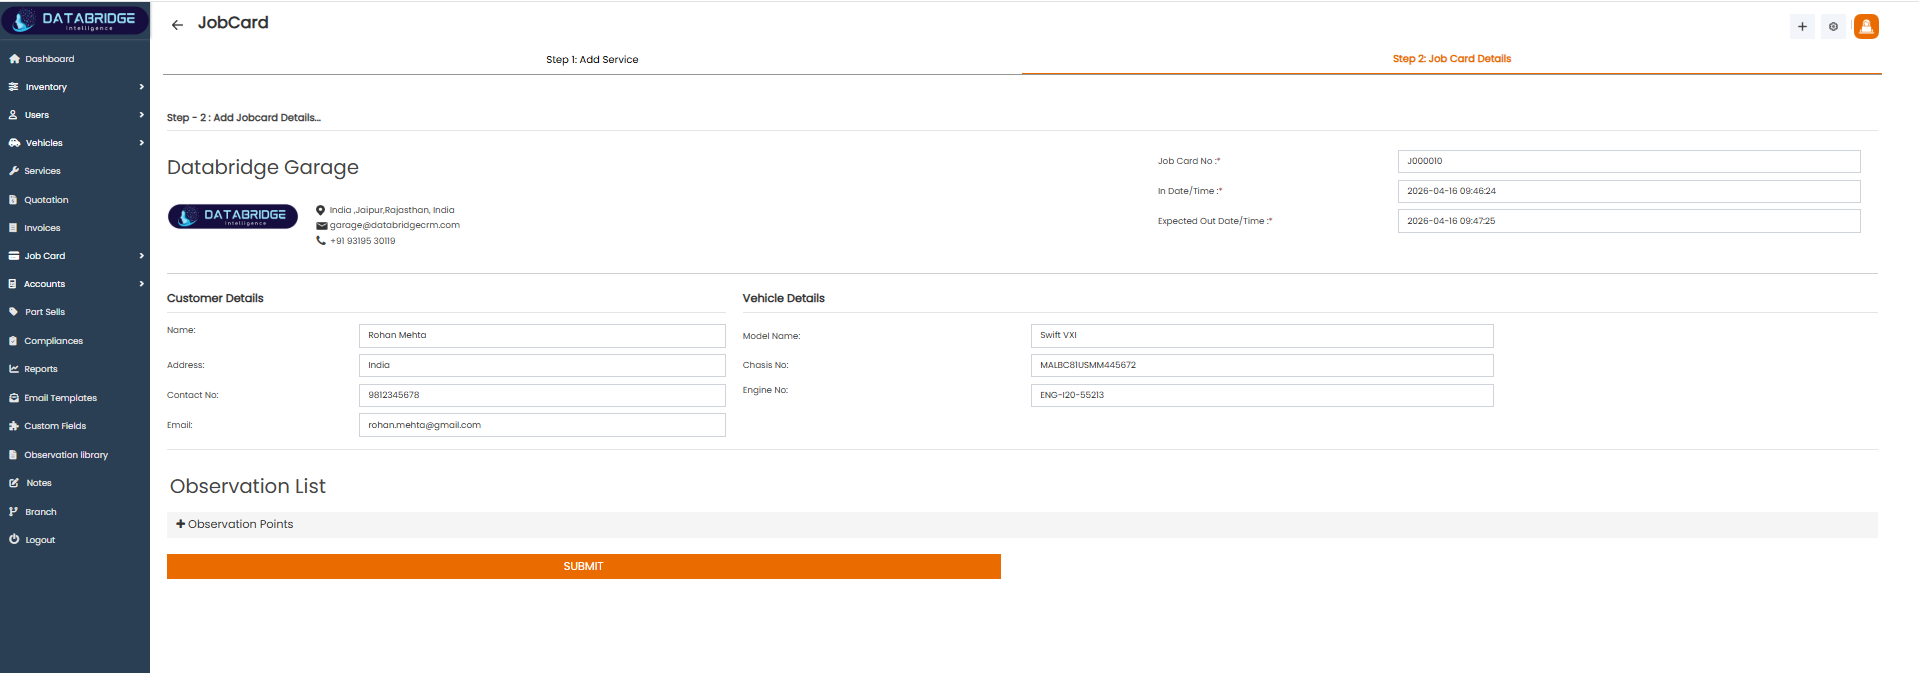
Add Job Card Details:
This screen represents the second step of job card creation, where detailed information about the customer and vehicle is displayed and verified. It allows users to review all entered data and add observation points before final submission of the job card.
Features:
-Displays workshop/garage details
-Shows job card number, in-time, and expected delivery time
-Customer details section (Name, Address, Contact, Email)
-Vehicle details section (Model, Chassis No, Engine No)
-Observation list for adding inspection points
-Simple and clear submission interface
Functionality:
-Users can review all job-related details before final submission
-Users can add observation points for inspection or service notes
-Users can verify customer and vehicle information
-Users can submit the job card to complete the process
1
Job Card
2
Job Card
3
Add Job Card Details
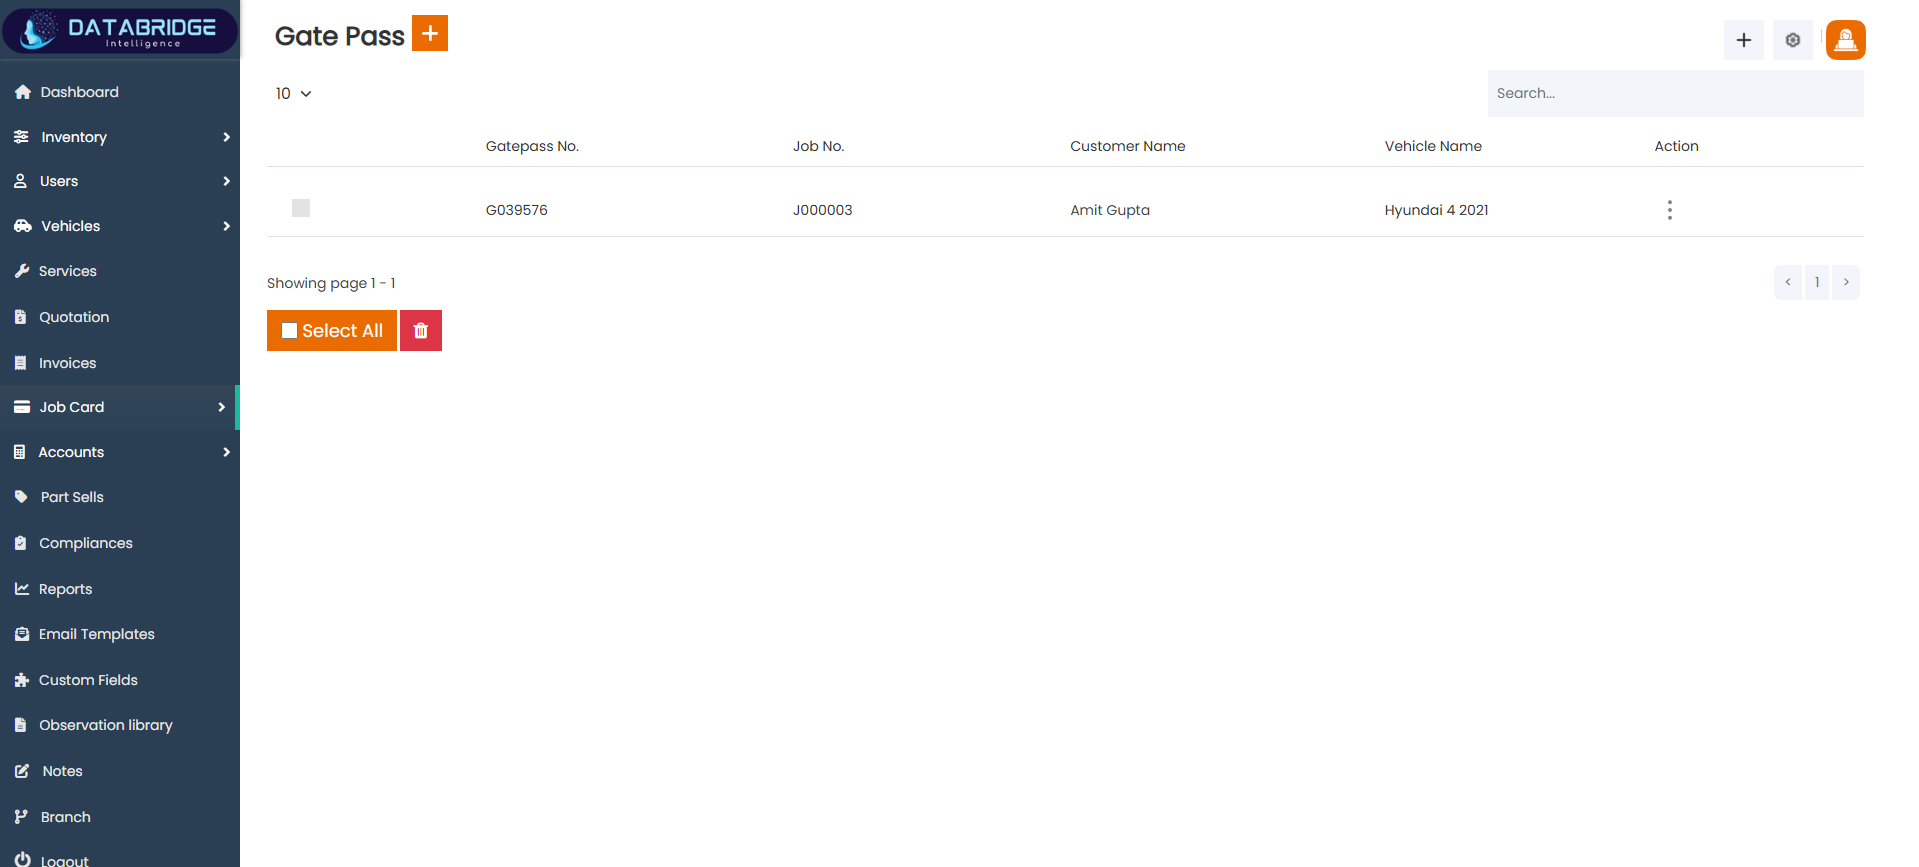
Gate Pass List:
The Gate Pass List screen provides a record of all gate passes generated for vehicle delivery or exit from the workshop. It helps track which vehicles have been released after service completion along with associated job and customer details. This screen ensures proper monitoring and control over vehicle movement.
Features:
-Displays Gate Pass Number, Job Card Number, Customer Name, and Vehicle Name
-Search functionality for quick record lookup
-Pagination and record count selection
-Bulk selection with delete option
-Action menu for managing individual gate passes
Functionality:
-Users can view all generated gate passes in a tabular format
-Users can search for specific gate passes
-Users can perform bulk delete actions
-Users can navigate through records using pagination
-Users can access detailed actions via the options menu
1
Job Card
2
Gate Pass
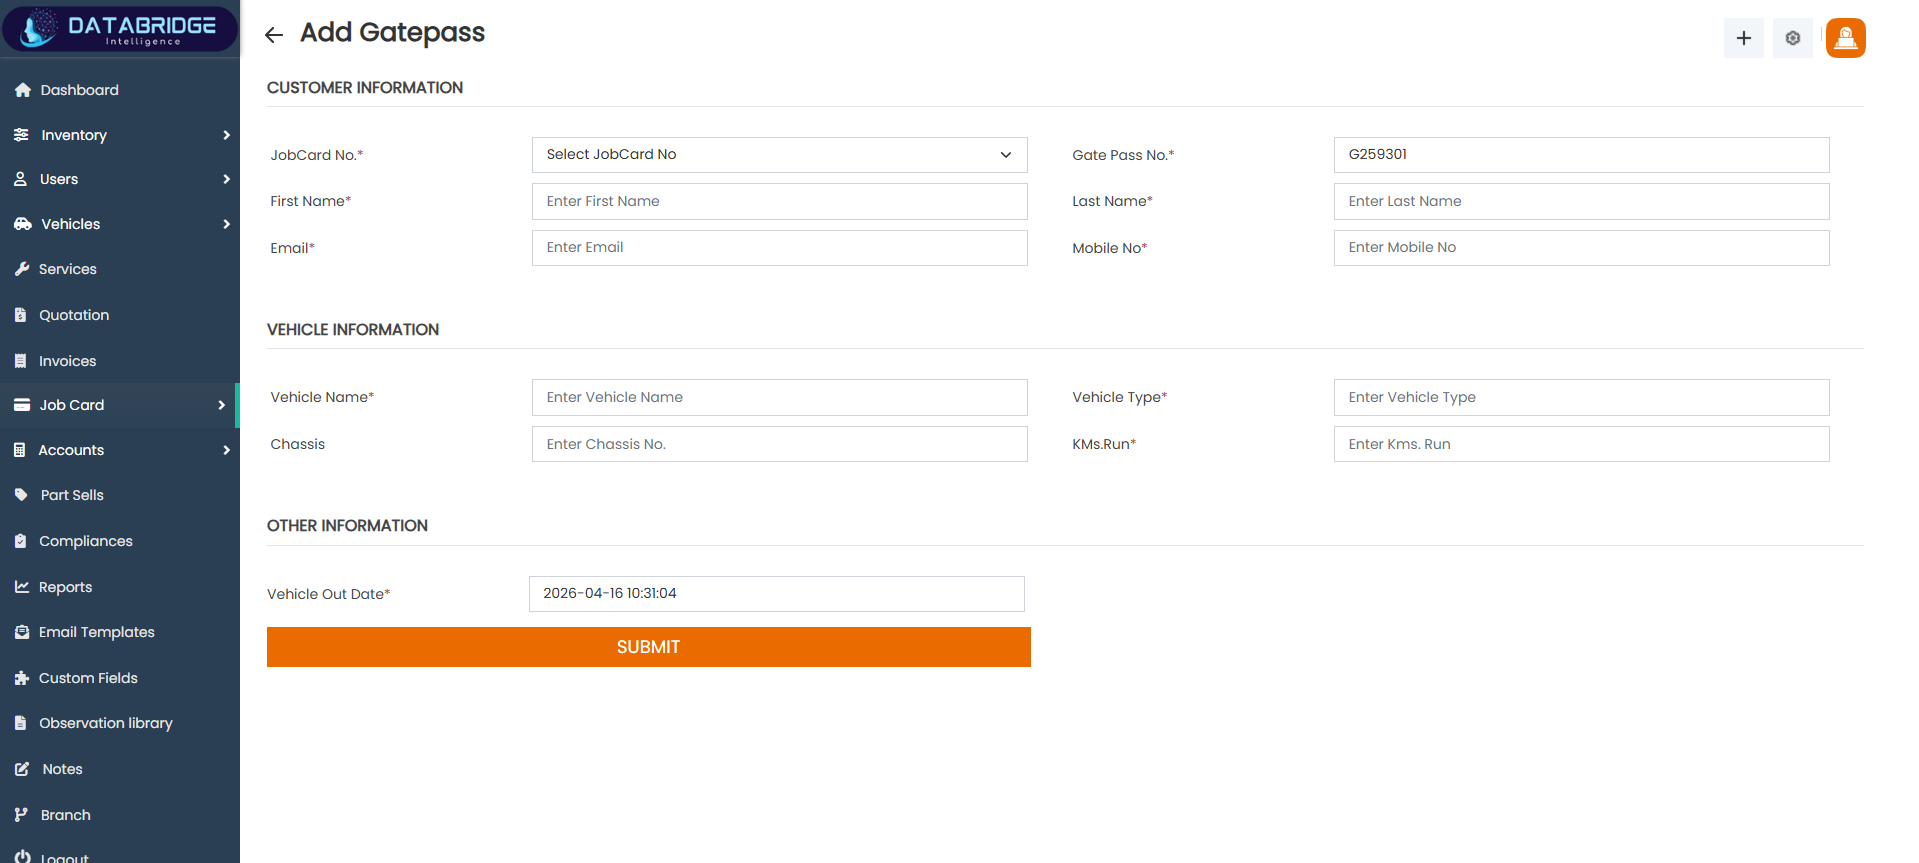
Add Gate Pass:
The Add Gate Pass screen is used to generate a new gate pass for vehicle exit after service completion. It captures customer details, job card reference, vehicle information, and exit timing to ensure proper authorization and documentation of vehicle delivery.
Features:
-Job Card selection to link gate pass with service record
-Auto/manual Gate Pass Number entry
-Customer information fields (Name, Email, Mobile Number)
-Vehicle information fields (Vehicle Name, Type, Chassis, KMS Run)
-Vehicle out date and time capture
-Clean and structured form layout
Functionality:
-Users can create a gate pass linked to a specific job card
-Users can enter and verify customer and vehicle details
-Users can record vehicle exit date and time
-Users can submit the form to generate a gate pass
-System maintains records for tracking vehicle delivery history
1
Job Card
2
Gate Pass
3
Add Gate Pass
Accounts
The Accounts module is responsible for managing all financial records and transactions within the system. It provides a centralized platform to track income, expenses, taxes, and overall financial activities of the business. This module ensures proper organization and transparency in financial data handling.It helps users maintain accurate accounting records by integrating with invoices, payments, and expense entries. The system allows easy monitoring of cash flow, outstanding balances, and financial performance.
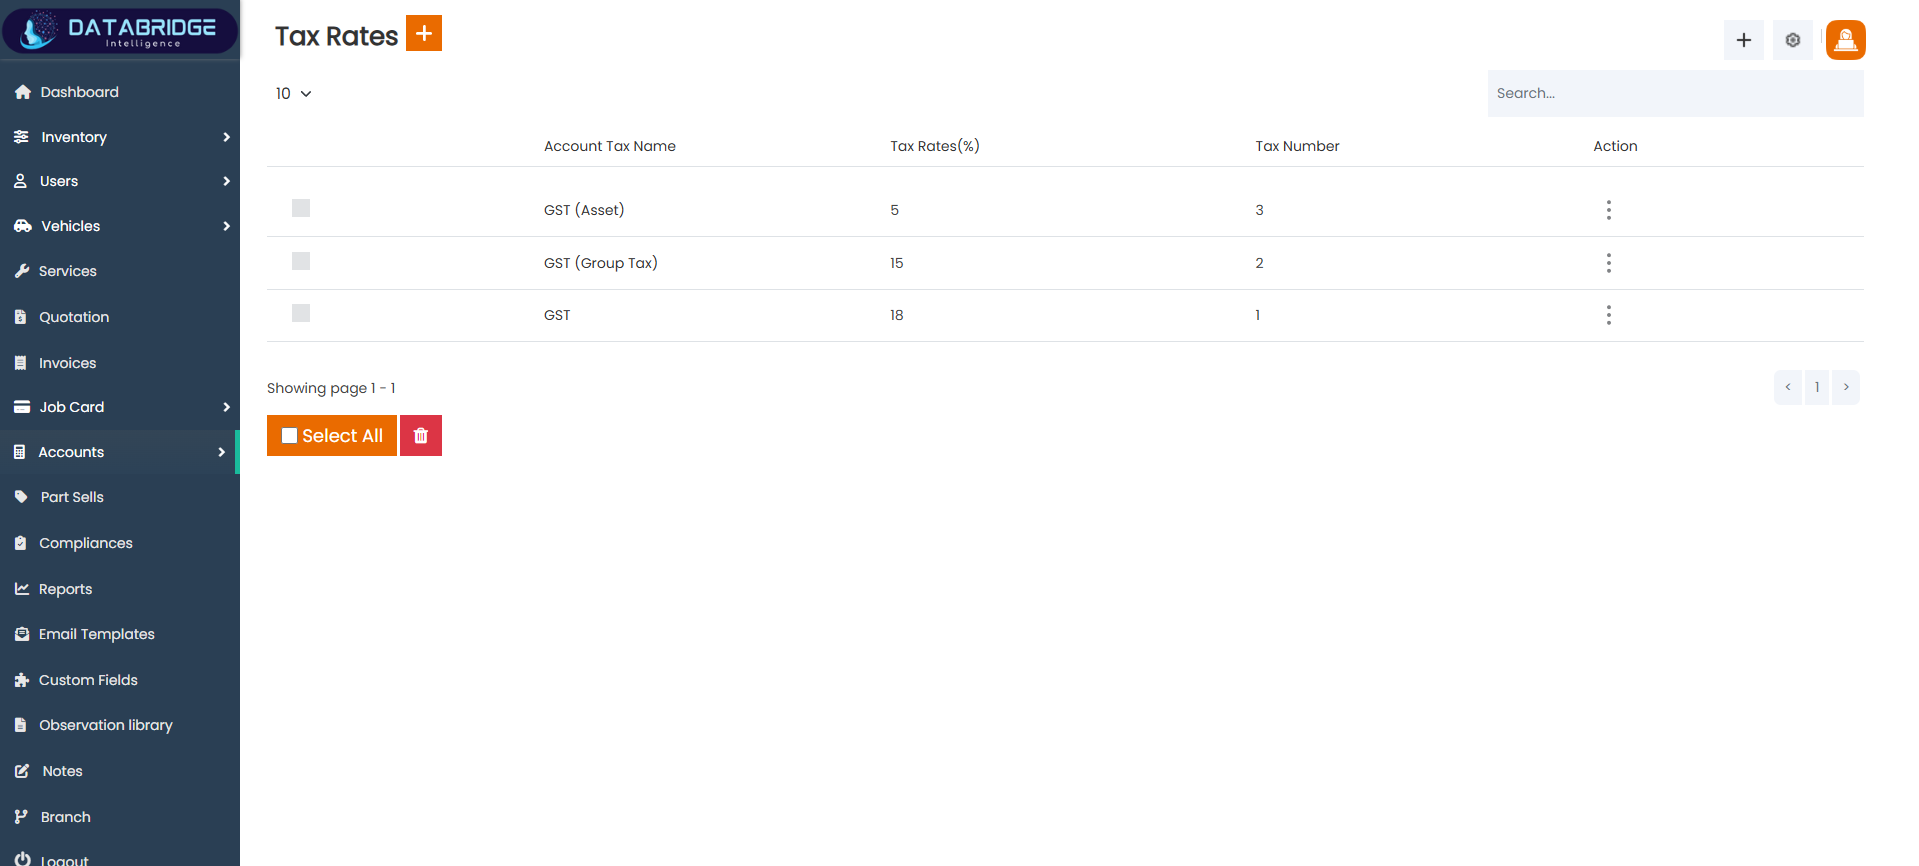
Tax Rates:
The Tax Rates screen is used to manage different tax configurations applicable within the system. It allows administrators to define and maintain tax percentages such as GST, group taxes, or asset-specific taxes. This ensures accurate tax calculation across quotations, invoices, and financial transactions.
Features:
-Displays tax name, tax rate (%), and tax number
-Search and filter functionality
-Bulk selection and delete option
-Action menu for edit/delete operations
-Structured tabular layout for easy management
Functionality:
-Users can view all configured tax rates
-Users can add, update, or delete tax entries
-Users can apply tax rates in invoices and quotations
-System ensures accurate tax calculations during billing
1
Account
2
Tax Rates
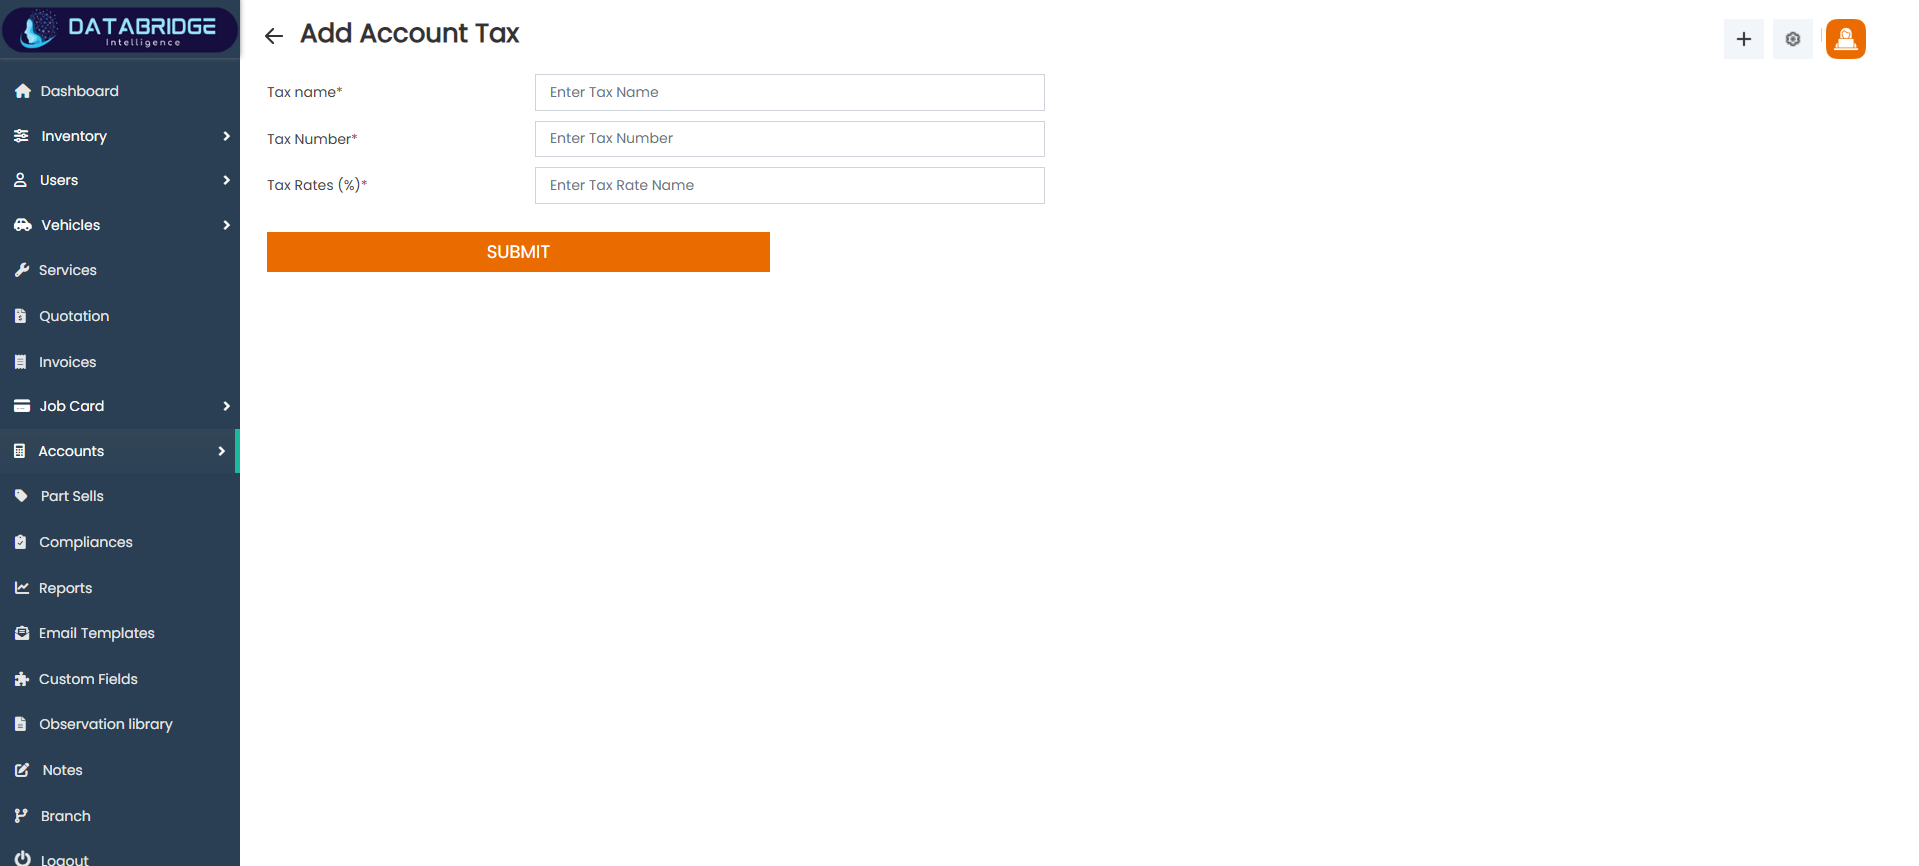
Add Account Tax:
The Add Account Tax screen allows users to create new tax entries by defining tax name, tax number, and percentage. It helps maintain a centralized tax configuration system that can be reused across different modules.
Features:
-Input fields for Tax Name, Tax Number, and Tax Rate (%)
-Simple and clean form layout
-Validation for required fields
-Submit button for saving tax details
Functionality:
-Users can create new tax configurations
-System stores tax details for future transactions
-Tax values are automatically used in billing modules
-Ensures consistency in tax application
1
Account
2
Tax Rates
3
Add Account Tax

Payment Method:
The Payment Method screen is used to manage different payment options accepted by the business such as UPI, Card, and Cash. It provides flexibility in handling transactions and improves customer convenience during payments.
Features:
-Displays list of available payment methods
-Search and filter options
-Bulk select and delete functionality
-Action menu for managing payment methods
Functionality:
-Users can view all available payment types
-Users can add, edit, or delete payment methods
-Payment methods are used in invoices and income entries
-Ensures proper categorization of payment transactions
1
Account
2
List Payment Method
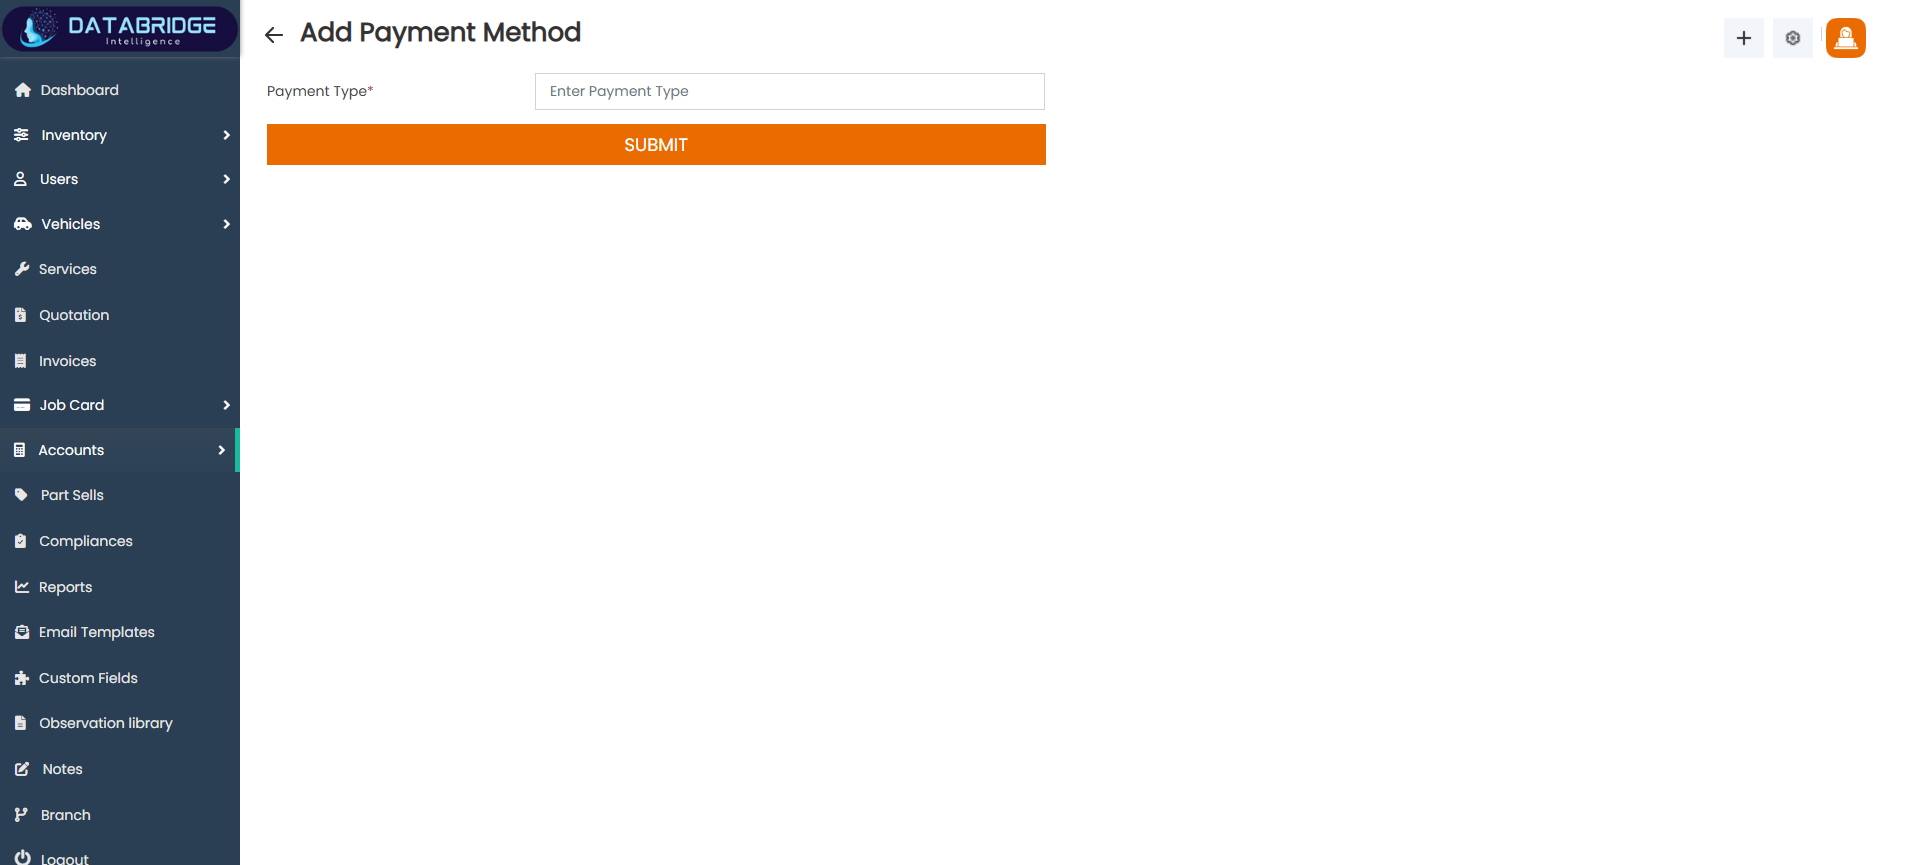
Add Payment Method:
The Add Payment Method screen allows users to define new payment types that can be used across the system. It ensures flexibility in handling different modes of payment as per business requirements.
Features:
-Input field for Payment Type
-Simple form design
-Validation for required input
-Submit button for saving
Functionality:
-Users can add new payment methods
-System updates payment options dynamically
-Newly added methods become available in billing and
income modules
1
Account
2
List Payment Method
3
Add Payment Method
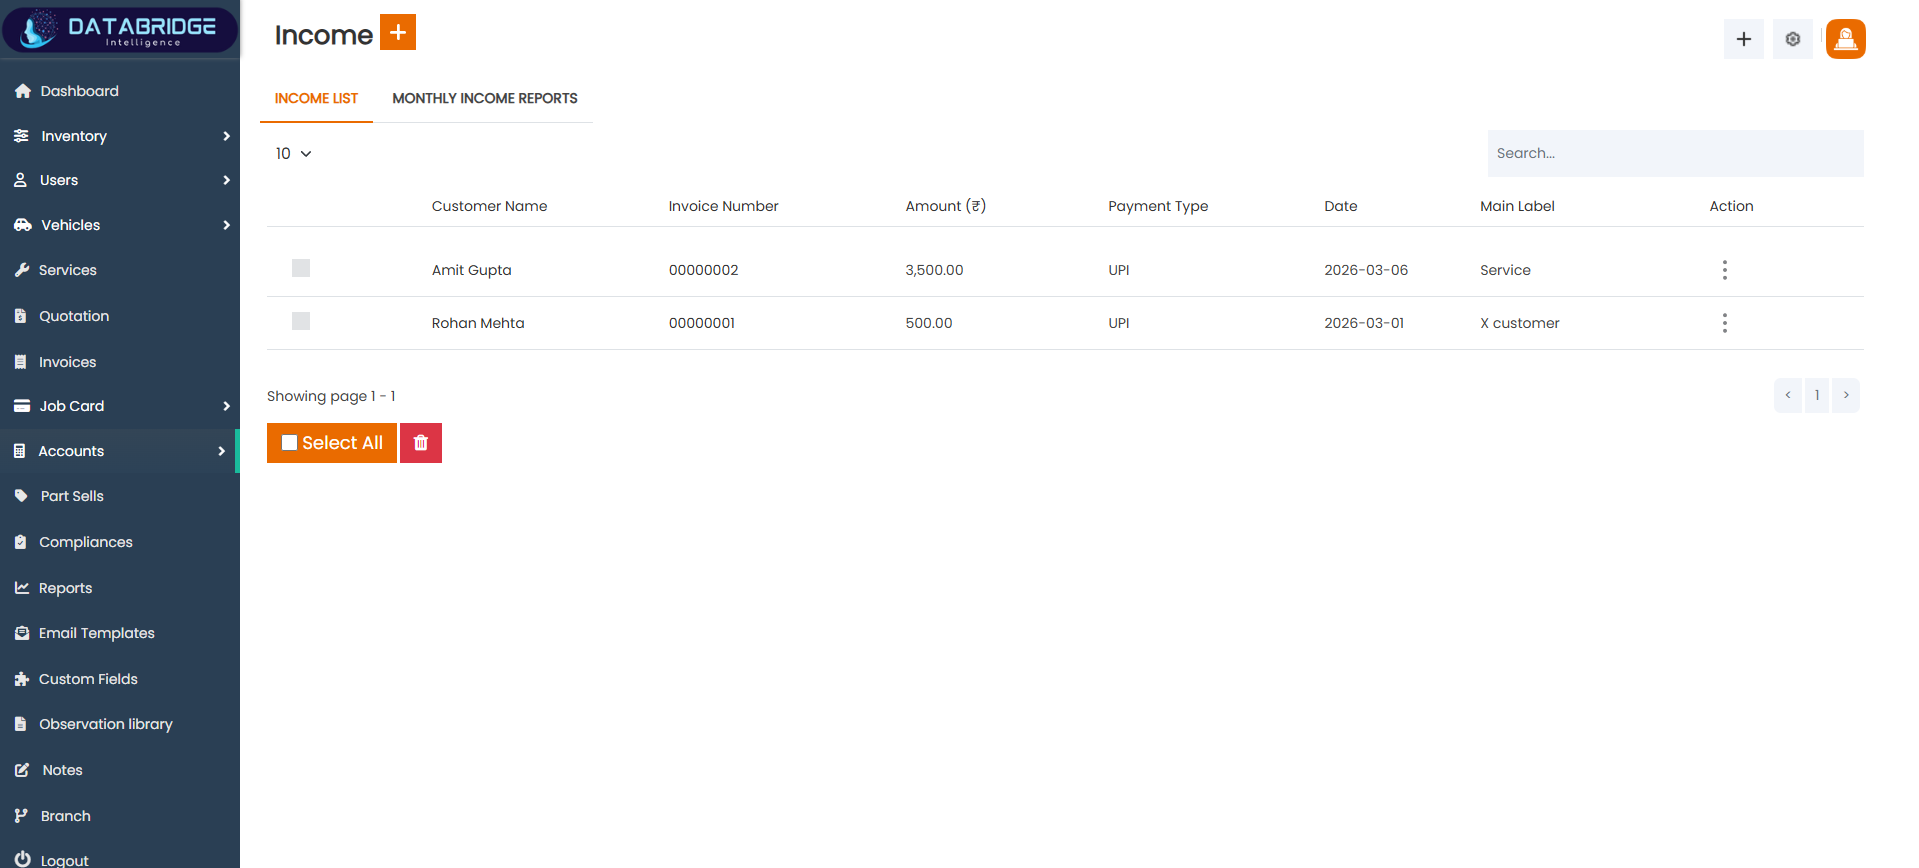
Income:
The Income screen provides a complete overview of all income transactions recorded in the system. It helps track payments received against invoices along with payment type, date, and customer details, enabling better financial management.
Features:
-Displays customer name, invoice number, amount, payment type, and date
-Tabs for income list and monthly income reports
-Search and filtering options
-Bulk selection and delete option
-Action menu for record management
Functionality:
-Users can view all income entries
-Users can track payments received from customers
-Users can filter income based on date or payment type
-System generates reports for financial analysis
1
Account
2
Income
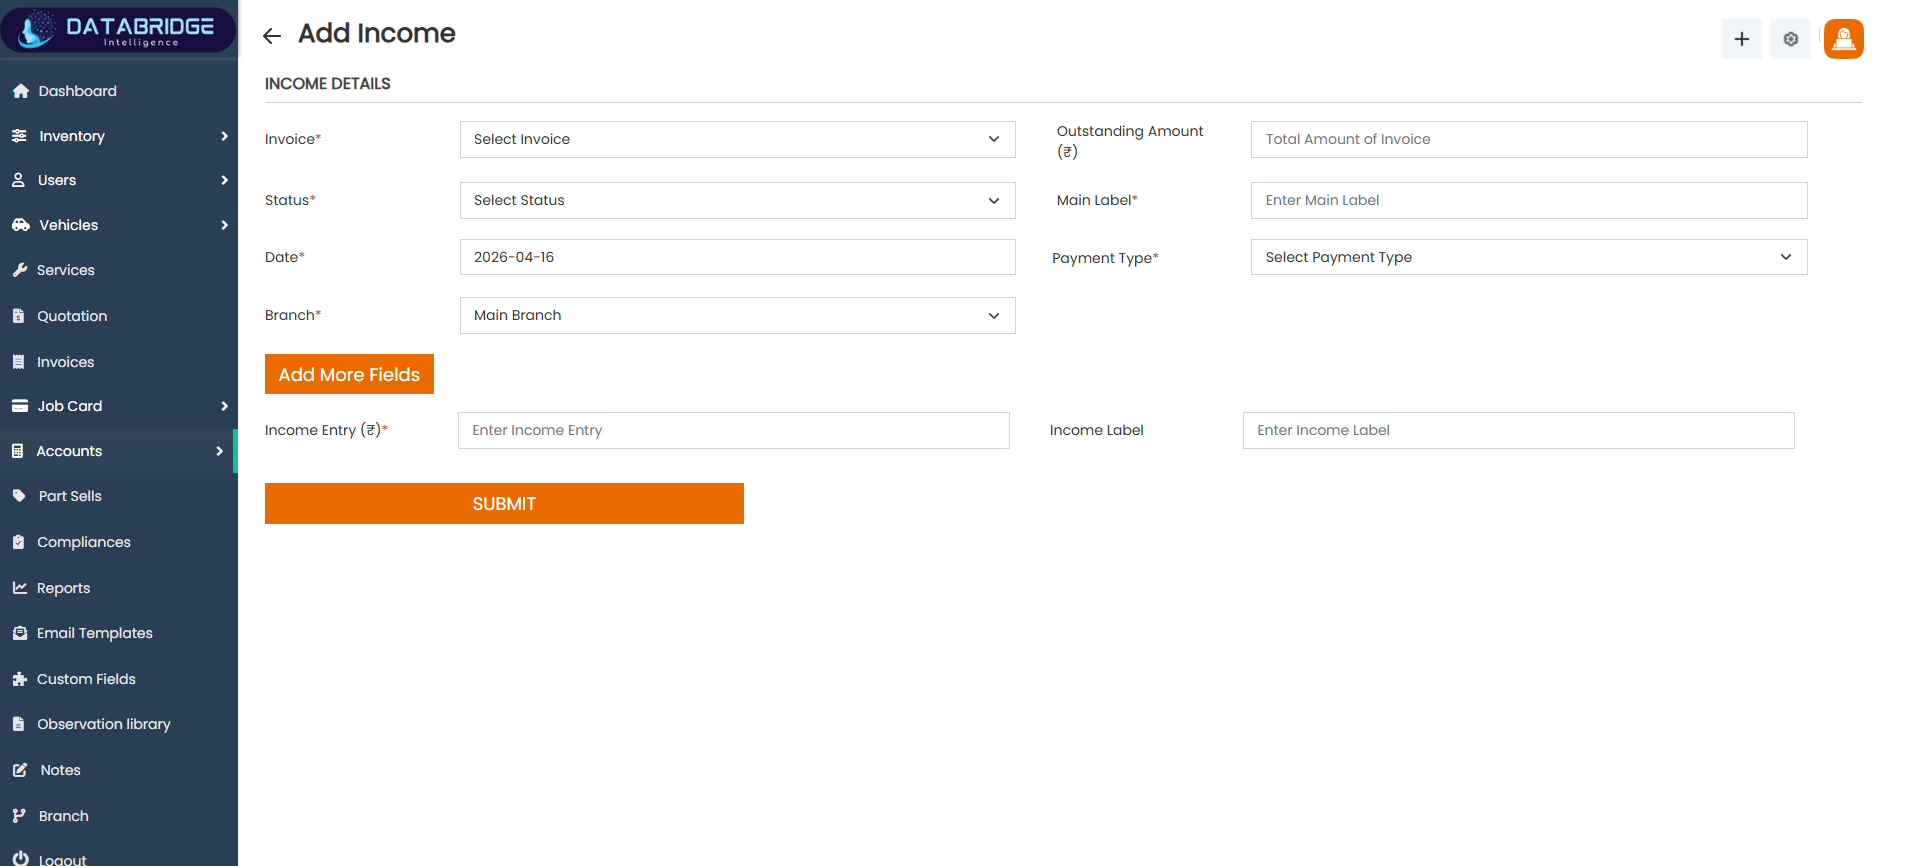
Add Income:
The Add Income screen is used to record incoming payments linked to invoices. It captures details such as invoice reference, payment type, amount, and labels, ensuring accurate financial tracking.
Features:
-Invoice selection dropdown
-Status and date selection
-Payment type selection
-Fields for income amount and labels
-Option to add additional fields
-Submit button for saving data
Functionality:
-Users can record new income entries
-System links income to specific invoices
-Users can track outstanding and paid amounts
-Data is stored for reporting and accounting purposes
1
Account
2
Income
3
Add Income
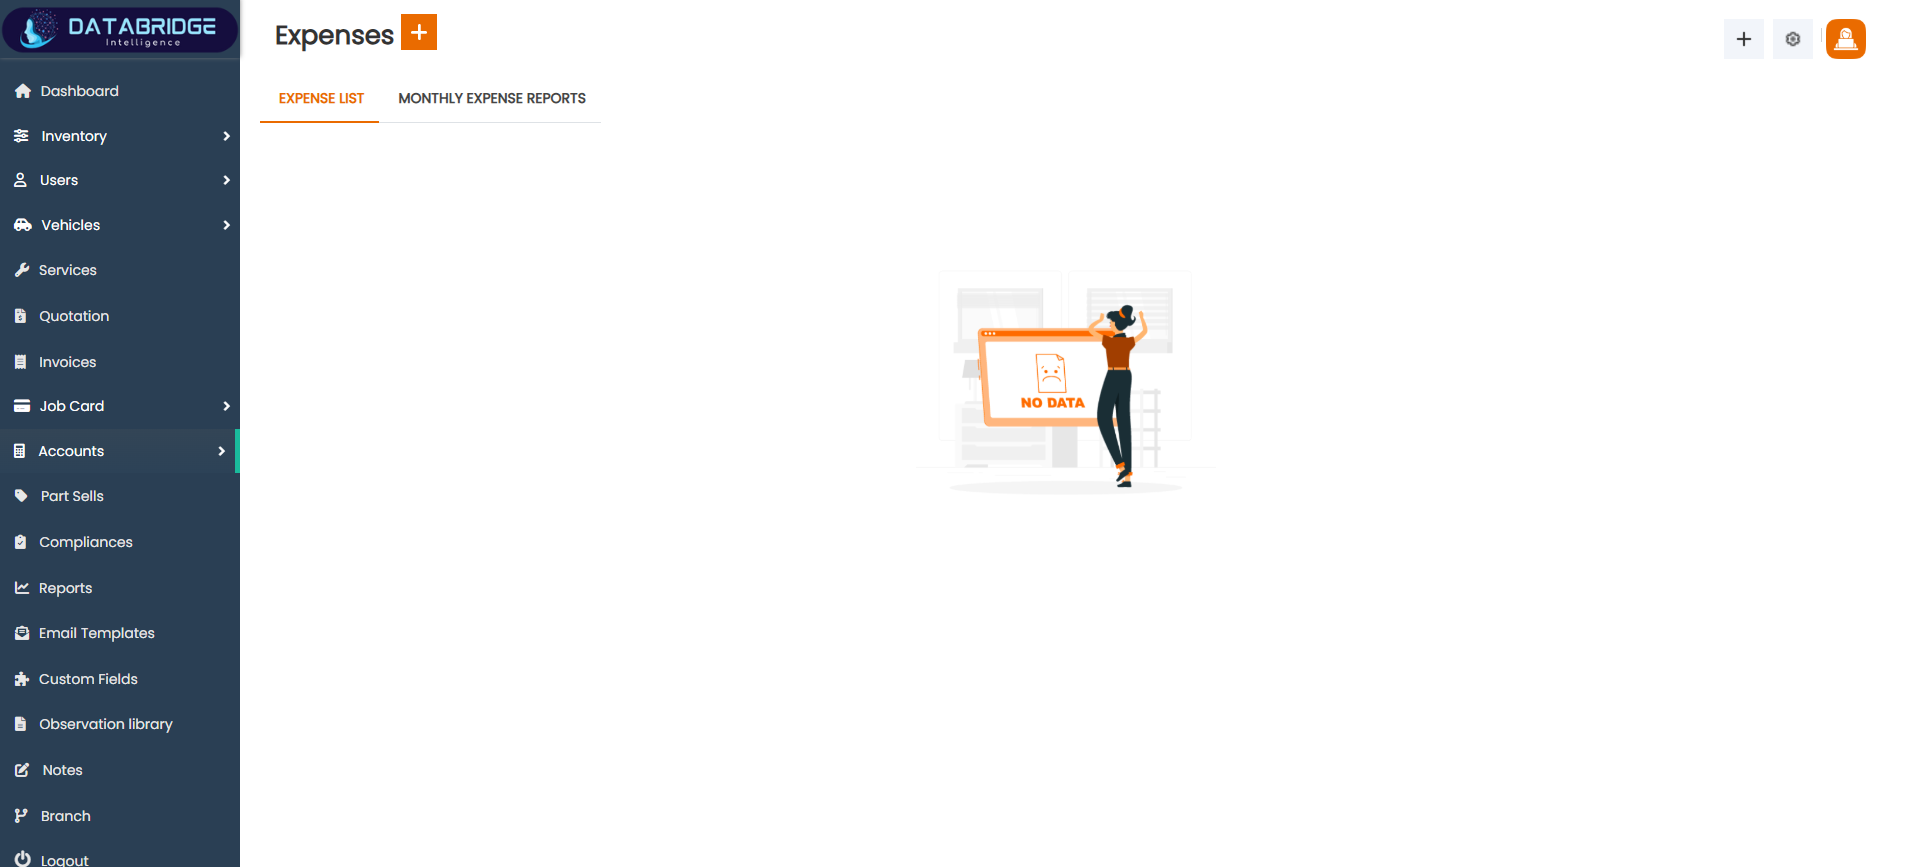
Expenses:
The Expenses screen is used to manage and track all outgoing financial transactions. It helps businesses monitor operational costs and maintain proper expense records for financial planning.
Features:
-Tabs for expense list and monthly expense reports
-Empty state display when no data is available
-Search and filtering options (when data exists)
-Clean and user-friendly interface
Functionality:
-Users can view all expense records
-Users can track spending patterns
-System supports reporting for expense analysis
-Helps in financial decision-making
1
Account
2
Expenses
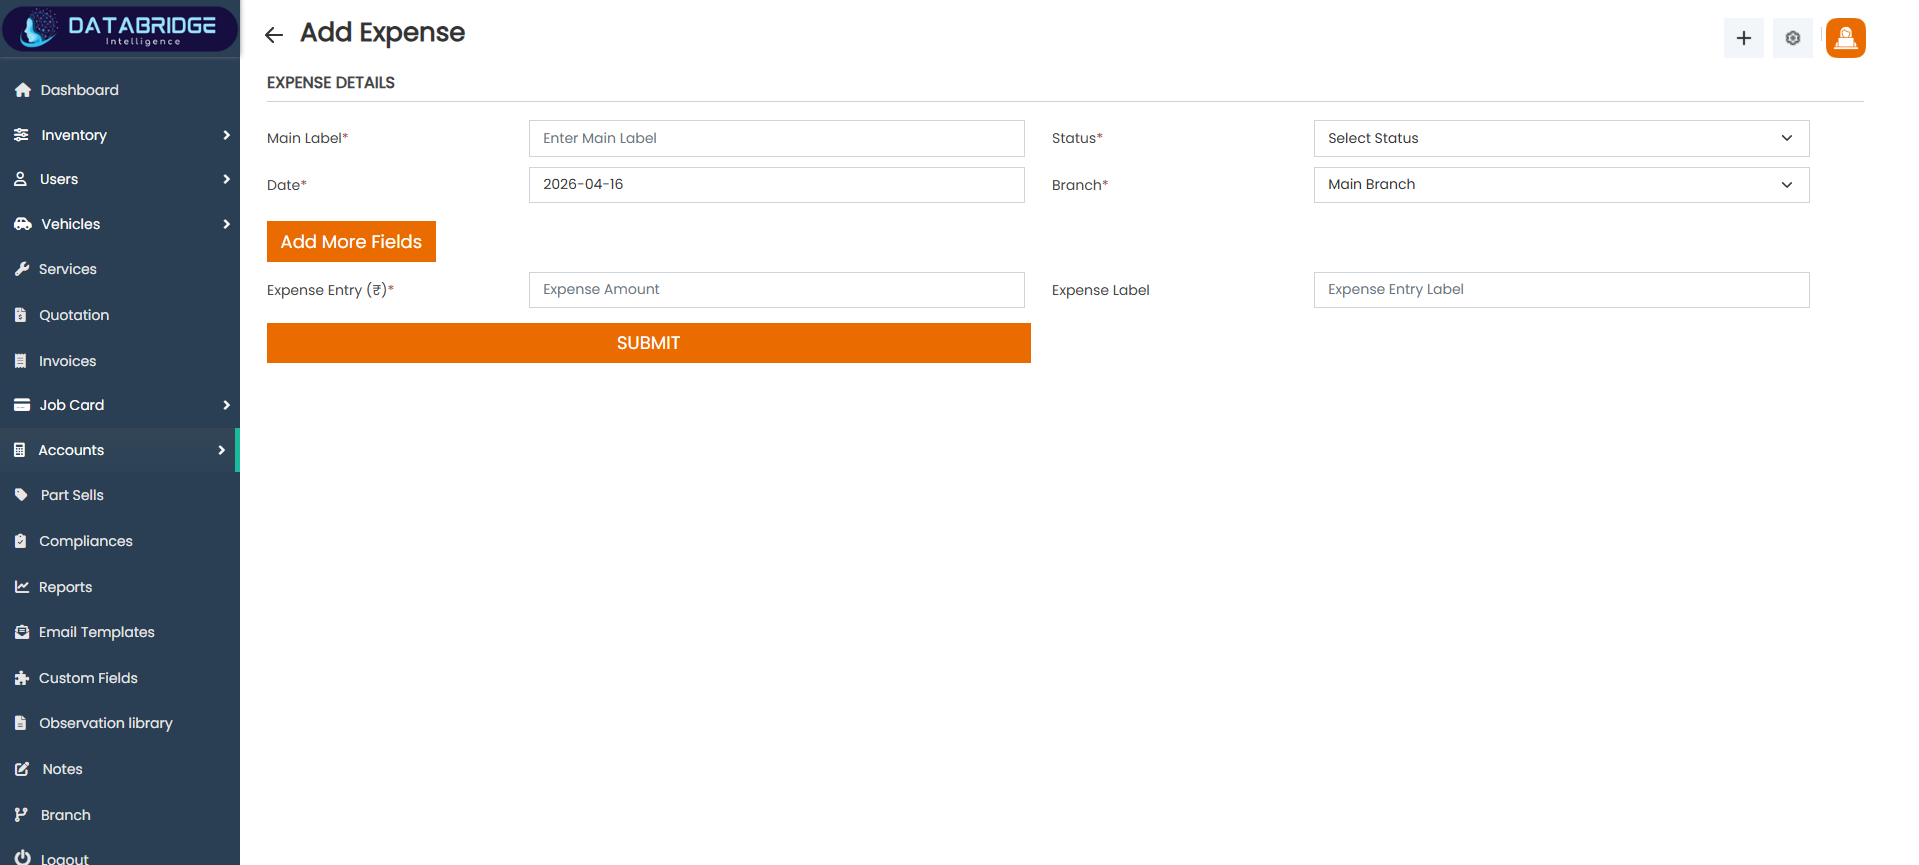
Add Expense:
The Add Expense screen allows users to record new expenses by entering details such as amount, date, category, and labels. It ensures proper documentation of all outgoing payments.
Features:
-Fields for main label, date, and status
-Branch selection
-Expense amount entry
-Option to add additional fields
-Submit button for saving expense details
Functionality:
-Users can add new expense records
-System categorizes expenses for reporting
-Data is stored for financial tracking
-Helps maintain accurate expense history
1
Account
2
Expenses
3
Add Expense
Part Sells
The Part Sells module is used to manage and record the sale of spare parts within the system. It allows users to generate bills for parts sold, ensuring proper tracking of each transaction along with customer and sales details. This module helps streamline the sales process by organizing product selection, quantity, pricing, and total amount calculation in one place.It enables businesses to maintain accurate records of parts inventory movement and sales history. Users can easily link customers, assign salespersons, and track sales dates for better accountability. The system also supports adding multiple parts in a single transaction, improving efficiency during billing.
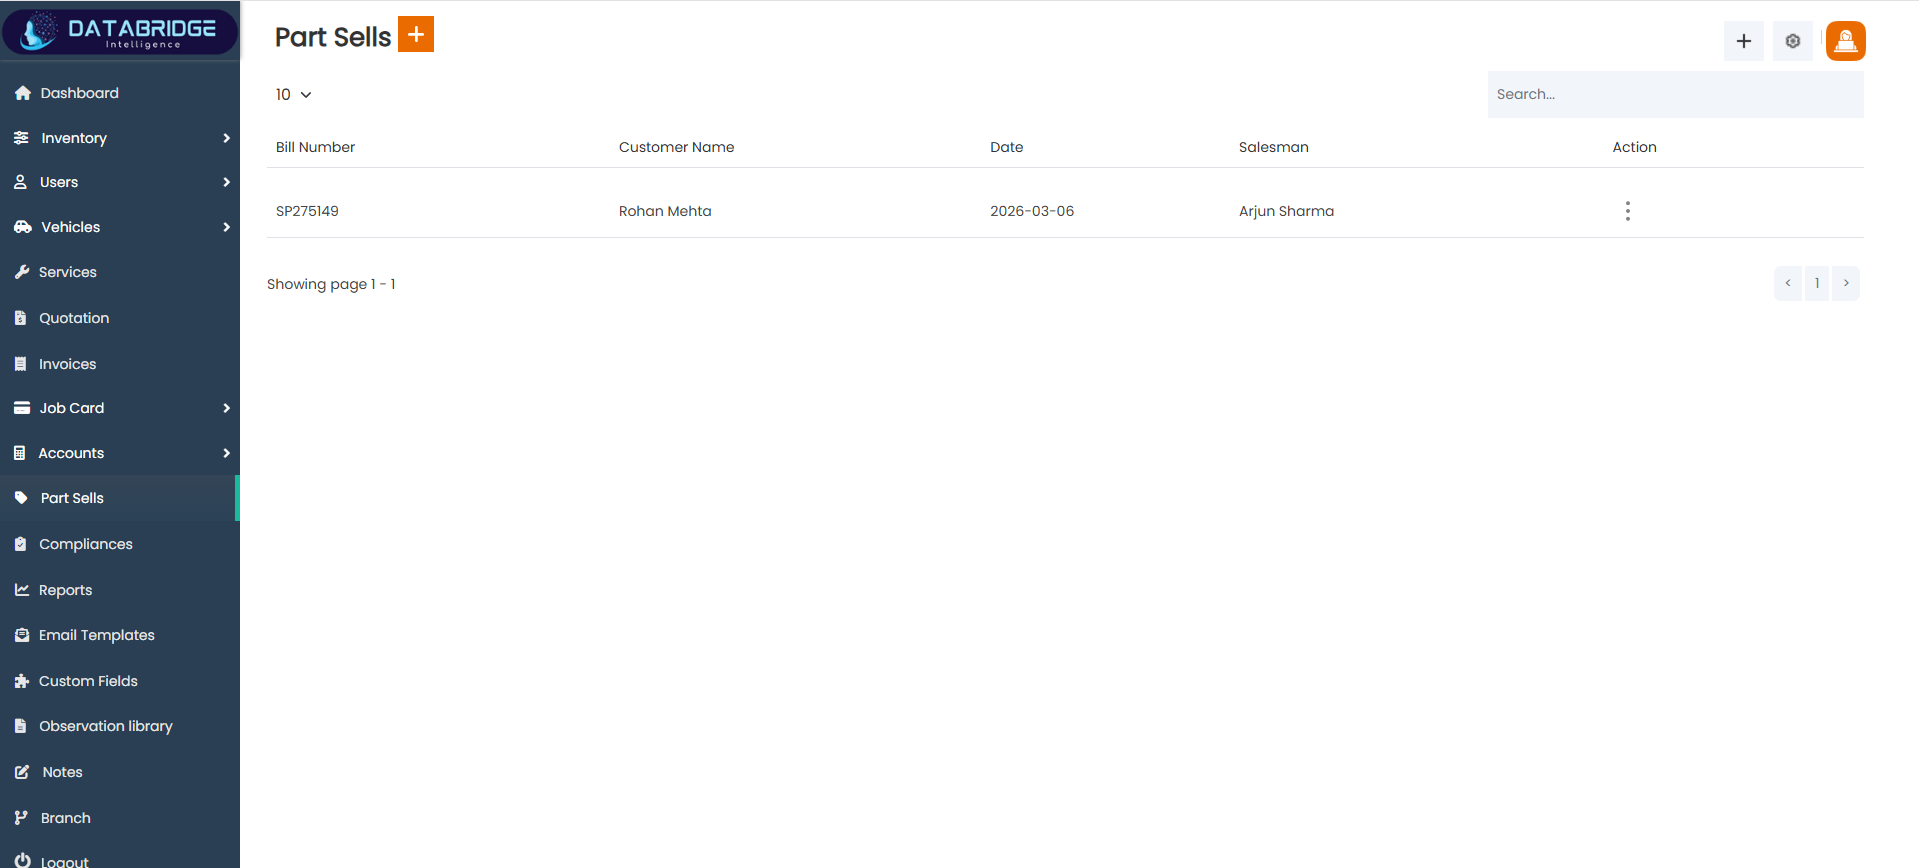
Part Sells:
The Part Sells List screen provides a centralized view of all spare parts sales transactions recorded in the system. It helps users track billing details, customer information, and sales activity in an organized manner. This screen ensures transparency and easy monitoring of all part-related sales within the workshop or business.
Features:
-Displays a list of all part sale transactions
-Shows key details like bill number, customer name, date, and salesman
-Search bar to quickly find specific records
-Pagination for handling large datasets
-“+” button to add a new part sale
-Action menu for edit, delete, or view options
-Checkbox selection for bulk actions
-Clean and structured tabular layout
Functionality:
-Loads and displays all part sales data from the database
-Allows users to search records using keywords
-Supports pagination for navigating multiple records
-Enables users to perform actions (edit/delete/view) via -action menu
-Redirects to “Add Part Sell” screen when clicking the add (+) button
-Supports bulk selection for performing group operations
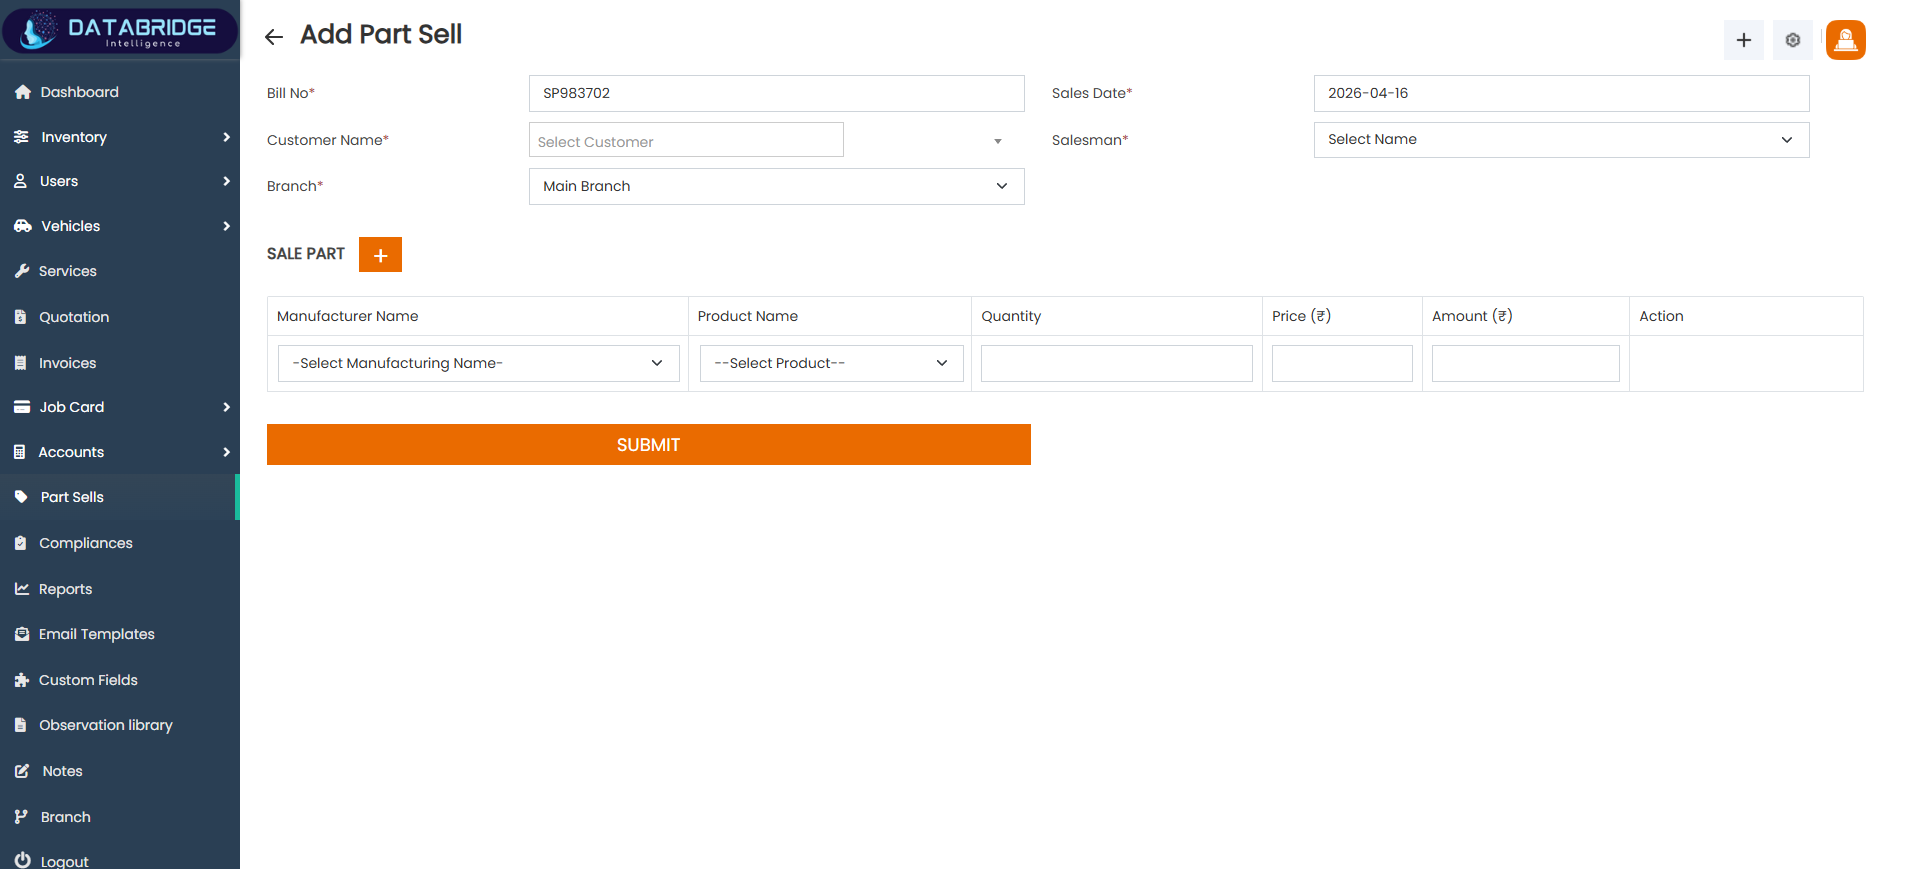
Add Part Sell:
The Add Part Sell screen is used to create new spare parts sales entries in the system. It allows users to generate bills, assign customers, select products, and calculate the total sale amount efficiently. This screen ensures accurate recording of each transaction and maintains proper linkage between inventory and sales.
Features:
-Input fields for bill number, customer name, branch, and sales date
-Dropdown selection for customer and salesman
-Section to add multiple parts dynamically
-Manufacturer and product selection dropdowns
-Quantity and price input fields
-Automatic amount calculation (Quantity × Price)
-Option to add multiple items using “+” button
-Submit button to save the transaction
-Structured and user-friendly form layout
Functionality:
-Accepts user input for creating a new part sale record
-Allows selection of customer and assigns a salesperson
-Enables adding multiple products in one bill dynamically
-Calculates amount automatically based on quantity and price
-Validates required fields before submission
-Saves the data into the system database upon submission
-Updates inventory and financial records accordingly
-Redirects user back to Part Sells List after successful submission
1
Parts sells
2
Add Part Sell
Complaints
The Complaints module allows users to record, track, and manage customer or service-related issues efficiently. It helps ensure timely resolution by maintaining complaint details, status updates, and assigned responsibilities within the system.
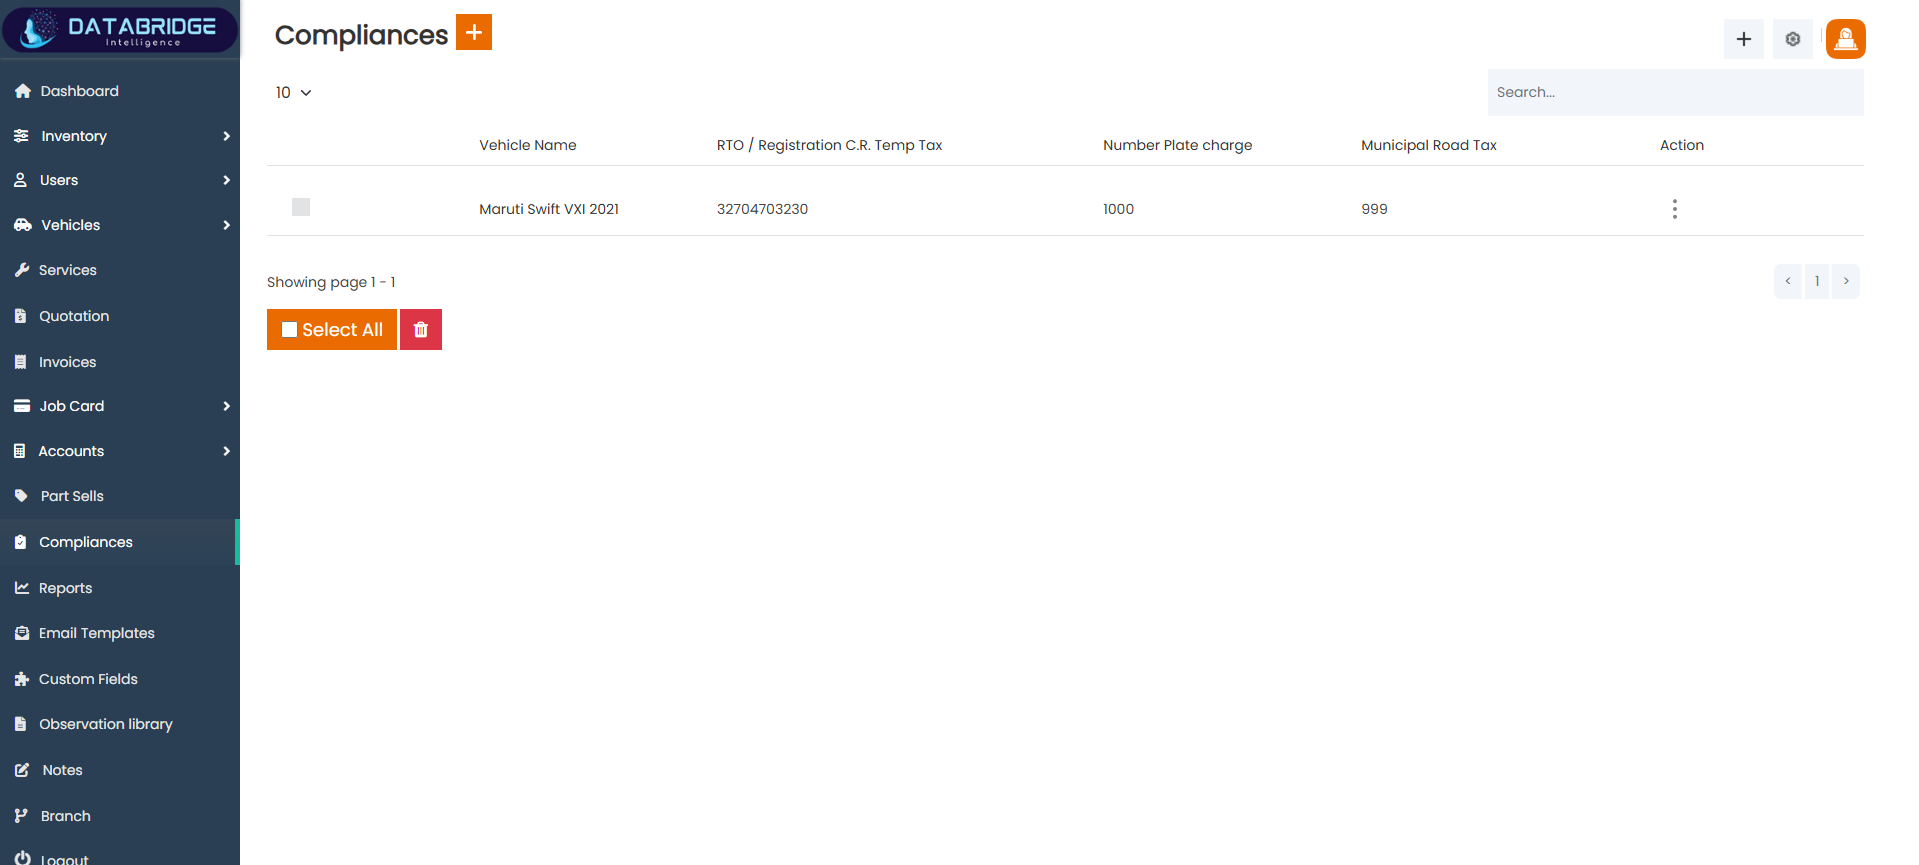
Compliances (RTO Taxes):
The Compliances screen provides a centralized view of all RTO-related tax records associated with vehicles in the system. It enables users to monitor compliance details such as registration tax, number plate charges, and municipal road tax. This screen acts as a tracking dashboard to ensure that all vehicle-related statutory payments are properly recorded and managed. It simplifies compliance monitoring and helps avoid legal or operational delays.
Features
-Displays a list of all compliance records in a tabular format
-Shows vehicle details along with RTO/registration tax information
-Includes fields for number plate charges and municipal road tax
-Search functionality to quickly find specific records
-Pagination support for handling multiple records
-“Select All” option for bulk actions
-Action menu (three dots) for edit/delete operations
-Add (+) button to create new compliance entries
Functionality:
-User can view all compliance records linked to vehicles
-User can search records using keywords
-User can select single or multiple records for bulk actions
-User can delete selected compliance records
-User can navigate through pages using pagination controls
-User can click on the action menu to edit or manage a specific record
-User can click the “+” button to redirect to the Add RTO Taxes screen
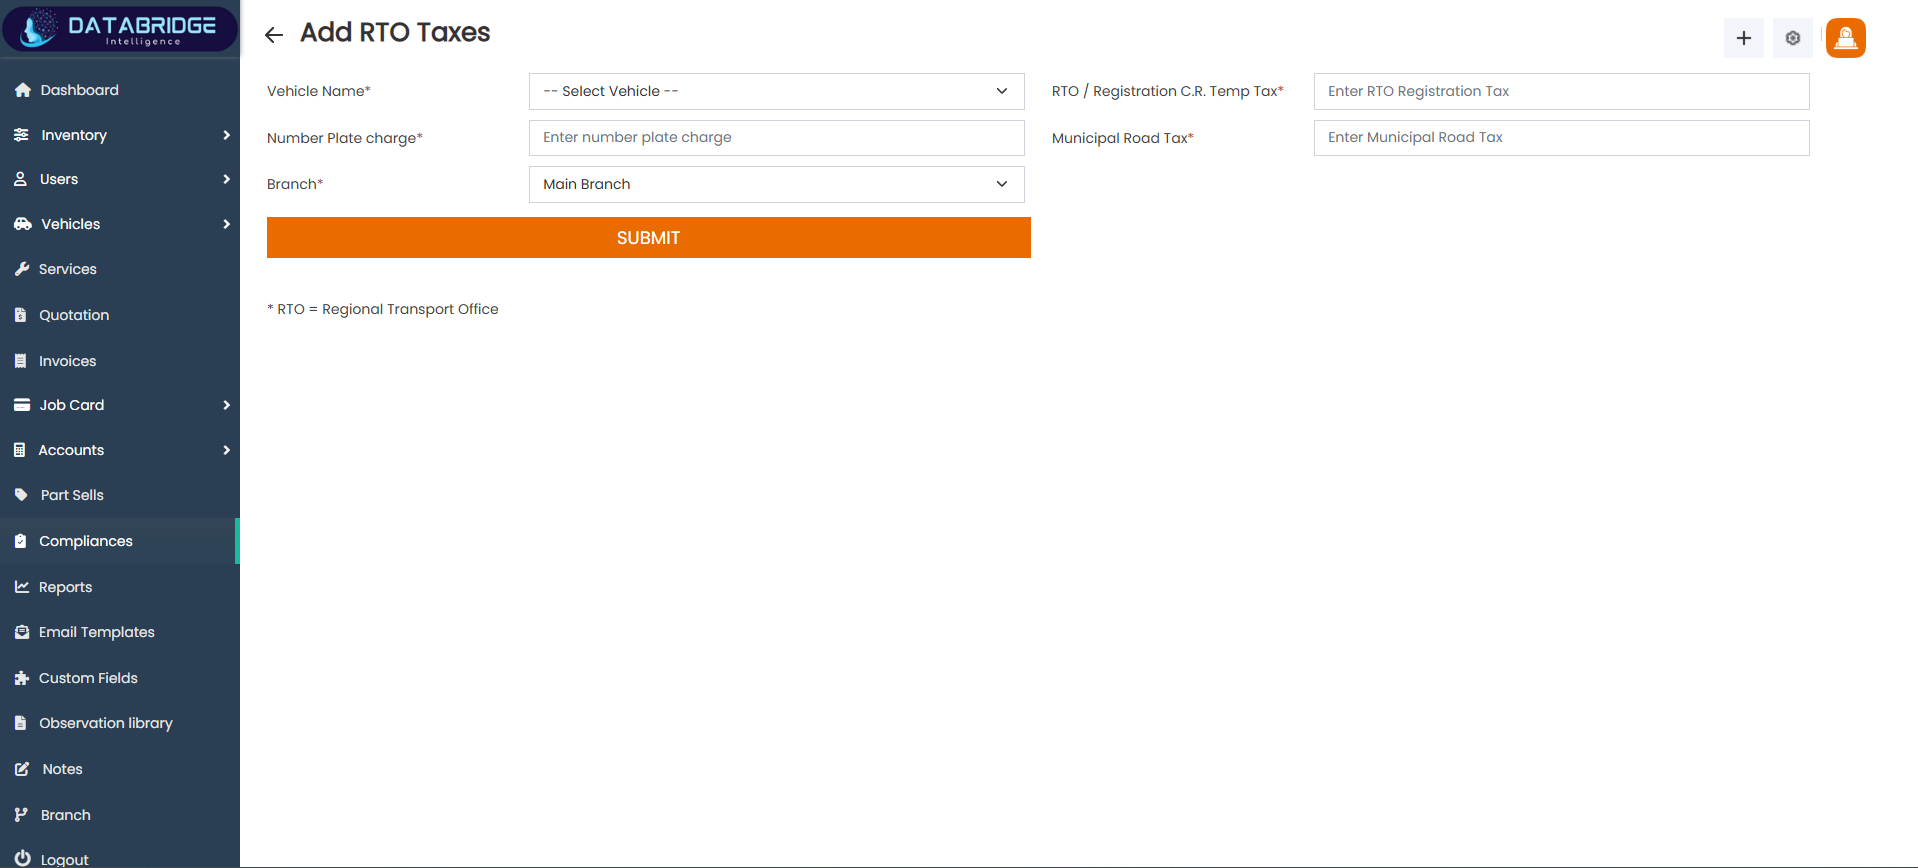
Add RTO Taxes:
The Add RTO Taxes screen allows users to input and manage RTO-related tax details for vehicles. It provides a structured form to capture essential compliance data such as registration tax, number plate charges, and municipal road tax. This screen ensures accurate data entry and helps maintain proper regulatory records for each vehicle within the system.
Features:
-Dropdown to select vehicle name
-Input field for RTO/Registration C.R. Temp Tax
-Input field for number plate charges
-Input field for municipal road tax
-Branch selection dropdown
-Mandatory field validation (marked with *)
-Submit button for saving data
-Informational note explaining RTO (Regional Transport Office)
Functionality:
-User selects a vehicle from the dropdown list
-User enters RTO registration tax details
-User inputs number plate charges
-User inputs municipal road tax
-User selects the branch associated with the entry
-System validates all required fields before submission
On clicking “Submit”, the data is saved into the system
-After submission, the record becomes available in the Compliances listing screen
1
Complaints
2
Add RTO Taxes
Reports
The Reports screen provides a comprehensive overview of service-related data within a selected time range. It allows users to filter records based on services, customers, and dates, helping in analyzing business performance. The screen also supports data export and visualization through charts, making it easier to generate insights and track total revenue.
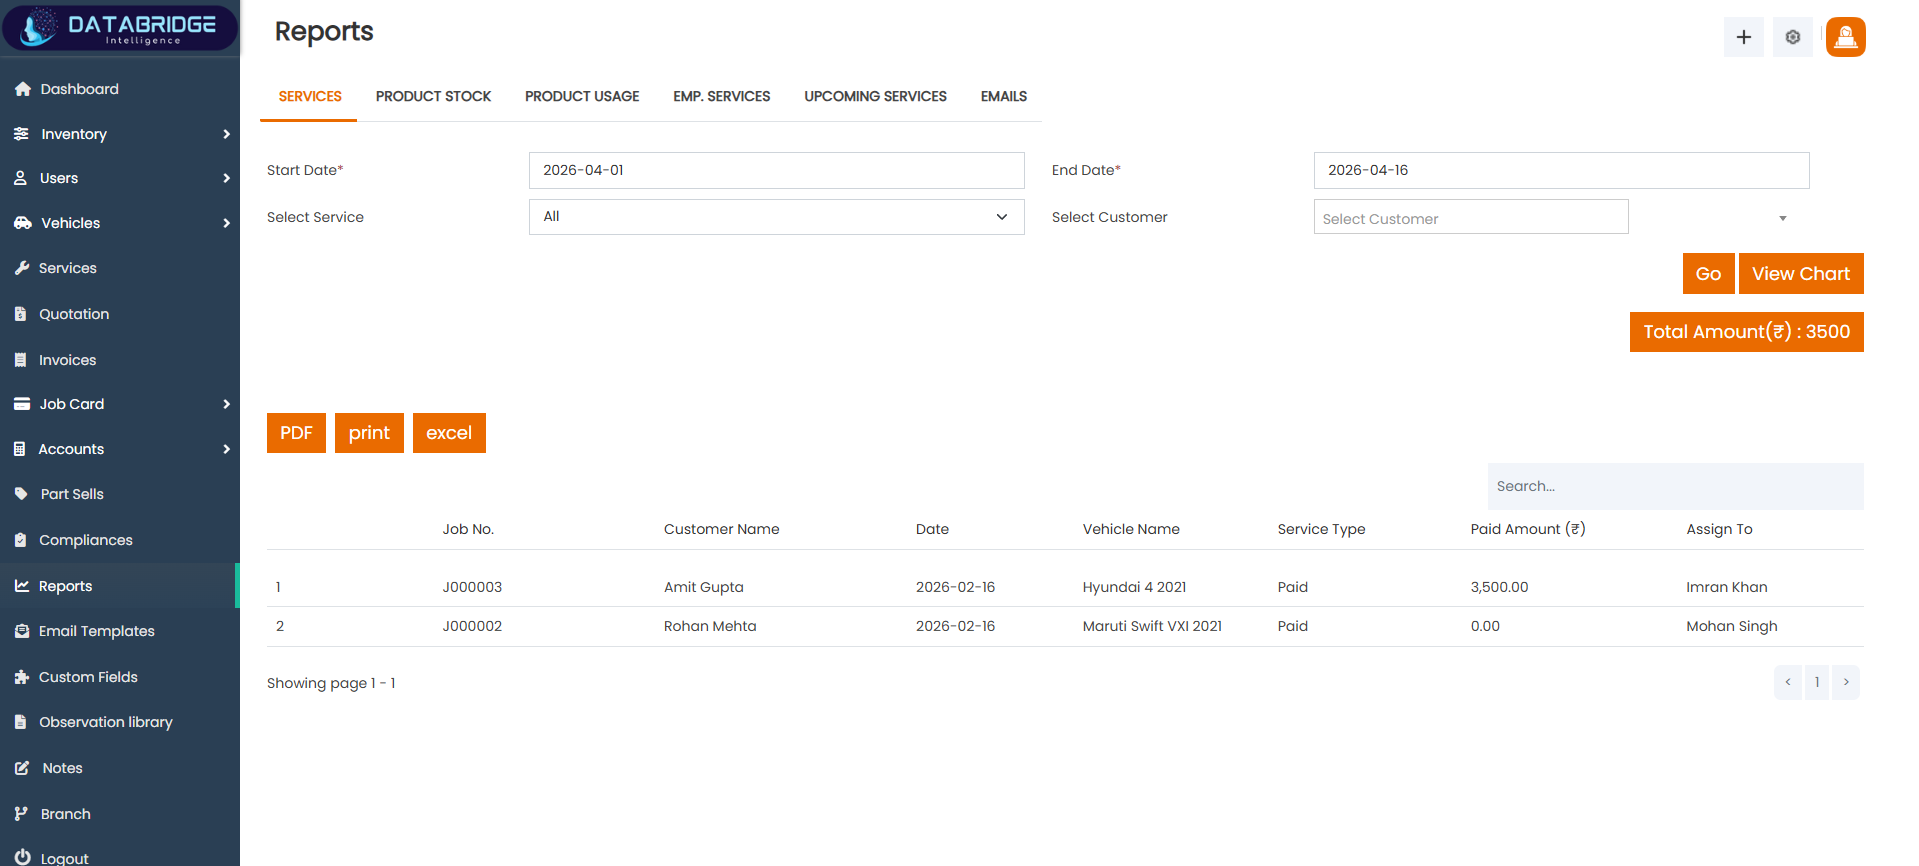
Reports:
The Reports module is designed to generate detailed service reports with advanced filtering options. Users can view transaction records, monitor assigned tasks, and evaluate financial summaries such as total paid amounts. It also enables exporting reports in multiple formats and visualizing data through charts for better decision-making.
Features:
-Multiple report tabs for different data views
-Date range filter (Start & End Date)
-Service and customer filtering options
-Chart view for data visualization
-Total amount display
-Export options (PDF, Print, Excel)
Functionality:
-User filters data using date, service, and customer
-System displays report on clicking “Go”
-User can switch between report tabs
-Total amount is calculated dynamically
-User can view data in chart format
Reports can be exported or printed
Reports
Email Templates
The Email Templates module allows users to create and manage automated email notifications for different system events.It provides a customizable editor to design email content using dynamic variables and placeholders.This module helps ensure consistent communication with customers, employees, and administrators.Users can enable or disable templates and control when emails are triggered within the system.
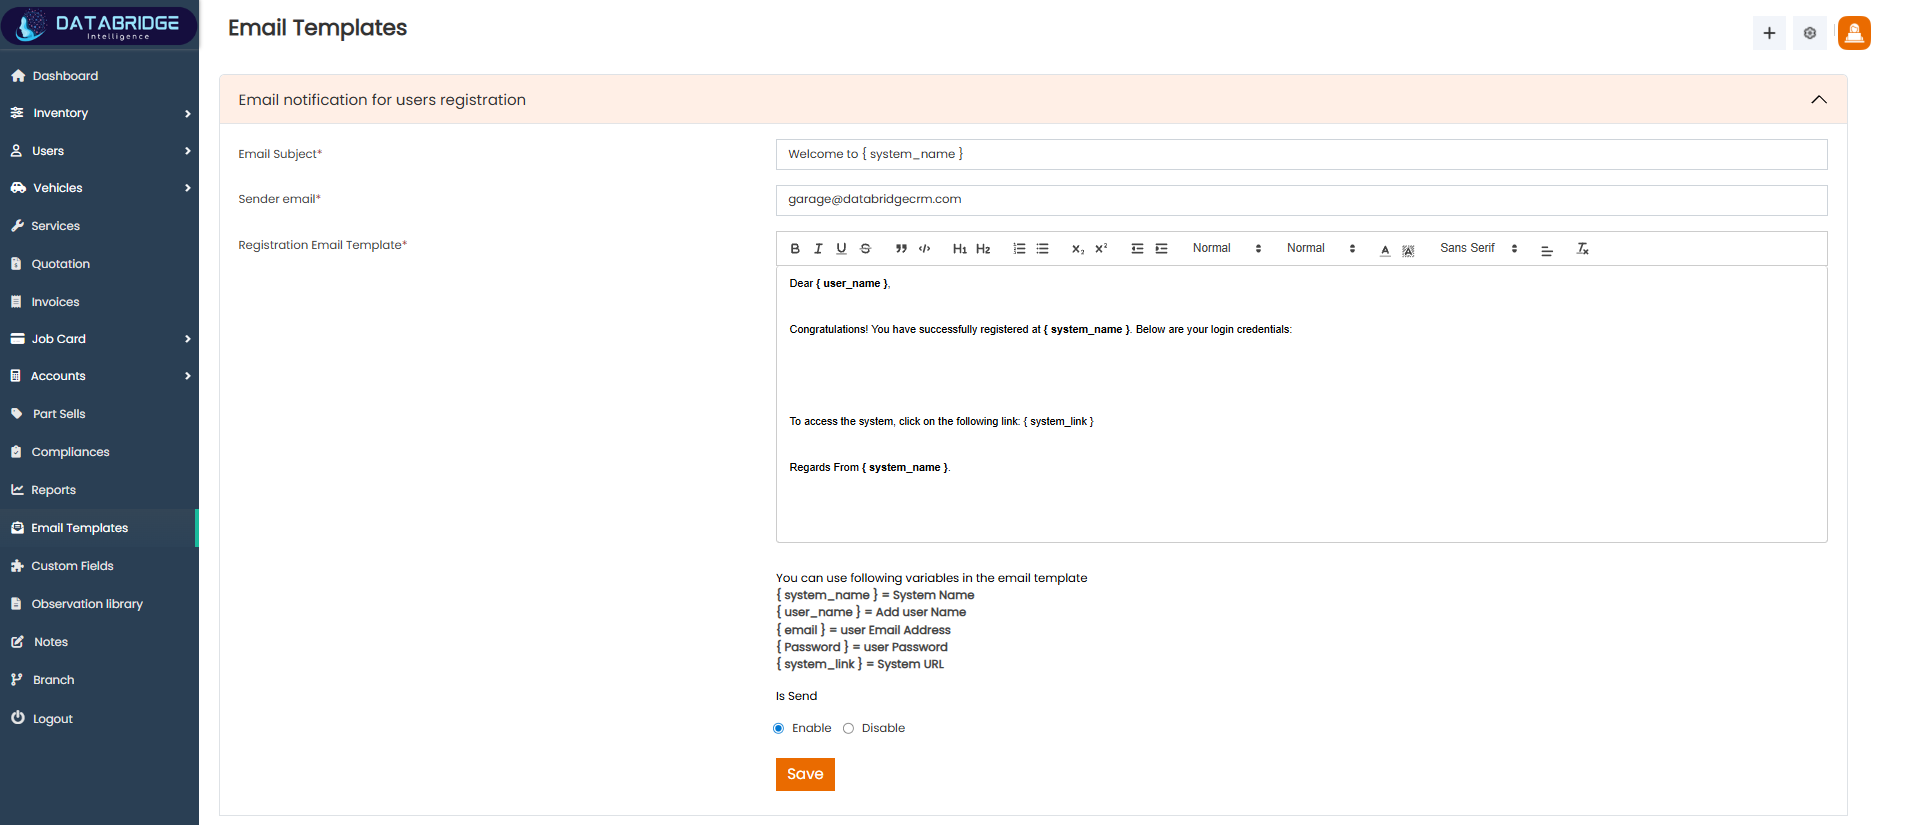
User Registration Email Template:
This template is used to send a welcome email to users after successful registration.
It includes login details and system access information for the user.
Features:
-Editable email subject
-Sender email configuration
-Rich text editor
-Dynamic variables support
-Enable/Disable option
-Save template option
Functionality:
-Triggered after user registration
-System replaces dynamic variables
-Sends email with login details
-User can edit template anytime
-Enable/Disable controls sending
-Template is saved for future use
1
Email Template
2
User Registration Email Template
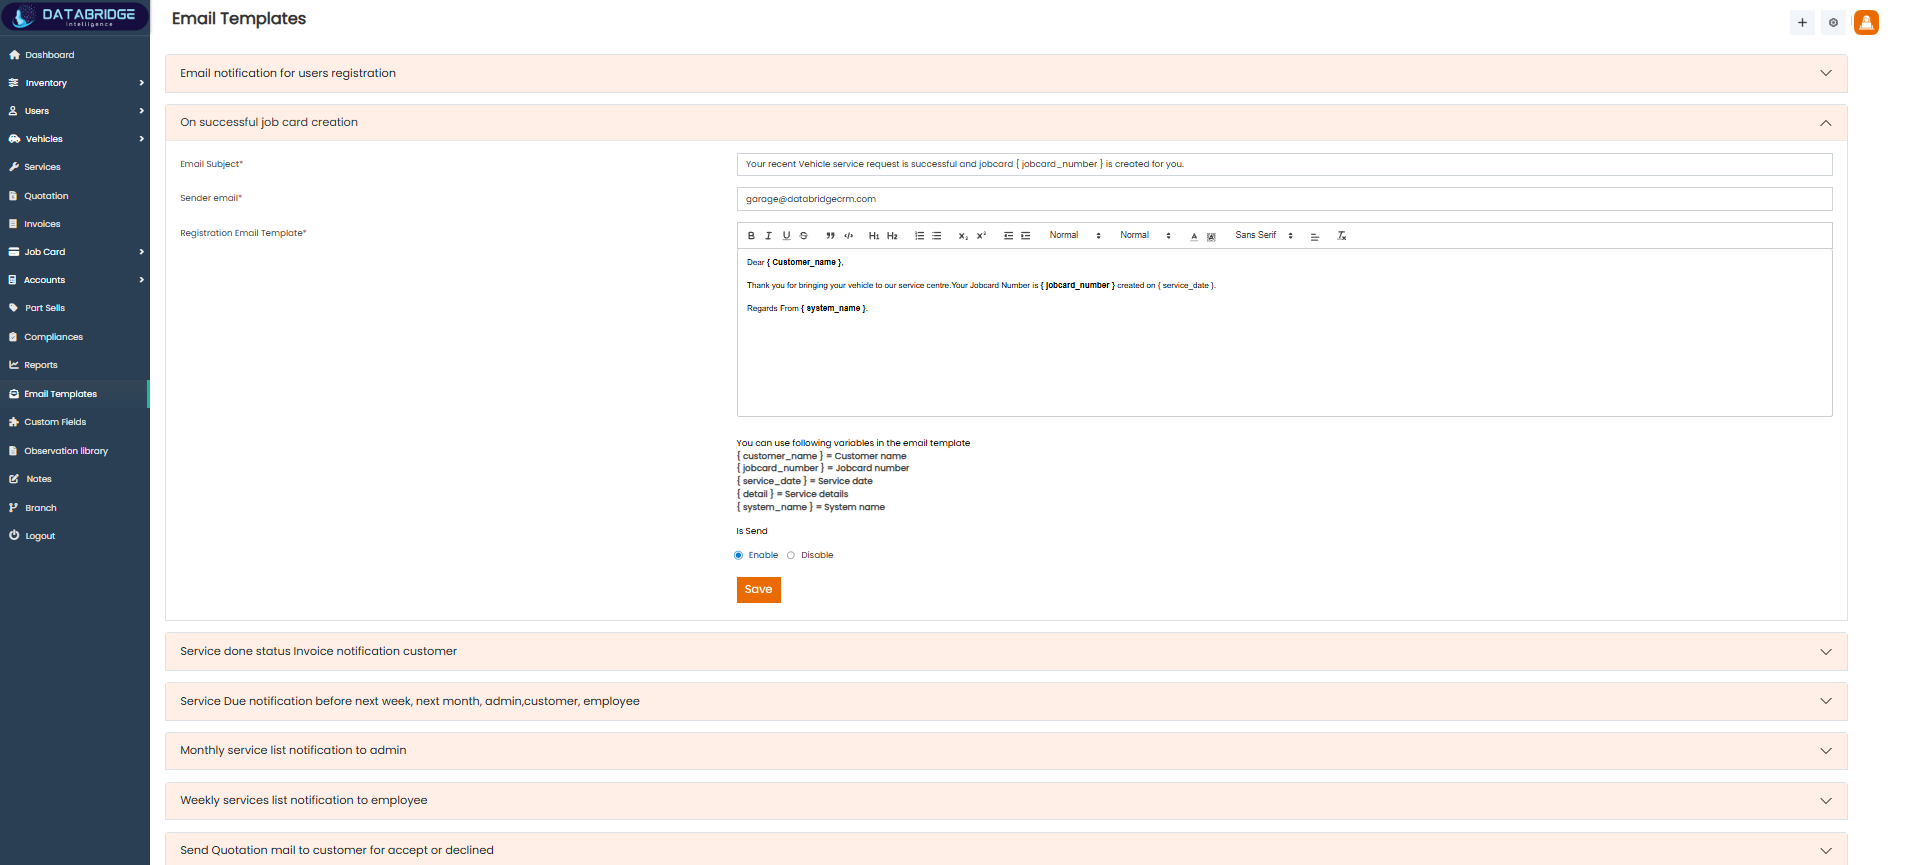
Job Card Creation Email:
This template sends a notification when a job card is created in the system.It helps inform users or staff about new service entries.
Features:
-Custom subject line
-Template editor
-Dynamic placeholders
-Enable/Disable toggle
-Save option
-Event-based trigger
Functionality:
-Triggered on job card creation
-Inserts job details dynamically
-Sends email to assigned user
-Template can be edited
-Enable/Disable controls usage
-Saves updated template
1
Email Template
2
Job Card Creation Email
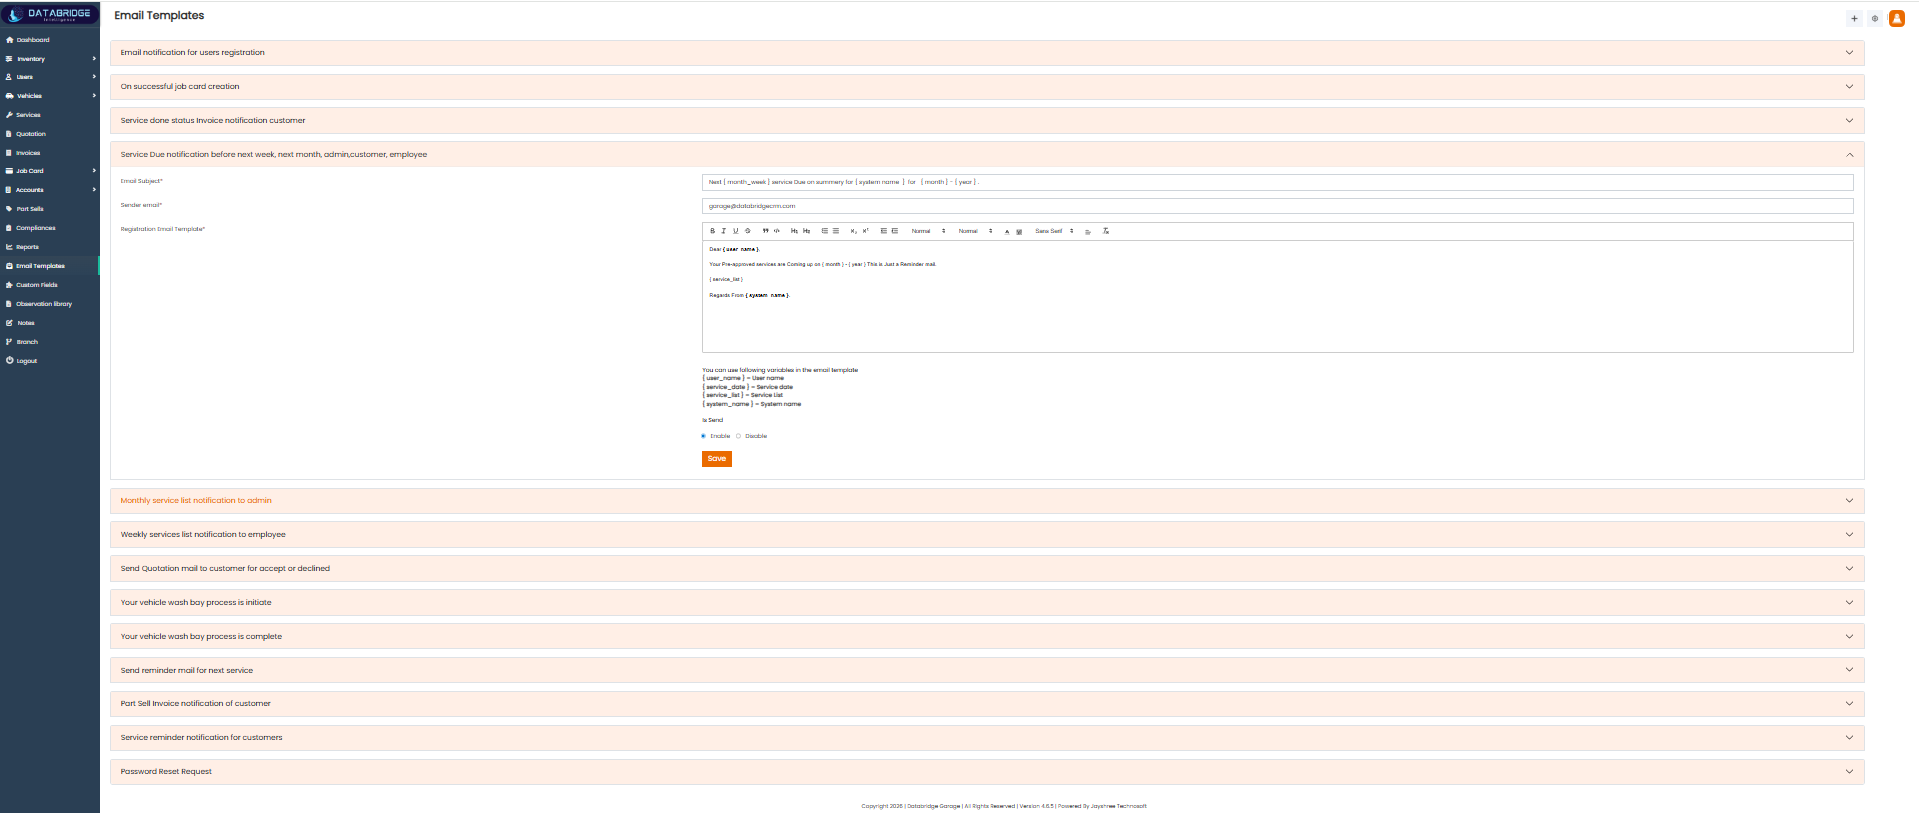
Service Done Invoice Notification:
This template notifies customers after service completion along with invoice details.
It ensures customers are informed about billing and payment status.
Features:
-Invoice email template
-Rich text editor
-Dynamic fields support
-Editable subject
-Enable/Disable option
-Save functionality
Functionality
-Triggered after service completion
-Sends invoice details to customer
-System fills dynamic values
-Template is customizable
-Enable/Disable controls sending
-Saves template changes
1
Email Template
2
Service Done Invoice Notification
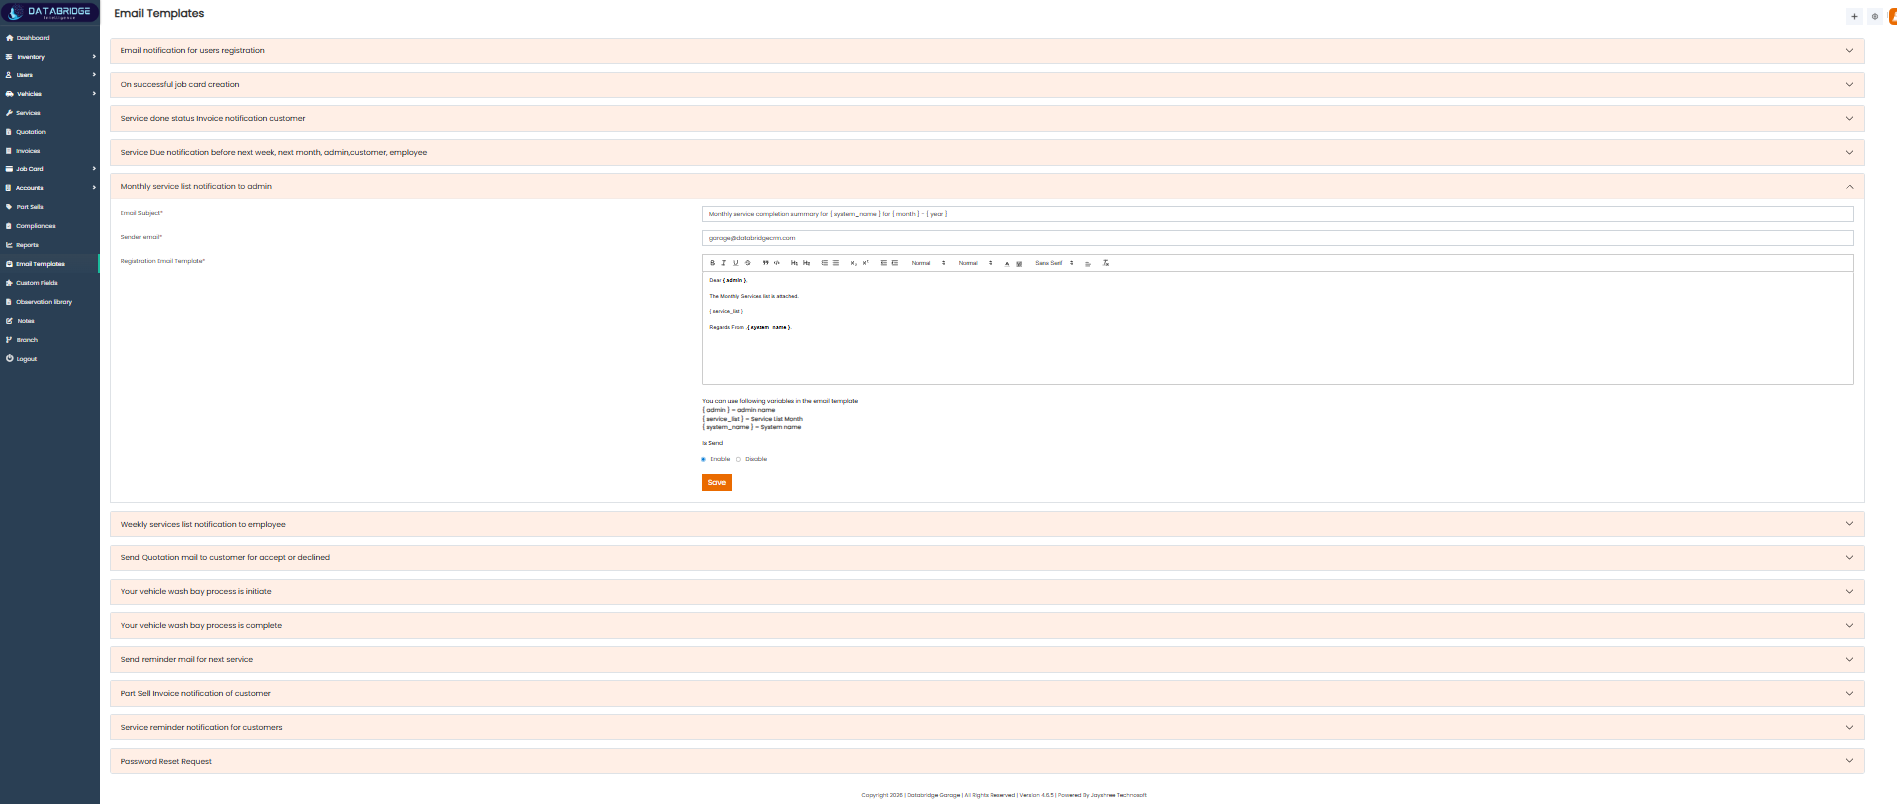
Service Due Notification:
This template is used to send reminders for upcoming vehicle services.
It helps notify customers, employees, and admins before due dates.
Features:
-Multi-recipient support
-Custom message editor
-Dynamic variables
-Enable/Disable toggle
-Scheduled trigger support
-Save option
Functionality:
-Triggered before service due date
-Sends reminders to selected users
-Dynamic data is auto-filled
-Template can be modified
-Enable/Disable controls sending
-Stores updated template
1
Email Template
2
Service Due Notification
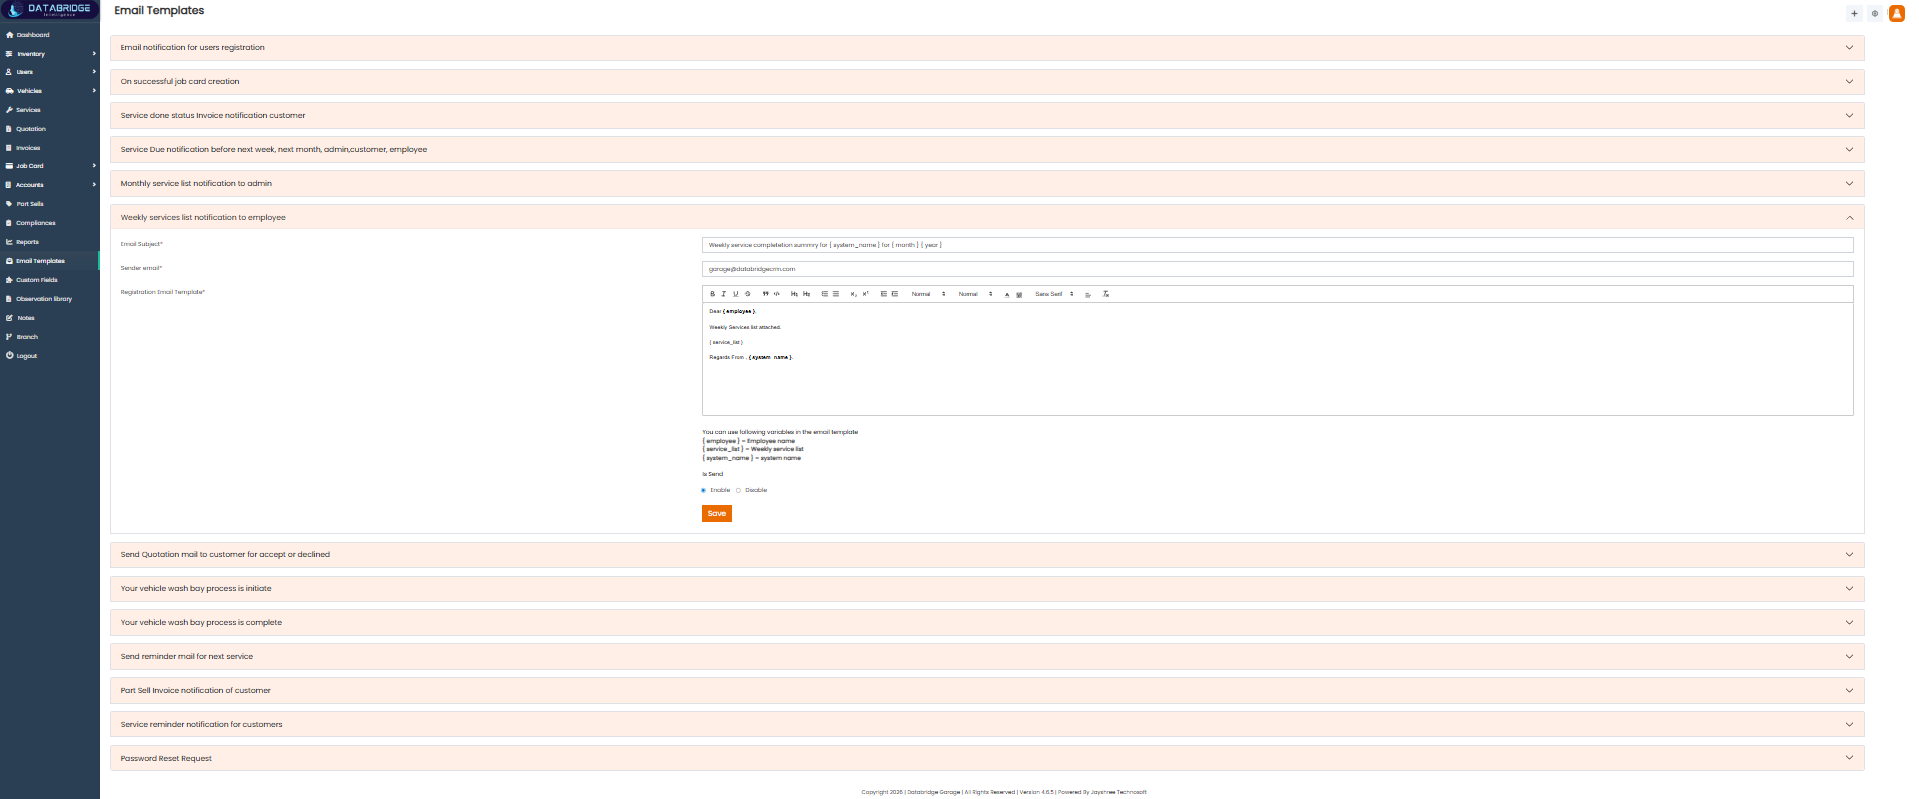
Monthly Service List Notification (Admin):
This template sends a monthly summary of services to the admin.
It helps in tracking overall service activities and performance.
Features:
-Monthly report template
-Editable content
-Dynamic data placeholders
-Enable/Disable option
-Admin-specific notification
-Save functionality
Functionality:
-Triggered monthly
-Sends service summary to admin
-System fills report data
-Template can be customized
-Enable/Disable controls sending
-Saves template updates
1
Email Template
2
Monthly Service List Notification

Weekly Service List Notification (Employee):
This template sends weekly service updates to employees.
It helps staff stay informed about assigned or upcoming work.
Features:
-Weekly report format
-Dynamic variables
-Editable template
-Enable/Disable toggle
-Employee-specific use
-Save option
Functionality:
-Triggered weekly
-Sends service list to employees
-Auto-fills dynamic data
-Template can be edited
-Enable/Disable controls sending
-Saves changes
1
Email Template
2
Weekly Service List Notification
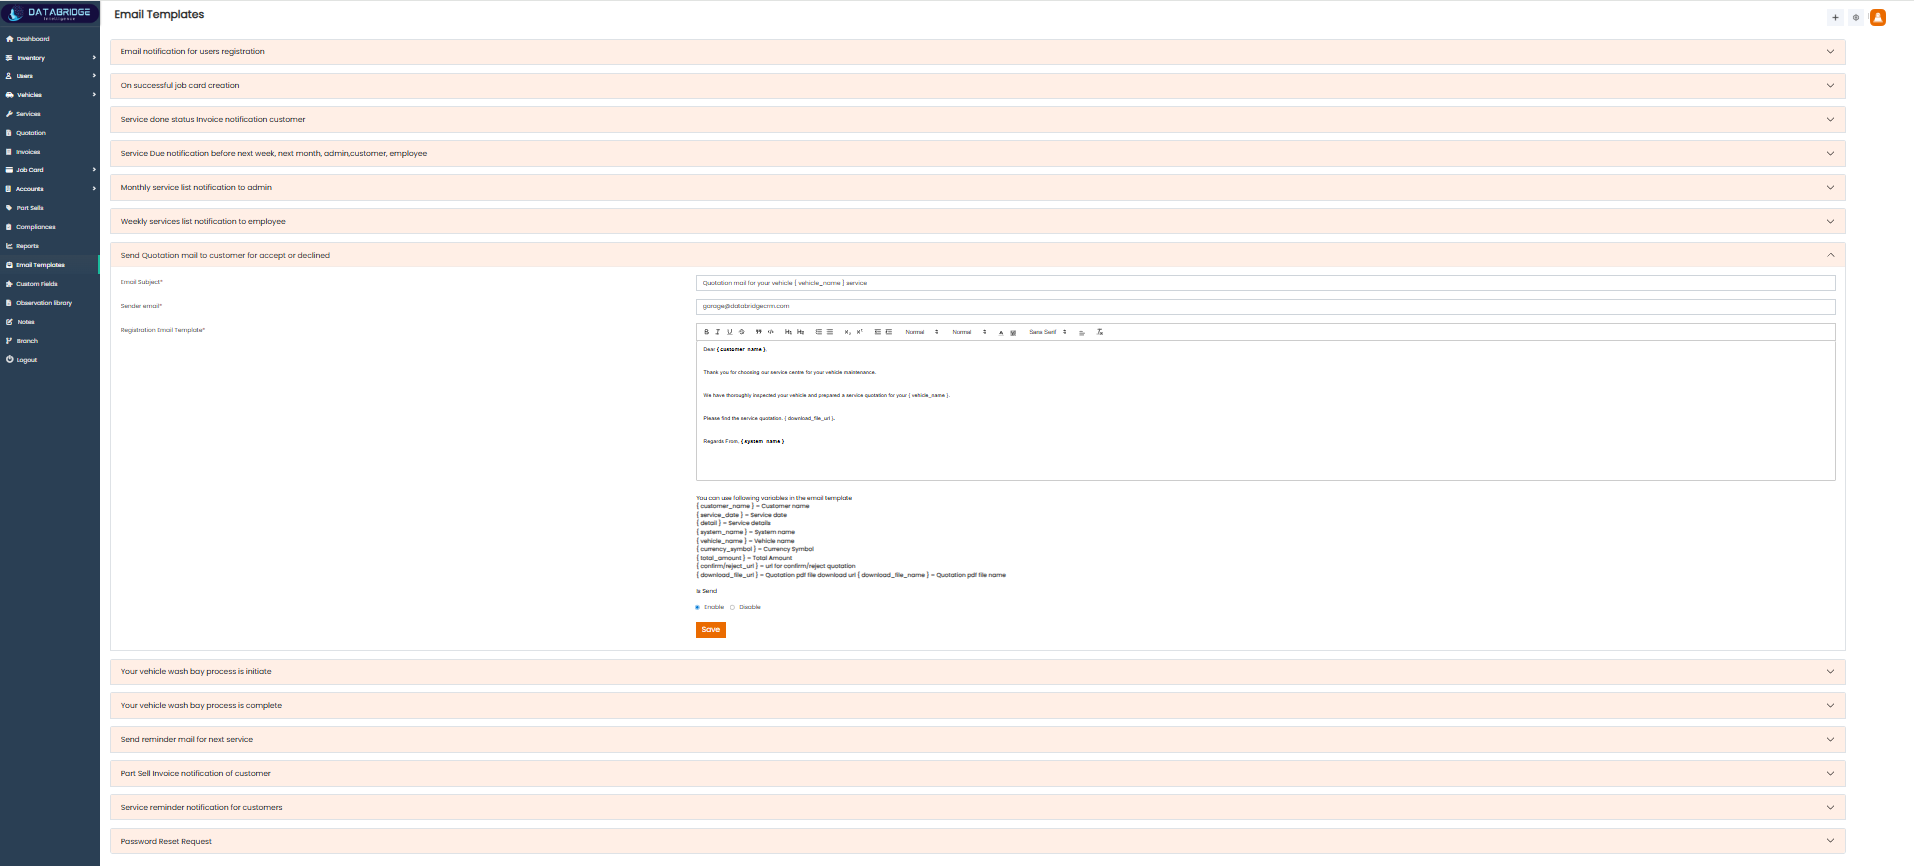
Quotation Email to Customer:
This template is used to send quotations to customers for approval or rejection.
It ensures clear communication regarding pricing and services offered.
Features:
-Quotation email template
-Editable subject & content
-Dynamic placeholders
-Enable/Disable option
-Customer-specific notification
-Save functionality
Functionality:
-Triggered when quotation is sent
-Sends details to customer
-System fills quotation data
-Template can be modified
-Enable/Disable controls sending
-Saves updated template
1
Email Template
2
Weekly Service List Notification
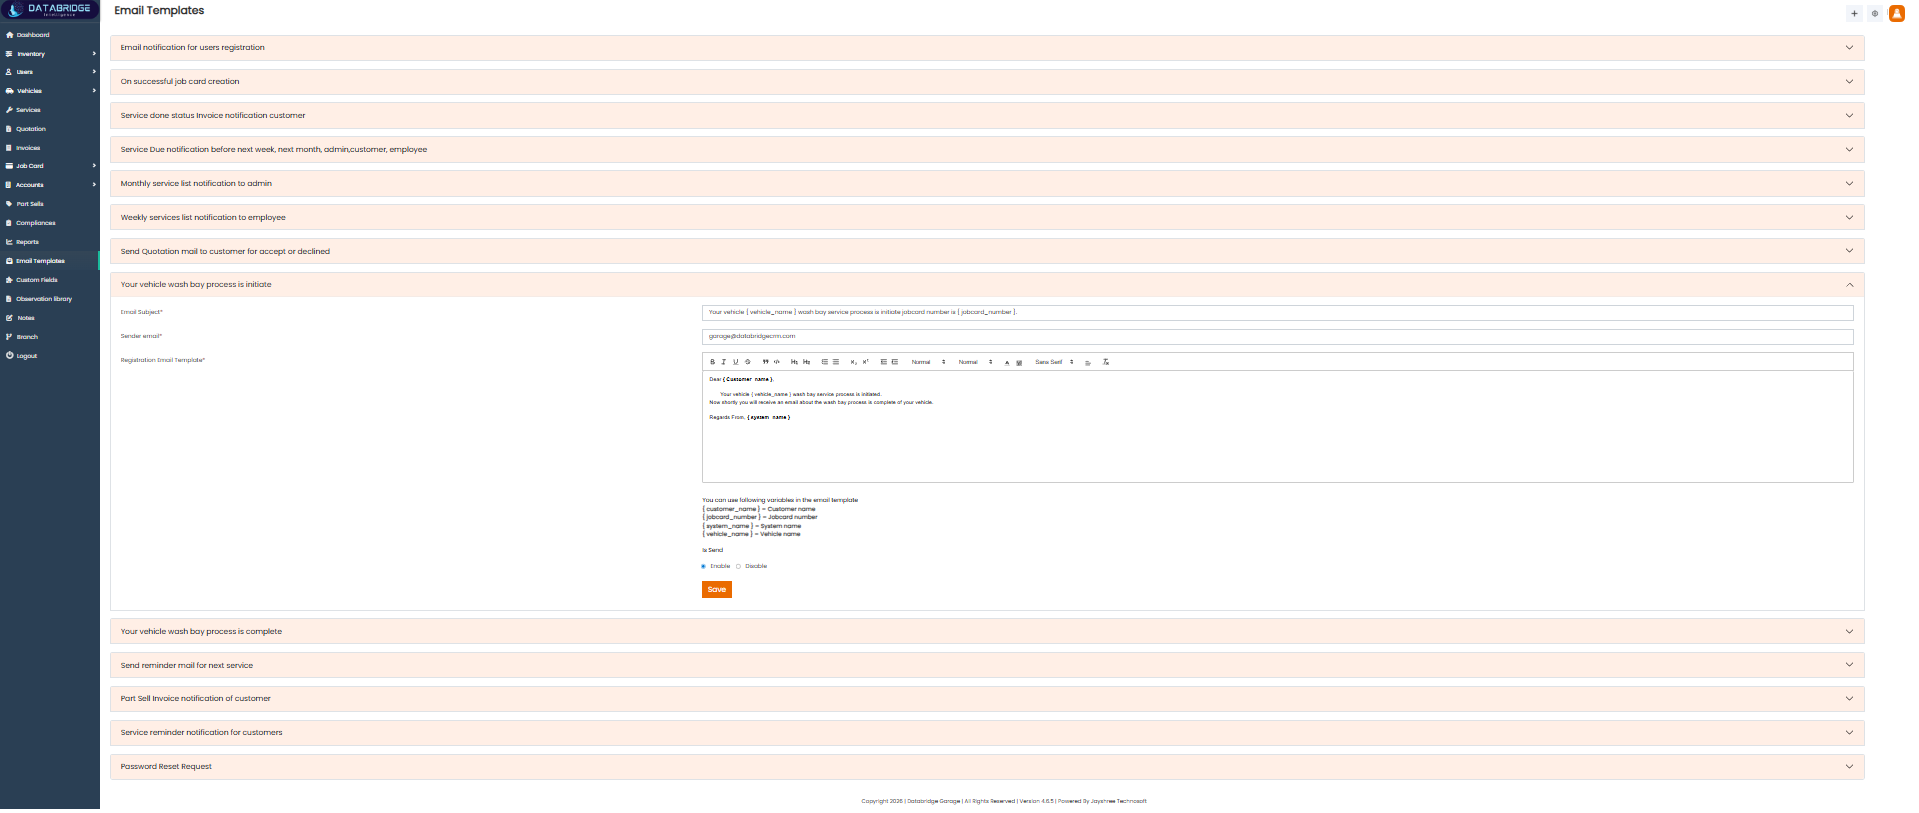
Vehicle Wash Process Initiated:
This template notifies when the vehicle wash process has started.
It keeps customers informed about service progress.
Features:
-Status update template
-Dynamic data support
-Editable content
-Enable/Disable toggle
-Event-based trigger
-Save option
Functionality:
-Triggered at wash start
-Sends notification to customer
-Inserts vehicle/service data
-Template is editable
-Enable/Disable controls sending
-Saves changes
1
Email Template
2
Vehicle Wash Process Initiated
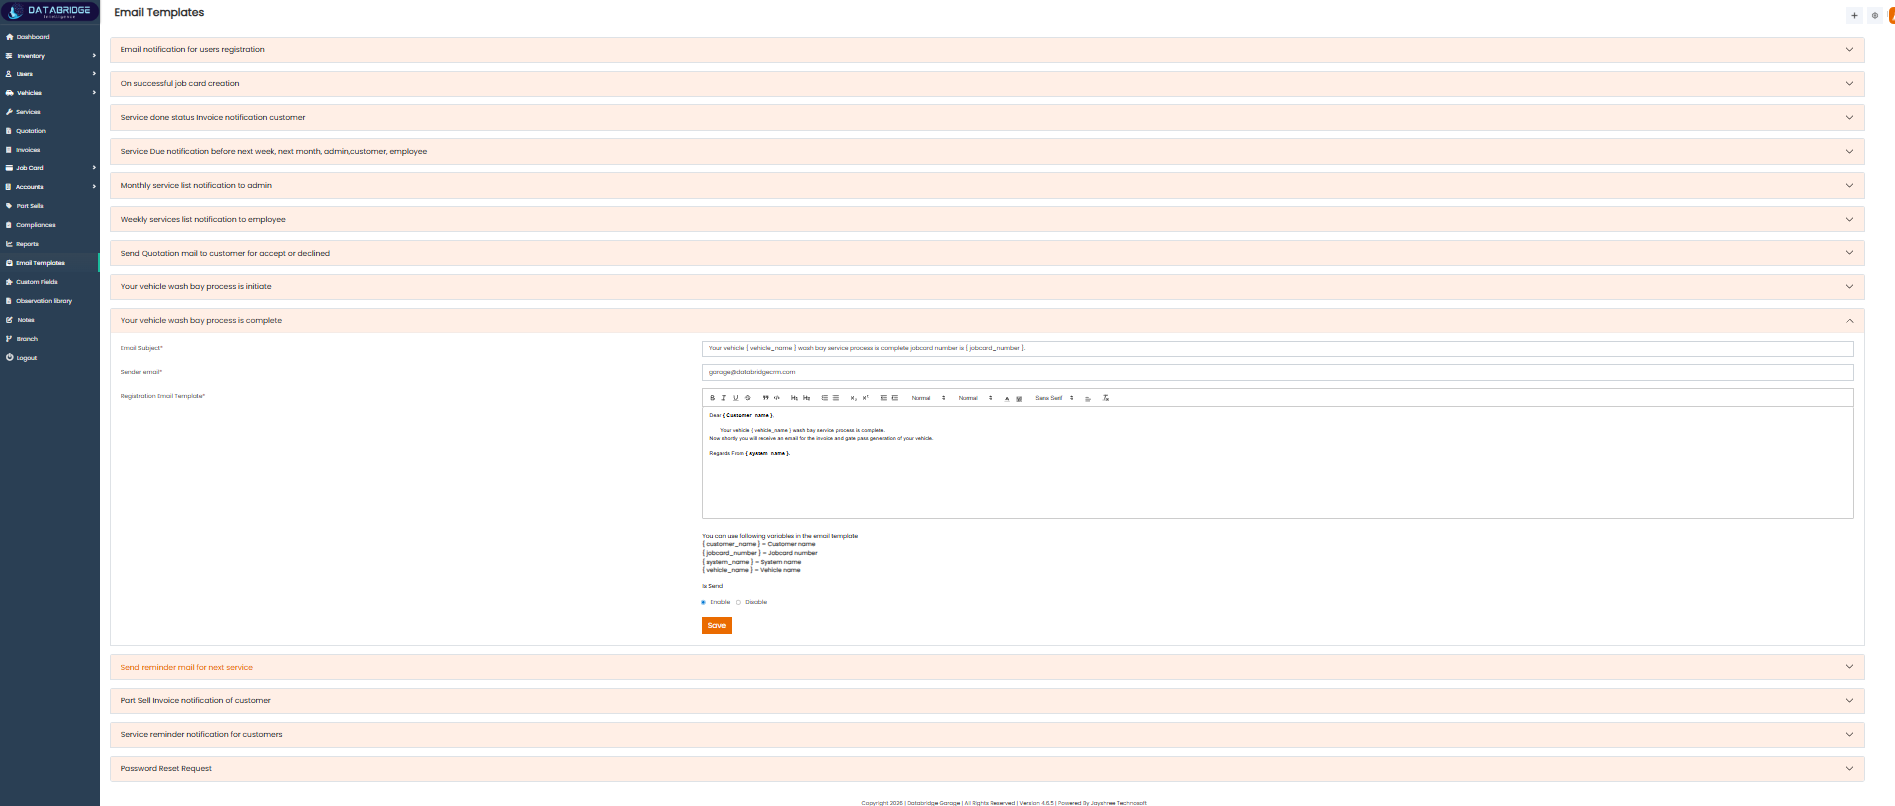
Vehicle Wash Process Completed:
This template informs customers once the vehicle wash process is completed.
It helps notify readiness for pickup or next steps.
Features:
-Completion notification template
-Editable message
-Dynamic placeholders
-Enable/Disable option
-Event trigger support
-Save functionality
Functionality:
-Triggered after wash completion
-Sends completion message
-System fills dynamic details
-Template can be edited
-Enable/Disable controls sending
-Saves template
1
Email Template
2
Vehicle Wash Process Completed
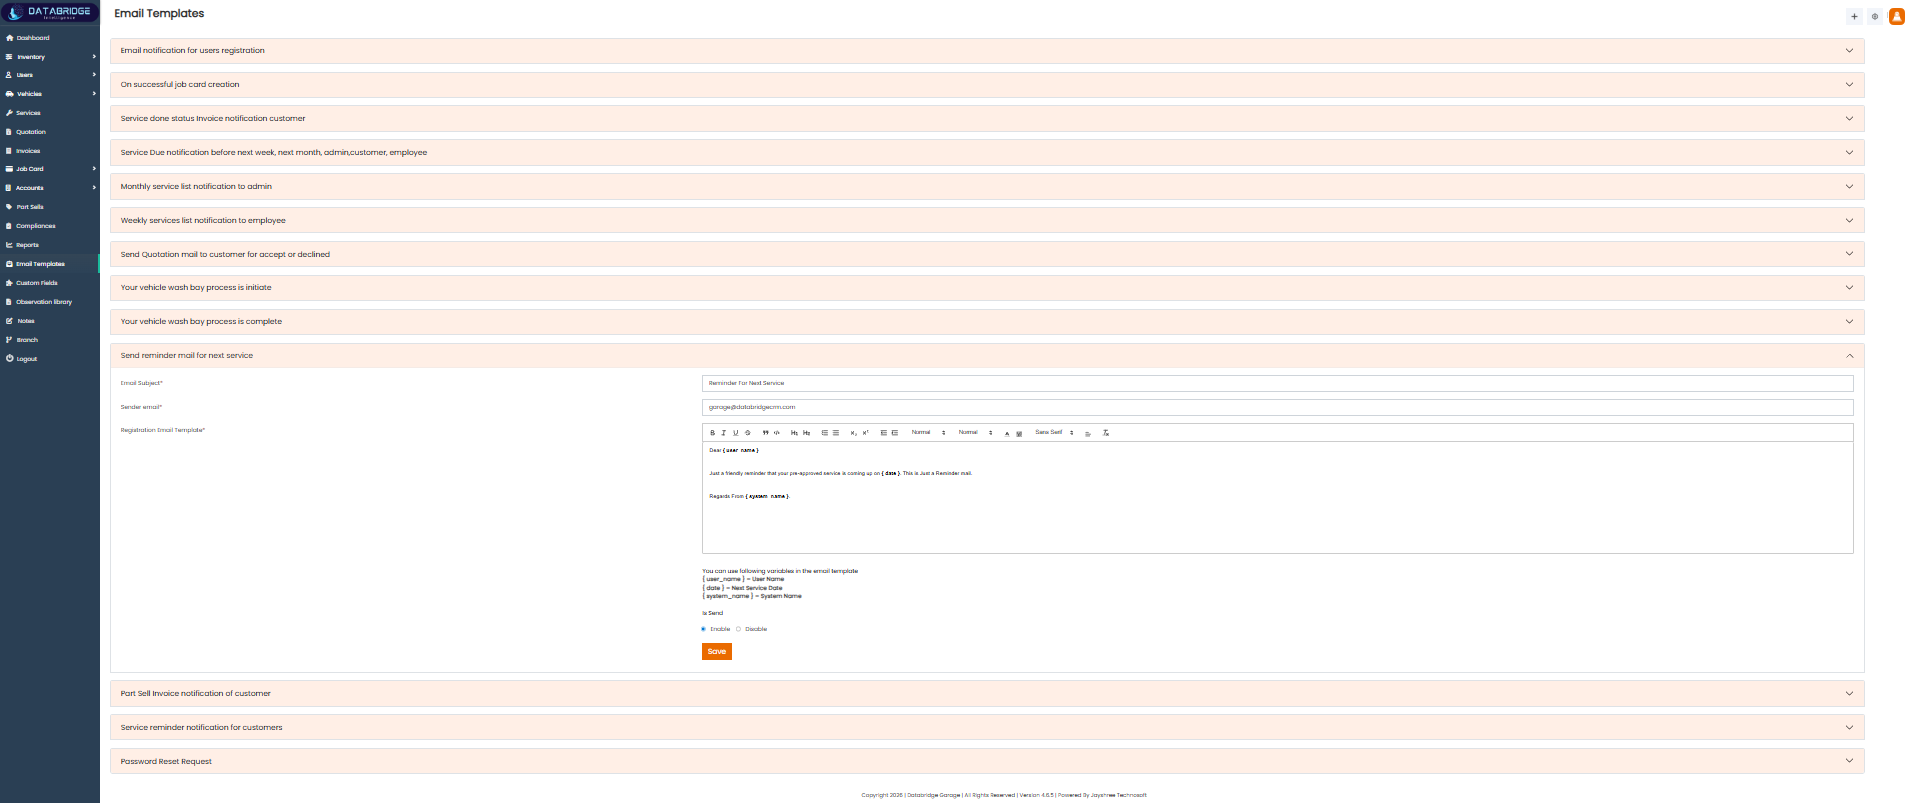
Service Reminder Email:
This template sends reminders to customers for their next scheduled service.
It helps improve customer retention and timely service visits.
Features:
-Reminder template
-Dynamic variables
-Editable content
-Enable/Disable toggle
-Customer notification
-Save option
Functionality
-Triggered before next service date
-Sends reminder to customer
-Auto-fills service details
-Template is customizable
-Enable/Disable controls sending
-Saves updates
1
Email Template
2
Service Reminder Email
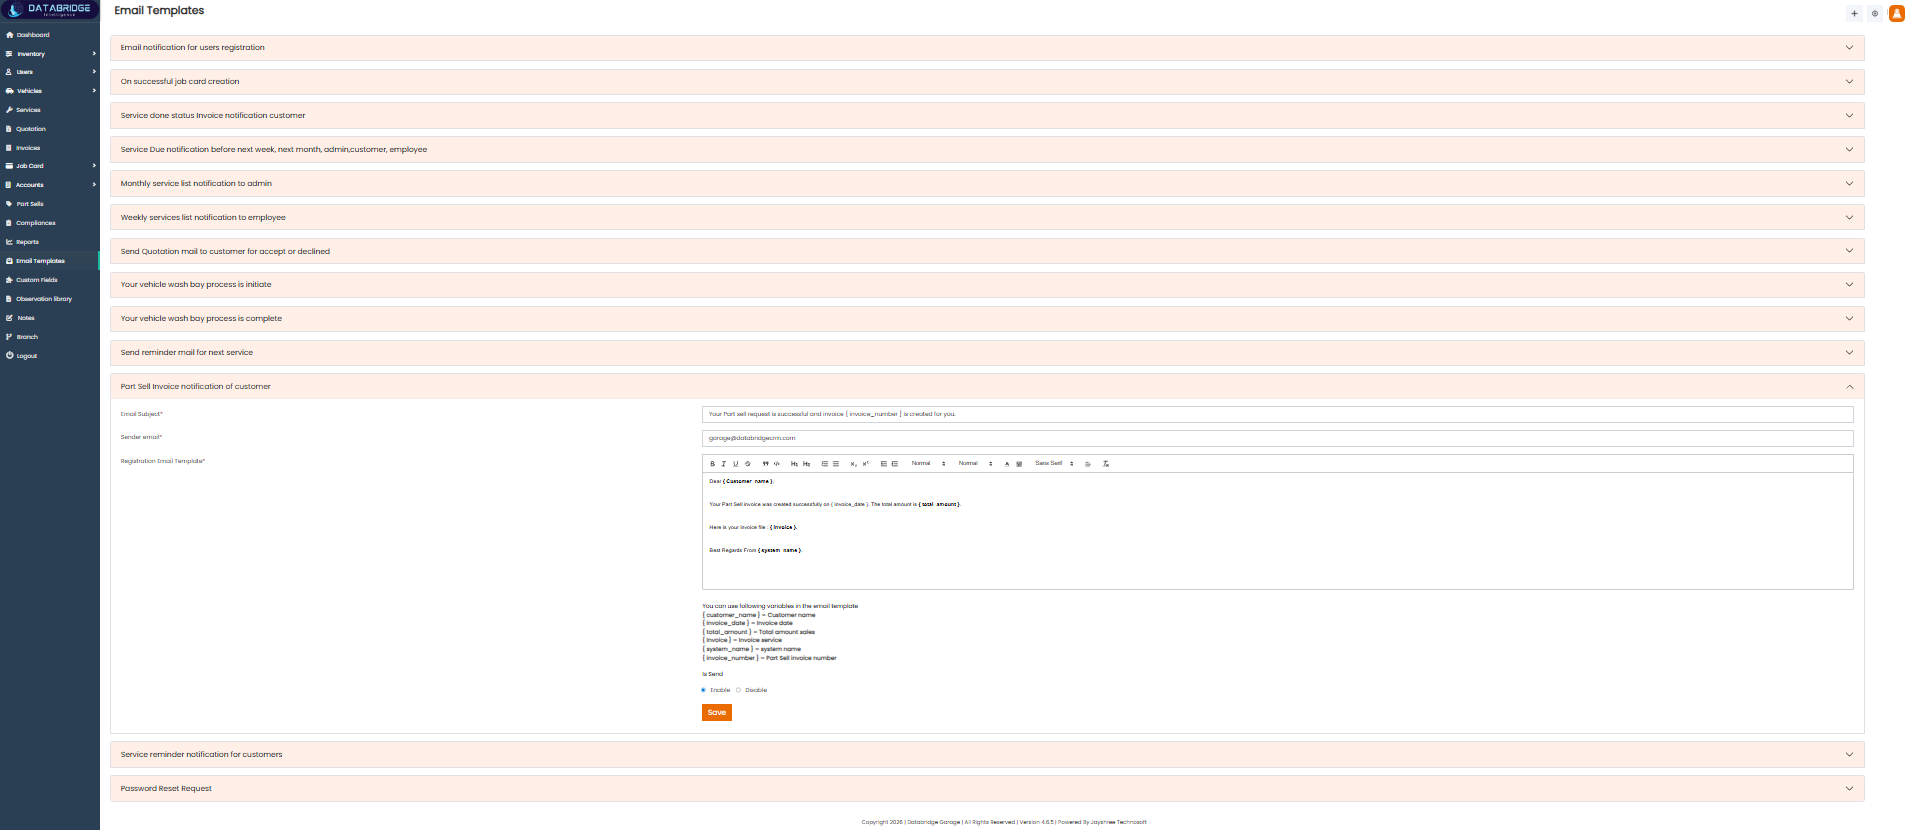
Part Sell Invoice Notification:
This template is used to send invoice notifications for part sales.
It ensures customers receive billing details for purchased items.
Features:
-Invoice template
-Dynamic fields
-Editable content
-Enable/Disable option
-Customer-specific use
-Save functionality
Functionality:
-Triggered after part sale
-Sends invoice to customer
-System fills billing data
-Template can be edited
-Enable/Disable controls sending
-Saves changes
1
Email Template
2
Part Sell Invoice Notification
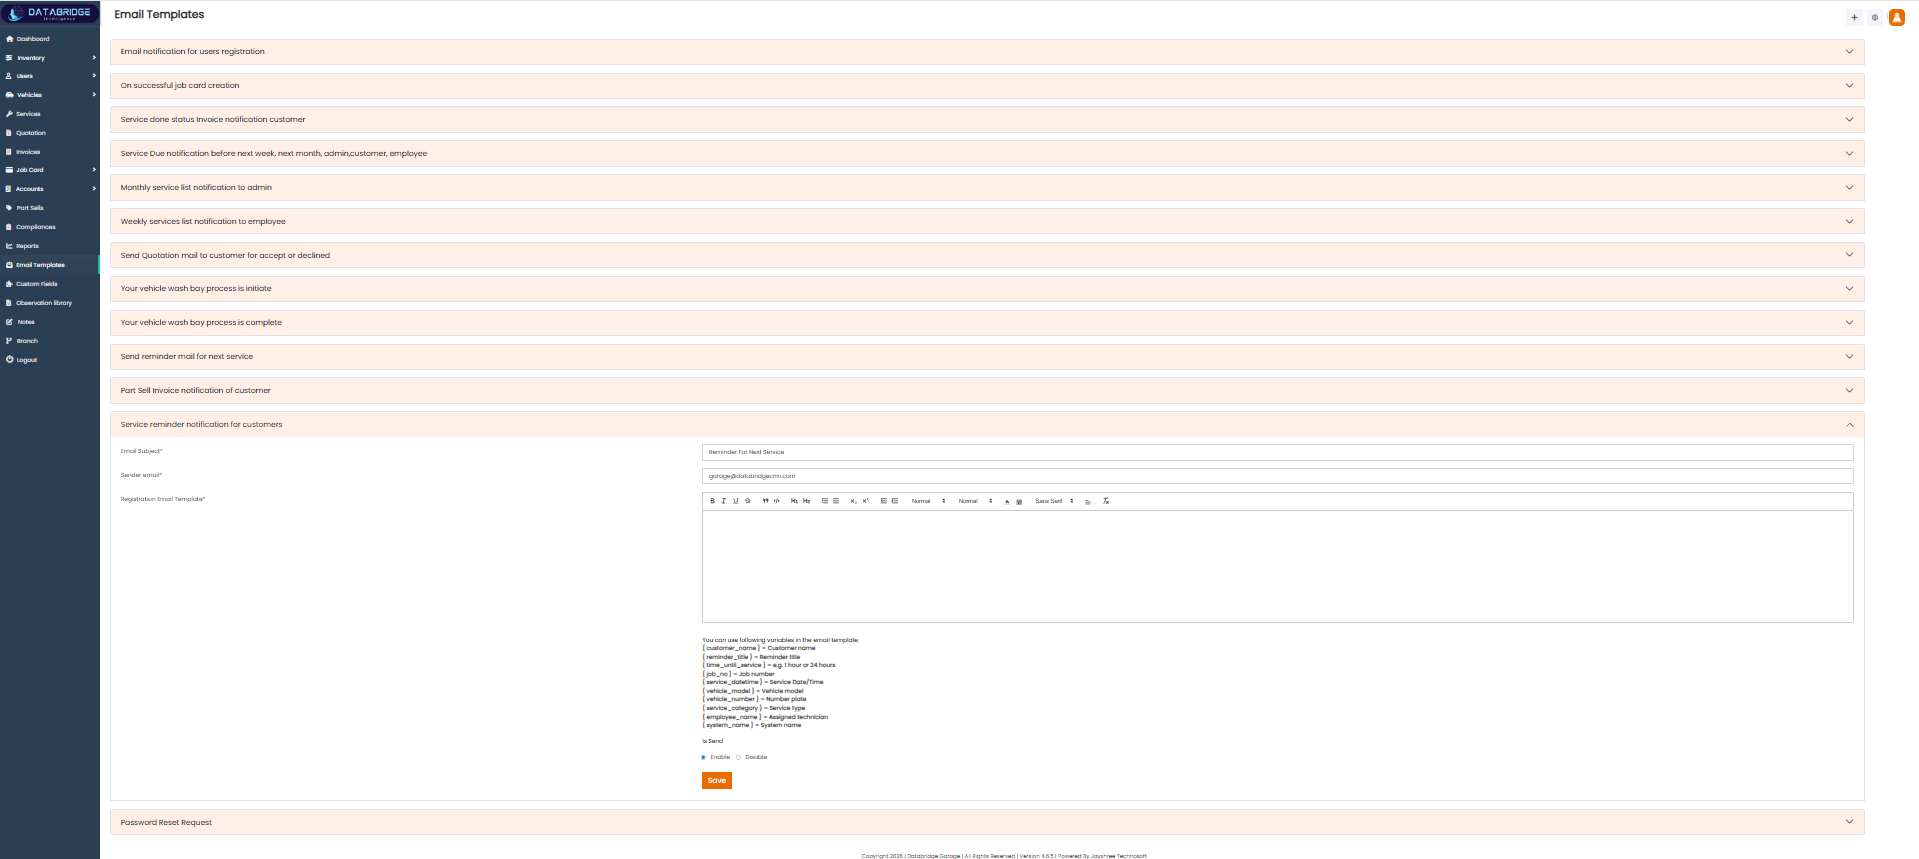
Service Reminder Notification:
This template is used to notify customers about upcoming or pending services.
It helps ensure timely service and better customer engagement.
Features:
-Reminder template
-Dynamic placeholders
-Editable message
-Enable/Disable toggle
-Customer notification
-Save option
Functionality
-Triggered before service due
-Sends notification to customer
-Auto-fills details
-Template is customizable
-Enable/Disable controls sending
-Saves updates
1
Email Template
2
Service Reminder Notification
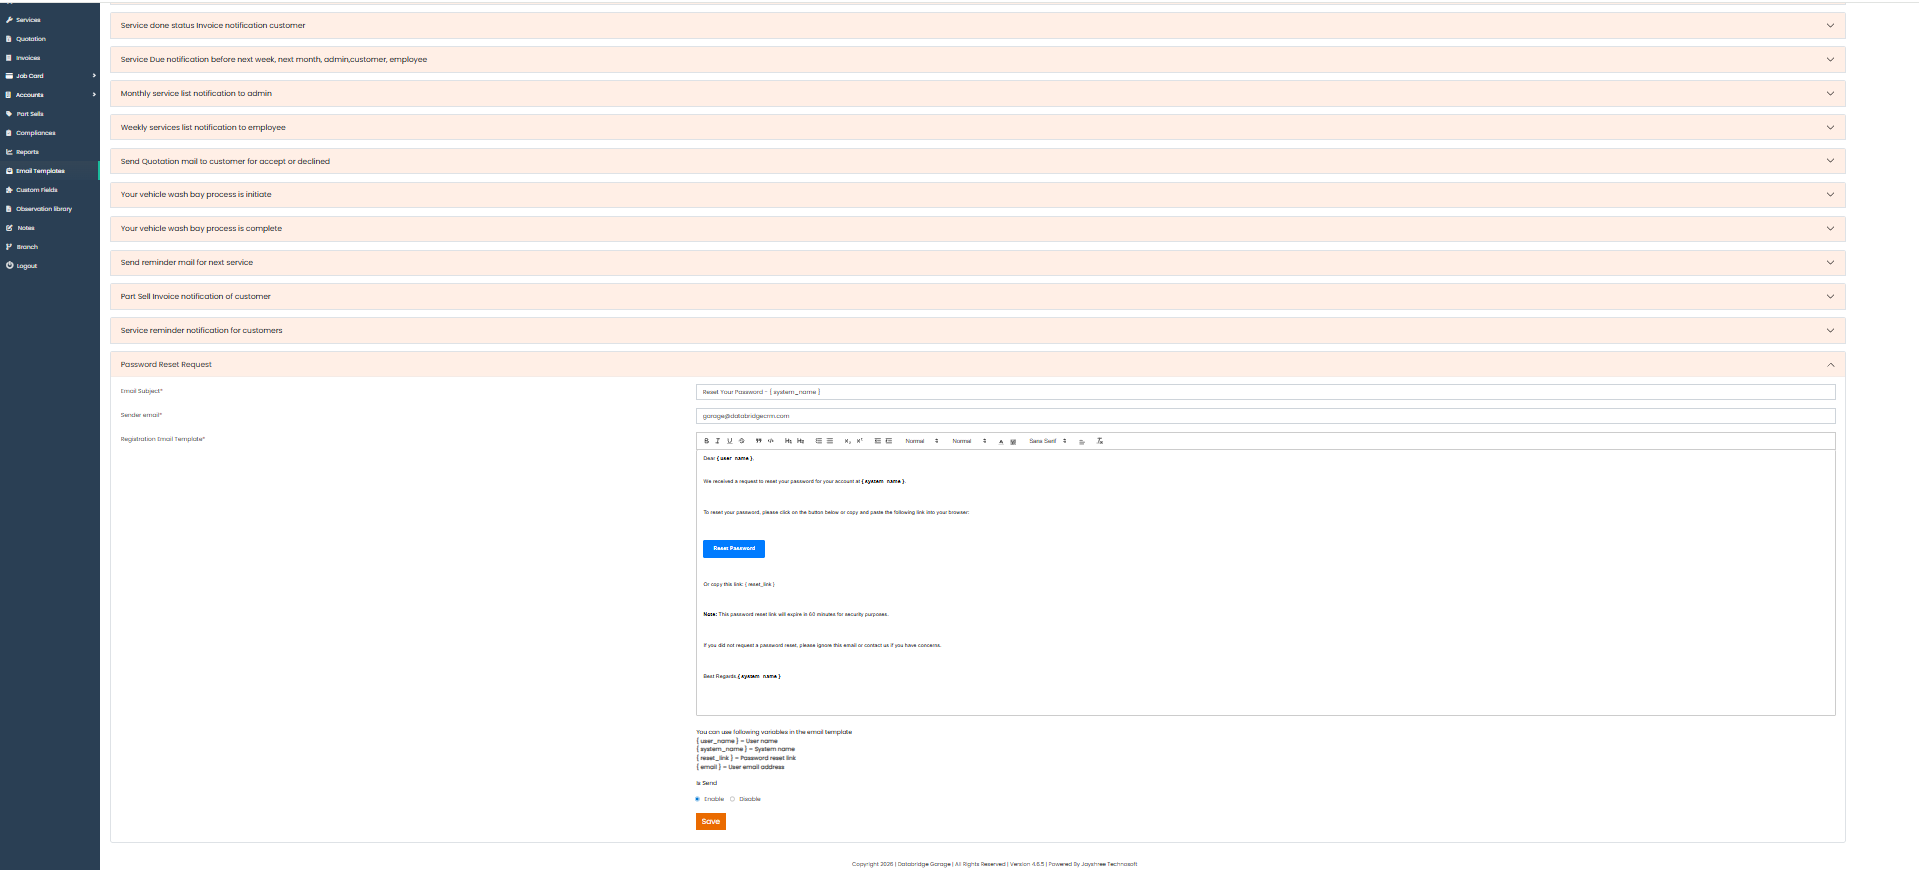
Password Reset Request:
This template is used when a user requests to reset their password.
It provides a secure link or instructions to update credentials.
Features:
-Password reset template
-Secure link support
-Dynamic variables
-Editable content
-Enable/Disable option
-Save functionality
Functionality:
-Triggered on password reset request
-Sends reset link to user
-System inserts secure token/link
-Template can be edited
-Enable/Disable controls sending
-Saves template
1
Email Template
2
Password Reset Request
Custom Fields
The Custom Fields module allows users to create and manage additional fields for different forms in the system.It provides flexibility to capture extra information based on specific business needs.Users can define field types, labels, and set required or visibility options.This module helps in customizing data collection without modifying the core system structure.
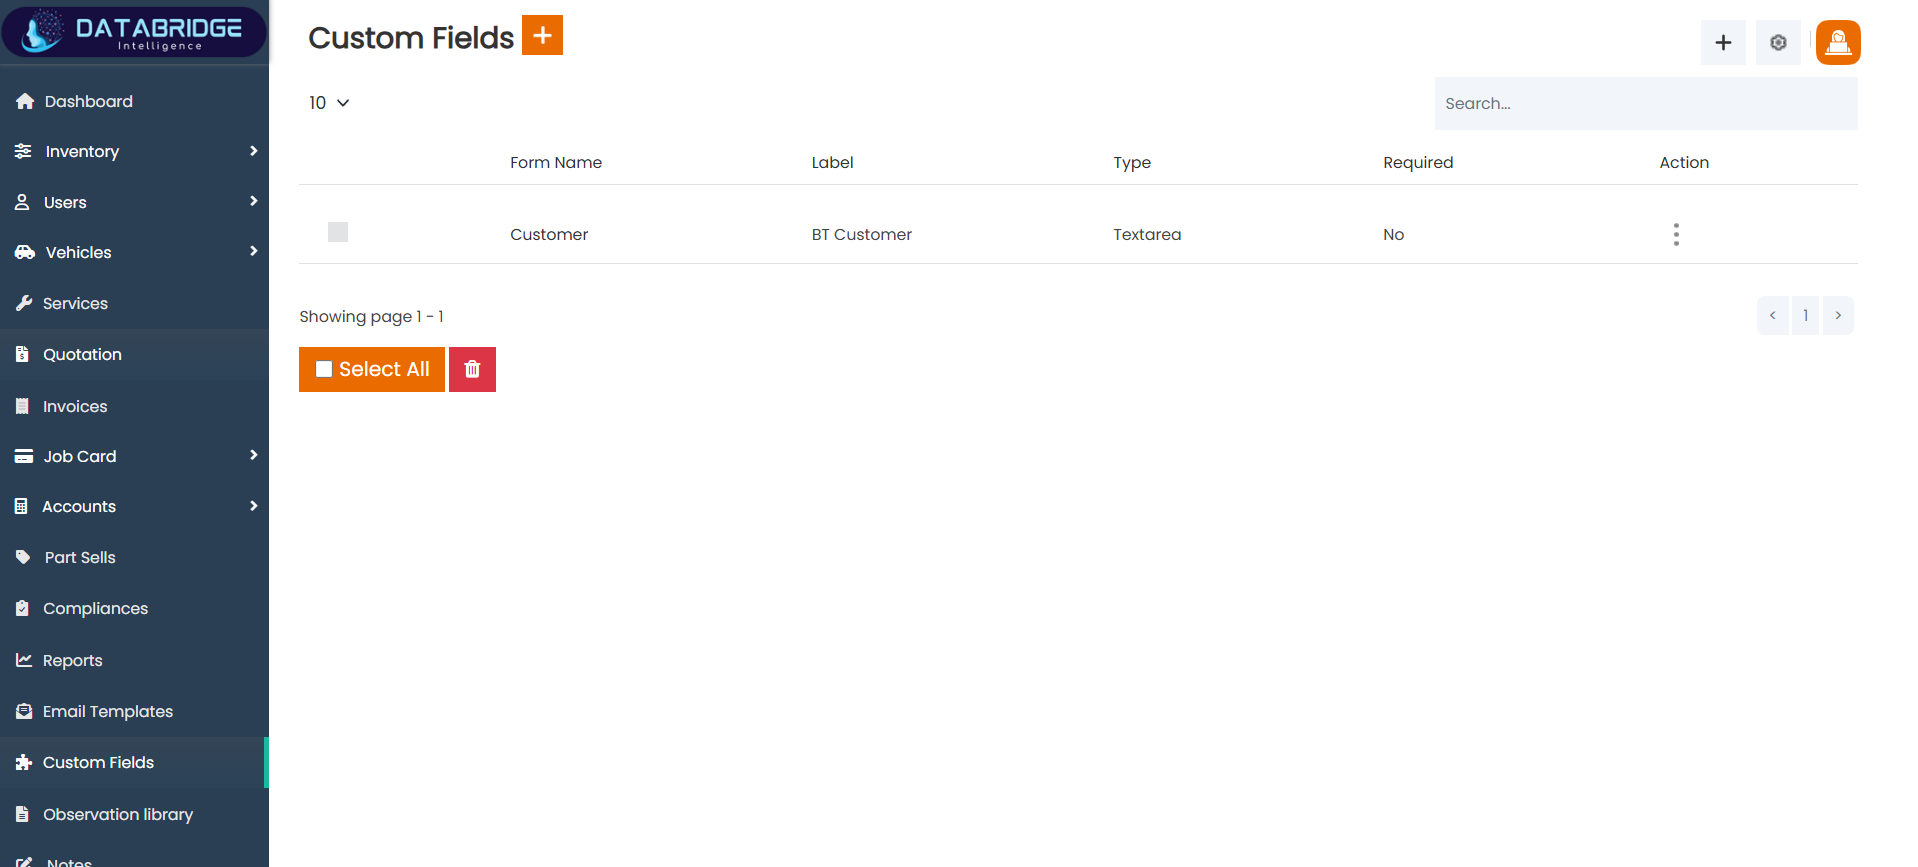
Custom Fields (Listing Screen):
This screen displays all custom fields created for different forms in the system.
It helps users manage and organize additional data fields as per business requirements.
Features:
-List of all custom fields
-Shows form name, label, and type
-Required field indicator
-Search functionality
-Select All & bulk delete option
-Action menu for edit/delete
Functionality:
-User can view all custom fields
-User can search specific fields
-User can select multiple records
-User can delete selected fields
-User can edit field using action menu
-User can click “+” to add new custom field
Custom Fields
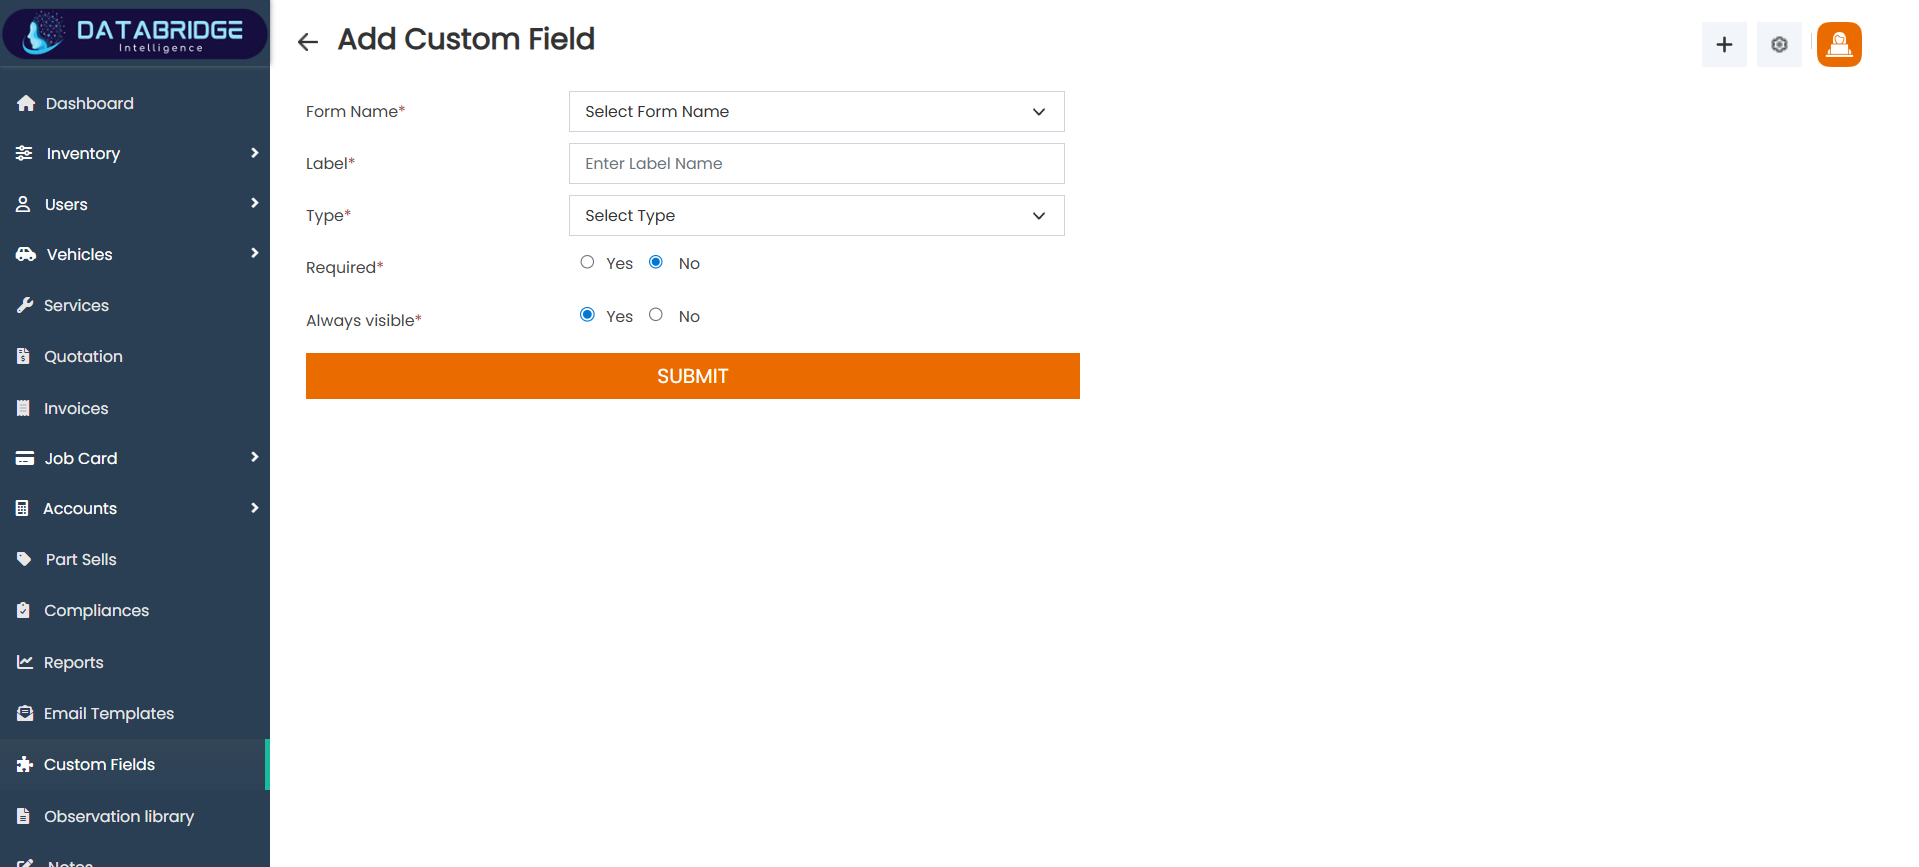
Add Custom Field Screen:
This screen allows users to create new custom fields for different forms.
It helps in capturing additional information dynamically based on requirements.
Features:
-Form selection dropdown
-Label input field
-Field type selection
-Required option (Yes/No)
-Always visible option
-Submit button
Functionality:
-User selects form where field will be added
-User enters label name
-User selects field type (text, textarea, etc.)
-User sets required/visibility options
-System validates required inputs
-On submit, field is saved and added to form
1
Custom Fields
2
Add Custom Field
Observation Library
The Observation Library module is used to manage predefined inspection checkpoints for vehicles.It organizes observations into categories such as interior, exterior, and general inspection points.This helps standardize the vehicle inspection process and ensures consistency during service operations.Users can easily add, update, or remove observation points based on business requirements.

Observation Library (Listing Screen):
This screen displays a structured list of inspection checkpoints categorized by vehicle parts and systems.
It helps users manage predefined observation points used during vehicle inspection and service processes.
Features:
-Categorized observation list (General, Interior, Exterior, etc.)
-Expand/Collapse categories
-Add (+) new observation option
-Delete option for categories/checkpoints
-Organized hierarchical view
-Easy navigation of inspection points
Functionality:
-User can view all observation categories
-User can expand categories to see checkpoints
-User can delete observation categories or items
-User can click “+” to add new observation
-System organizes data in grouped format
-Data is used in inspection/job card processes
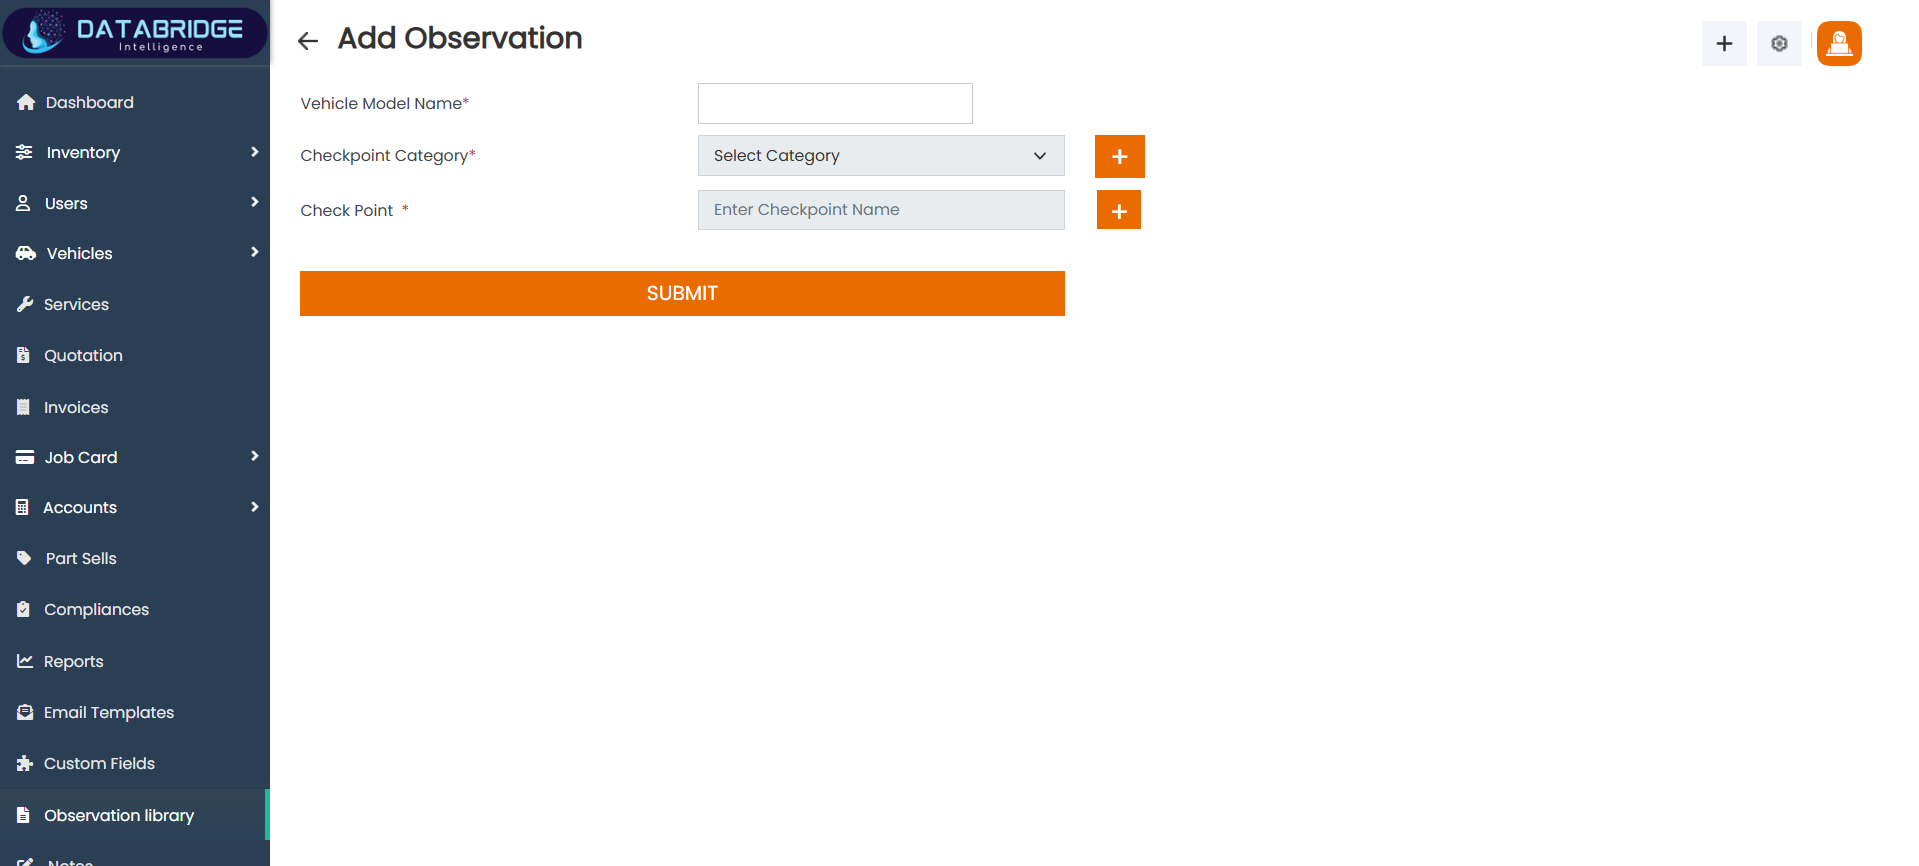
Add Observation Screen:
This screen allows users to create new observation checkpoints for vehicle inspections.
It helps in defining custom inspection points based on vehicle models and service requirements.
Features:
-Vehicle model input field
-Checkpoint category dropdown
-Add new category (+) option
-Checkpoint name input field
-Add new checkpoint (+) option
-Submit button
Functionality:
-User enters vehicle model name
-User selects or adds checkpoint category
-User enters checkpoint name
-User can dynamically add new categories/checkpoints
-System validates required fields
-On submit, observation is saved in library
1
Observation Library
2
Add Observation
Notes
The Notes module allows users to add and manage important remarks related to different records in the system.It helps in keeping track of additional information along with attachments for better reference and communication.
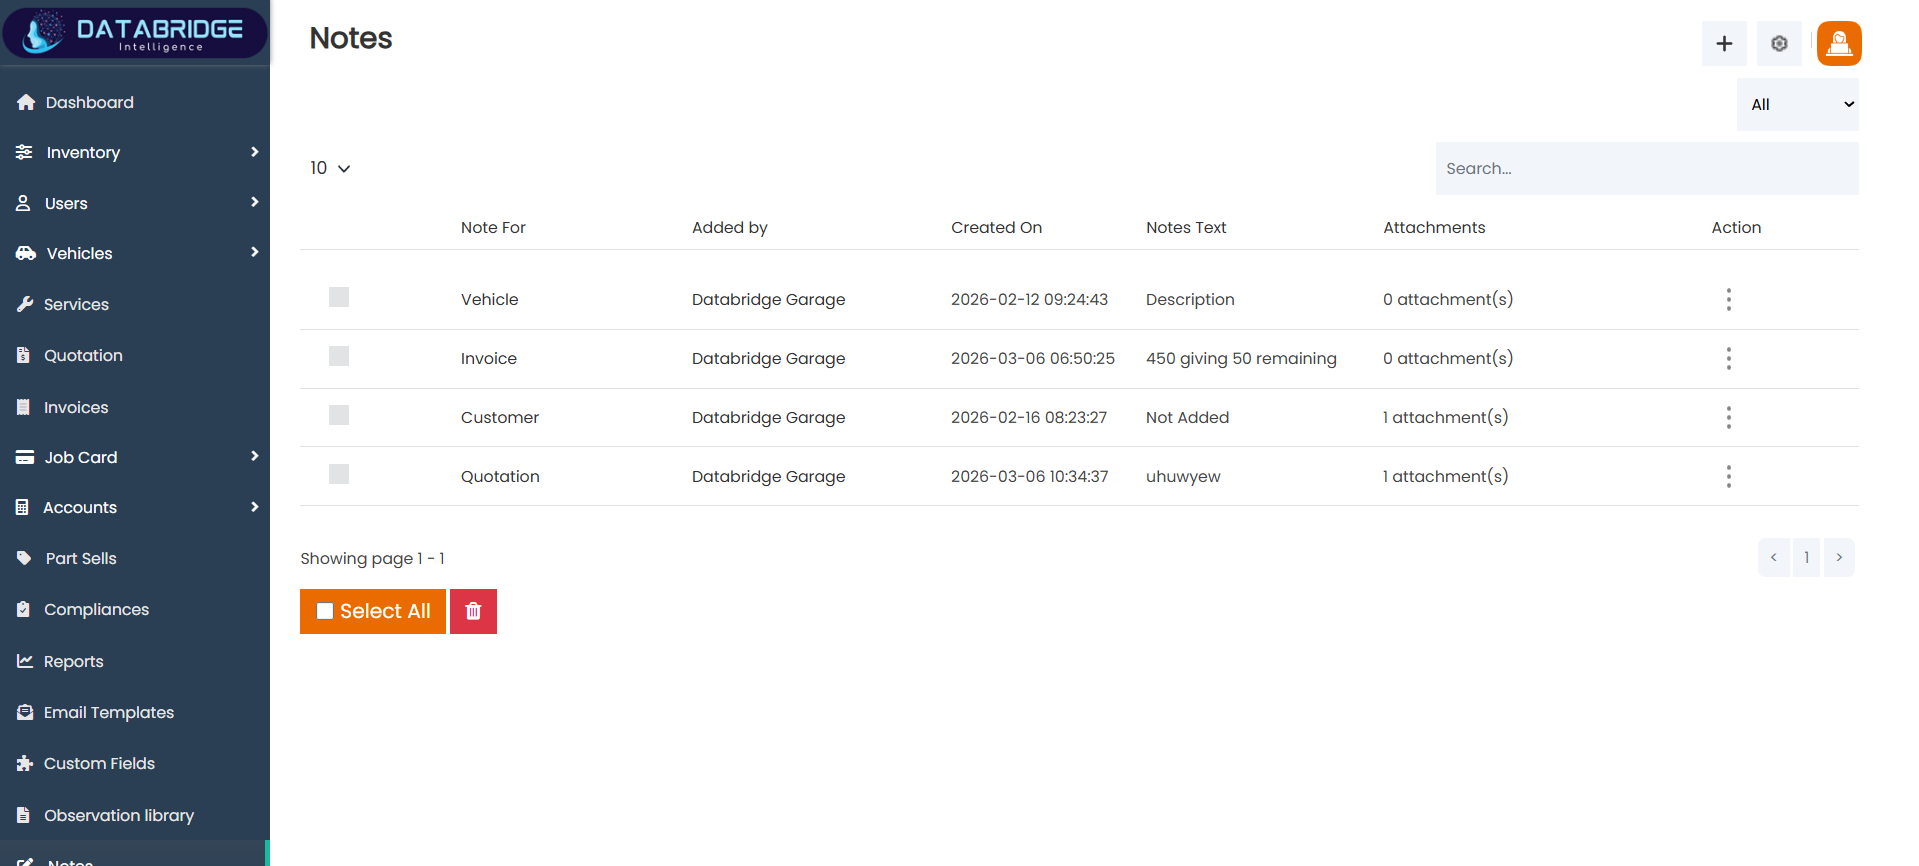
Notes (Listing Screen):
This screen displays all notes created for different modules such as vehicle, invoice, customer, and quotation.
It helps users manage and track important remarks along with attachments for better record keeping.
Features:
-List of notes with module reference (Vehicle, Invoice, etc.)
-Displays added by, date, and note text
-Attachment indicator for each note
-Search functionality
-Select All & bulk delete option
-Action menu for edit/delete
Functionality:
-User can view all notes in tabular format
-User can search notes using keywords
-User can select multiple notes
-User can delete selected notes
-User can manage notes via action menu
-User can click “+” to add new note
Notes
Branch
The Branch module allows users to manage multiple business locations within the system.It stores essential details such as branch name, contact information, and address.This helps in organizing operations and tracking activities across different branches.Users can easily add, update, or manage branch records for better administration.
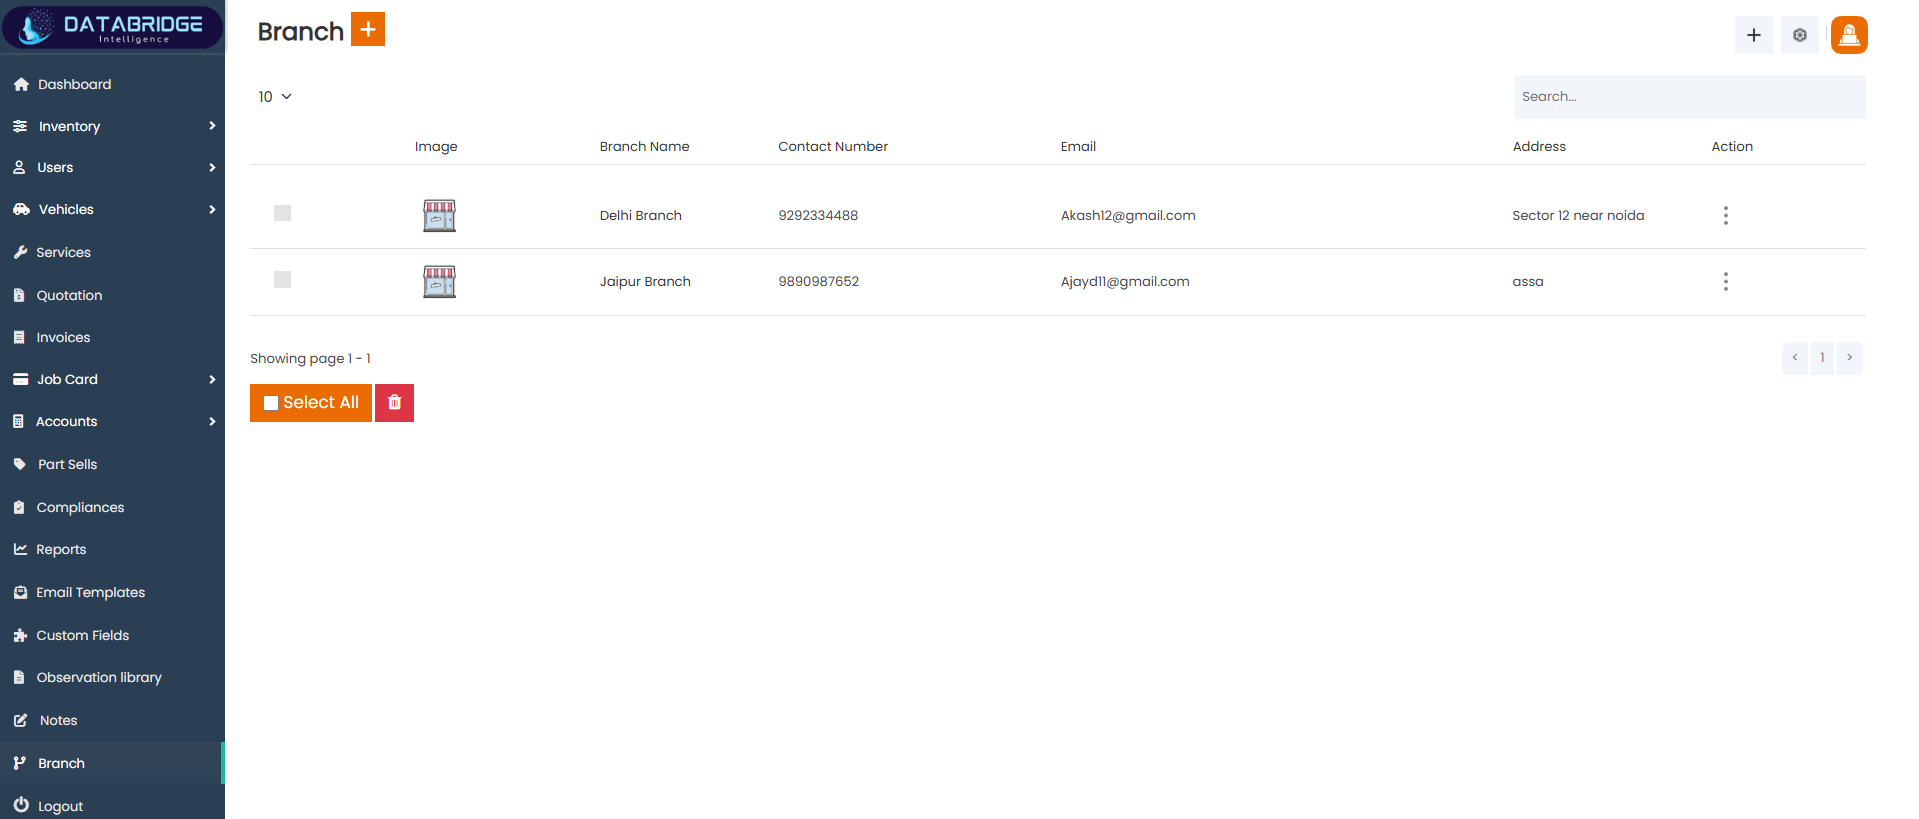
Branch (Listing Screen):
This screen displays all branches along with their contact and location details.
It helps users manage multiple business branches in a centralized way.
Features:
-List of all branches
-Displays name, contact, email, and address
-Branch image preview
-Search functionality
-Select All & bulk delete option
-Action menu for edit/delete
Functionality:
-User can view all branch records
-User can search branches
-User can select multiple branches
-User can delete selected records
-User can manage branch via action menu
-User can click “+” to add new branch
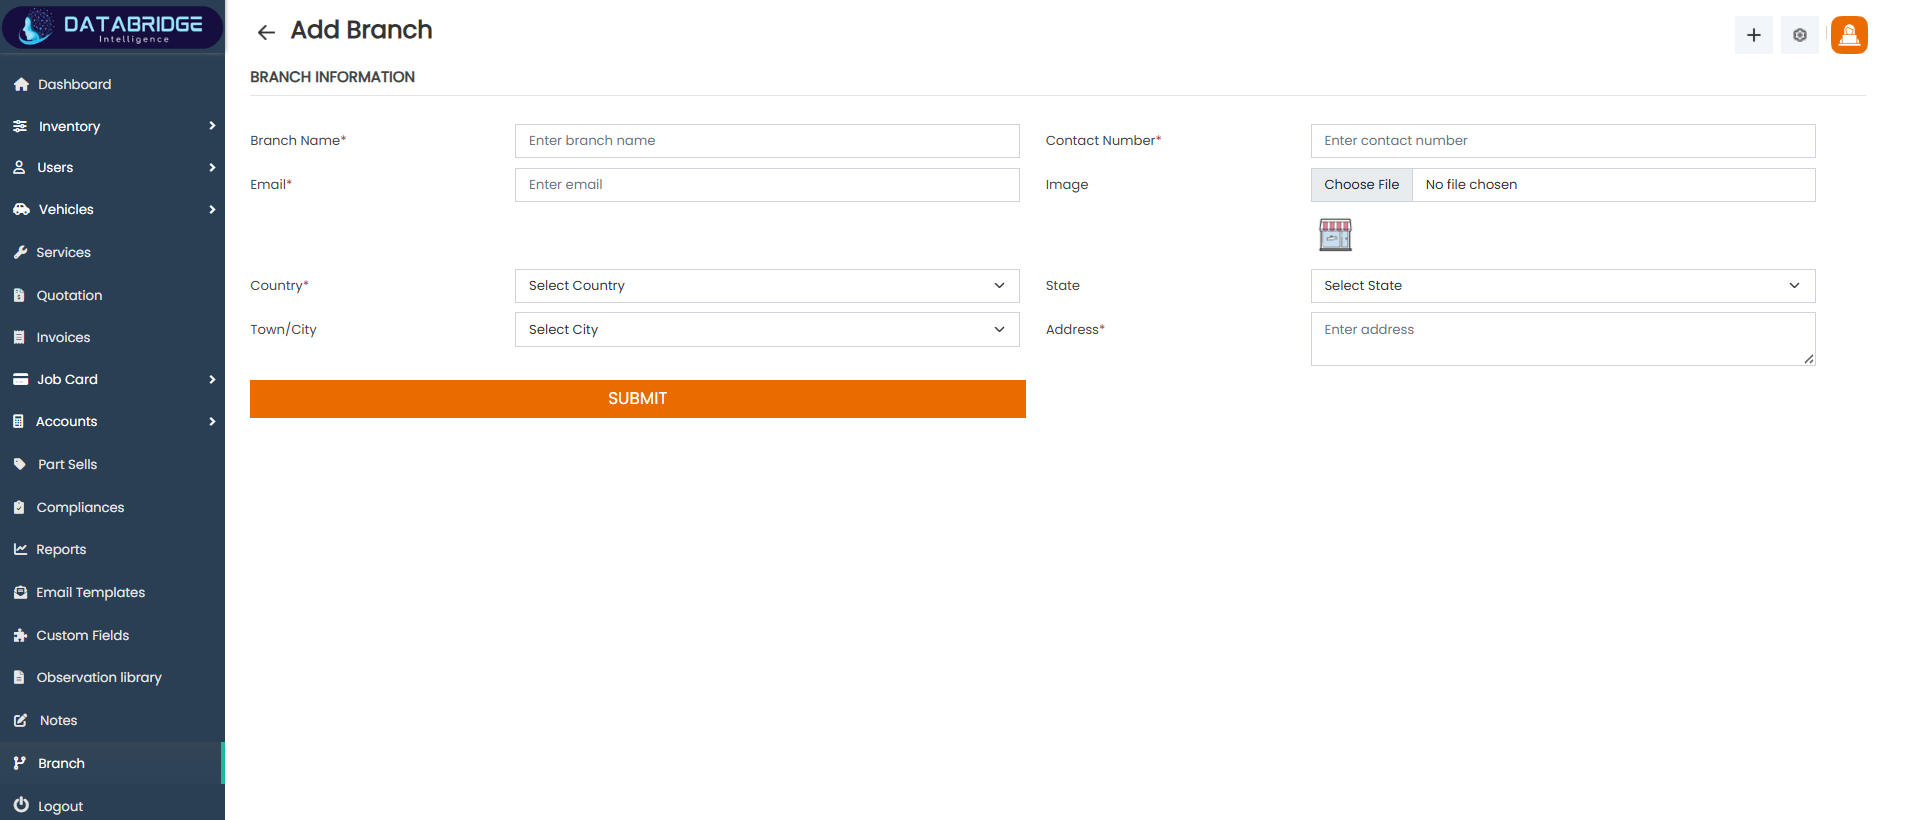
Add Branch Screen:
This screen allows users to add new branch details into the system.
It helps in maintaining branch-wise information for better management.
Features:
-Branch name input field
-Contact number field
-Email input field
-Image upload option
-Country, State, City selection
-Address input field
Functionality
-User enters branch details
-User uploads branch image
-User selects location details
-System validates required fields
-User submits form
-Branch is saved and added to listing
1
Branch
2
Add Branch
Logout
The Logout module allows users to securely exit the system from their current session.It ensures that user access is terminated to protect data and prevent unauthorized usage.confirmation step is included to avoid accidental logout actions.Once confirmed, the user is redirected to the login screen.
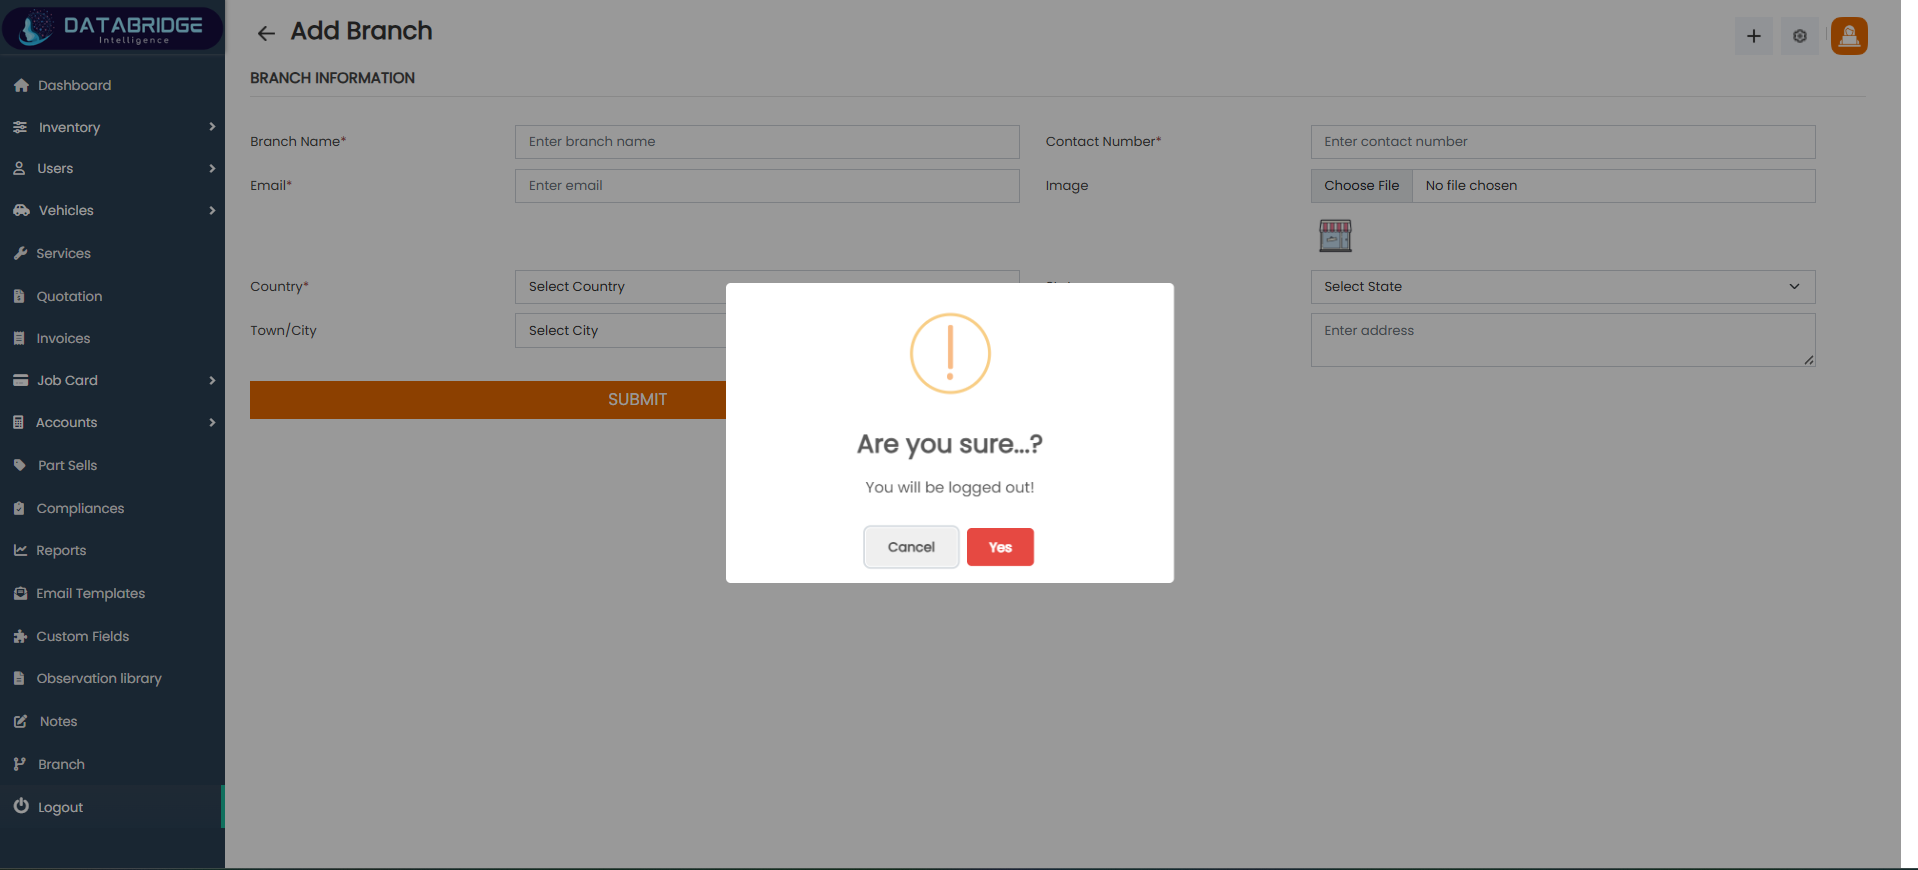
Logout Confirmation Popup:
This screen appears when the user attempts to log out of the system.
It asks for confirmation to prevent accidental logout actions.
The popup ensures user intent before ending the session.
Users can either proceed with logout or cancel the action.
Features:
-Confirmation popup message
-Warning icon for attention
-“Yes” button to confirm logout
-“Cancel” button to stop action
-Overlay background to block interaction
-Simple and user-friendly UI
Functionality
-Triggered when user clicks logout
-Displays confirmation message
-User can cancel and stay logged in
-User can confirm to proceed logout
-On confirmation, session is terminated
-User is redirected to login screen
Logout